[June 17, 2019]
This will be a slower posting build, but I want to get it going! After five years of, as I call them, "False starts", I finally have my own home, land, and a place to build! No more dealing with city bylaws, flip-flopping landlords, moves, etc.
This past weekend, I sold my RV, which was sitting right where I want my coop and run to go.
The neighbours have a massive coop they want gone, and have offered it to me. It's far too large for my needs (can house like 100 chickens), so I am cutting it all down and repurposing the wood.
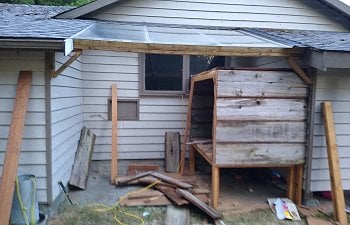
I just so happen to have an alcove on the west facing side of my garage that was originally used for storing firewood when the house and garage both were heated by wood.
I live on Vancouver Island in BC, Canada, and I am built on top of bedrock, meaning everything is electric now. This alcove is 10' 7" long, by 6' 7" deep.
My plan is to build a coop to the right side, it'll be as deep as the alcove, and I'm thinking four feet wide. It'll be raised, so there will be space under the coop as well as to the side. It's covered by a glass roof, so there will be light, and due to the forest next door, not a lot of direct sunlight. The great thing will be during the rain, they don't need to hide under the coop. No rain will ever make it into the main run!
Then, after that area is built, as you can see in the pictures, there's an area of dead grass, with long dug out lines of dirt. That's where the RV sat, and will be an additional covered run for the chickens.
I have three Bantam hens and a rooster hanging out at my parents, waiting for me to get this coop built!
I start tearing down the neighbours coop this weekend, and then begin building mine!
Stay tuned!


[June 19, 2019]
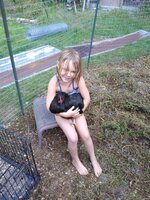
Just a couple pics of my hens and rooster to add! My parents hatched out some more chicks, so my Bantam's are out in gen pop now with the standard sized chickens.
(Turns out thanks to help from the fine folks here, I don't have Bantam's, nor Hens... lol
[June 24, 2019]
I spent the weekend tearing down my neighbours old coop. This thing was a monster! It was 12x17, and up off the ground, overlooking the huge hill down towards my house.
Taking it apart was actually really easy, the windows were held into the frame with a few bent nails, the cedar panels popped off with a hammer, and only a small few actually broke. Then the tin roof came off easy. I had to sweep it as it had a few inches thick of plant matter and moss, but it was easy to get off with a push brush.
The walls were built with only one of the four corners having a proper butt against each other, so it was a little scary being up on the roof the building swayed. Slow and careful, and I was done! My phone died at this point (listening to music, so no pics of the coop without a roof, or down)
Grabbed hold of one wall, pushed and pulled until the walls came down. Pulled them apart, and threw them on the trailer.
Now everything is down at my house, and we'll be getting ready to build the entire thing this week!
[June 25, 2019]
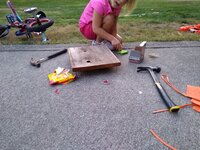
Yesterday, I got to work on building the frame. It was a bit slower going as my daughter wanted to help pound out nails. Being six, she doesn't have the strength, nor coordination to really help, but I won't let that stop her!
I built the two ends of the coop, and cut the wood for the side wall and floor. That's the next job for today. It's looking great (to me ), and it's pretty big! I made it four feet wide, by six feet long on the outside. I'm also building it a lot more sturdy than it probably needs to be, but I like things to be secure.
I still need to put new wood down where the bottom of the garage wall is, and cover the circular hole.
Because the coop will be under a roof, I'm not angling the roof when I put it up, unless there's a reason that I should?
[July 2, 2019]
Over the Canada Day Long Weekend, the kids went to visit their mom, so I was able to get a lot of work done on building the coop! I'm now at a point of being stuck on completion until I actually buy a couple things. So far, this entire build has been done with reclaimed everything, including nails!
As I started to get going on putting the walls in, I noticed that, being reclaimed wood, no matter how well I measured, not everything was straight. Some wood is crooked, others a bit warped. So, I started to build in place.
Basically, I laid the old exterior wood down, nailed it in, and then cut the boards. Worked pretty good! Needed to grab my father's saws-all to do some spots, but that was a bonus.
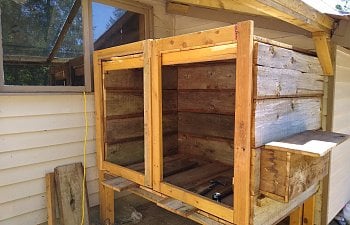
It wasn't as difficult as I was thinking it would be, given that these planks are so heavy. They're a foot wide, an inch thick, and very long. Still, the build came together nicely! You'll notice right off the bat in these pictures, that I do not have nesting boxes, nor any obvious ventilation.
Stay tuned.")
Next came cutting out the nesting boxes. I built two, in between my 16" center beams. With the sides, the boxes nicely came to 12x12x12, and are also made out of the same exterior wood.
The hinges for the nesting box lid are from the old in floor door that the old coop had to allow the chickens outside, via the floor to underneath. The framing on the inside is the wood from the framing on the outside of the old coop that covered the gaps between the panels.
I'm really loving the rustic look of this coop!
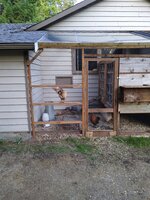
Next, I started on framing the doors.
The old coop had three old windows, and by old, I mean thin single panes held in by small metal clips, and then sealed with that old putty, which breaks away with my fingers...
After building the frame of the two doors, I discovered that the windows fit inside perfectly!
I cleaned out the gunk, removed old paint, then put the windows back in, and caulked them in place. Afterwards, while looking at the doors, I decided that I'll remove the bottom left pane on the left door in order to get some extra space for the door, and I'm going to remove a top pane and add mesh over it for additional ventilation.
Next, I need to buy hinges for these doors. They'll be the first purchase I've made so far in this build!
[July 12, 2019]
So, it has been a week since I finished the coop, and got the chickens into their new home! I've been super busy this week, and didn't really have a lot of time to update.
Last Sunday, was my son's fourth birthday, and the first full day that the chickens were home. My son woke up at 6am, and really wanted to go see them. He was so happy that he nearly cried!
Anyways, I had purchased the new hinges, and hooked them up. Prior to that, I was looking at the doors, and decided that I would remove a pane from one, flip the filler boards around, install one door as a unmovable wall instead, and that is where my chicken door would go.
It wasn't much work to do, and I used the third window I had as a test to see how it would do. It worked as expected!
The next thing I needed to work on was ventilation. I knew I wanted to put it in the doors above the windows, but I wasn't sure just how I was going to do it at the time. I eventually opted to cut out holes for them. I borrowed an adjustable hole cutter from my father, and set to work!
I wanted three holes on each, but as I was making the middle on the one door, I realized that it would cut the supports holding the chicken door in place, so one side got two, the other three. I then covered them in left over chicken wire.
That was the last thing I needed to do in order to get this coop to "livable"!!! That evening (Saturday, July 6), we collected the chickens up after they went in to roost, and brought them down from my parents coop. They did not want to come out of the dog carrier we had them in! It took a bunch of coaxing, but they finally came out.
I had to block off the nesting boxes with cardboard, as three of them would cram themselves into one, while one would actually use the roosting bars. Now they all roost properly!
Now that the kids have gone to their mom's for the first half of summer, I have additional time to work on the outside run for the chickens. After work, I started to clean up all the left over wood, and put the long pieces on one side of my well house, and the shorter ones on the other side. Then I figured out how large I was going to make the run, and drove some of my poles into the ground. I still need a post driver to get them firmly in the ground, but I'll find one. Home Depot shows them on their website, but there's no SKU, and neither of the two stores I went to carry them.
I'm going to be buying hardware cloth next week to fence it all in, and bury some of the cloth under ground to prevent burrowers from getting in as well. The back side of the run is 12 feet long, the first side is an additional 16 feet, the angled part is 9 feet, and the last part, where the door will be is 6.5 feet. So I need nearly 44 feet of hardware cloth, and of course, more as it's not as tall as the fence is. I'm also going to add a bird netting to keep our resident hawks and bald eagles from swooping in for a snack.
More to come!
[March 5, 2020]
So there has been a lot going on over this past while since I last posted! Summer and fall were busy with kids, gardening, and collecting eggs. The kids started to collect the eggs daily and for that, any that we sold to our neighbours, they got to keep the money! They were very excited to start earning money for taking care of the chickens.
The last post was about starting to get the outside run fenced in. Well, that has been done, and I built a gate as well to get in and out.
Here, we have my four roosters hanging out. Little do they know, but I was heading out to get them some girls!

Here's the ladies! I picked up six hens for $8 each. Lady had a crazy amount, and was trying to offload as many as possible.
So, I knew that I would need to reduce my rooster count, but I wasn't sure which to deal with. What I decided on, was to let the girls in with the boys, and see who was nasty to them. The nasty ones were going in the freezer.

Meanwhile, I was starting on building the outdoor chicken run. I hammered the posts in where I wanted them, taking care to avoid my sprinkler system. This gave the chickens a much larger area to work in, and thus began the first thing I have needed to buy so far for this project. The fencing.
While working on that, I found two of my boys that were terrible to the hens. I was kinda happy that my white one was one of them, because I didn't really like him anyways...
One of the other boys seemed rather concerned that they were in the crate. He got to stay because he was really docile, and when he did try to mount one of the girls, she let him have it. The alpha roo, he's another pretty one. You may notice that one of the roosters in the crate is the one my son was holding above. Thankfully, I grabbed a hen that looked just like him, so when he goes away, my son won't notice.
My first egg!!!!!!
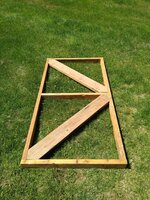
Here we have the bottom half of the fence wrapped, and the frame for the gate.
After that, I needed a door. I'm STILL using the reclaimed wood!
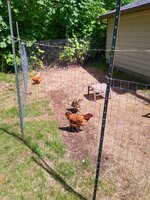
Finally, while I'm getting the upper part of the fence added, the chickens can explore their new area!
Chickaletta approves
All done!
Next steps, (which will happen this year, 2020) is to build raised boxes around the fence, with wire underneath. Then plant grapes.

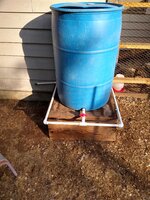
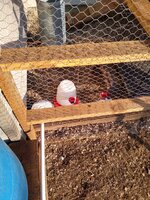
I needed a water system. I don't really want to keep filling these little waterers daily, especially when I have so much else I need to do every morning, from getting the kids up, dressed, fed, lunches, and off to school. I needed something. I turned to the Marketplace, and found a guy selling 55 gallon plastic drums. They were in the city my ex-wife lives in, so I got her to pick it up for me! Great find, and only cost me $40! I cut half the top off, and added some hardware cloth, which is screwed to the wide end, but can be lifted to get into the water if needed.
The box that the barrel is resting on, is the old box used to contain the chicks in the old coop. Very solid.
Next, I bought some of the drinking cups off of Amazon. I had read some great reviews about them, so I figured I'd give them a try. (As a side note, they're not that great. I replaced them.) I ran pvc to both inside the inner coop run, and to the outside. I also bought some additional piping for the eaves, and redirected it to the barrel.
Now, it's only July 2019, but I'm collecting food from the garden and eggs!
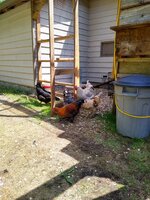
With the midsummer heat, my chickens needed somewhere to be outside and still be shaded. So I built this shade real quick. They use it during the heat of the day.
It's not pretty, but it does what I need it to do!!!
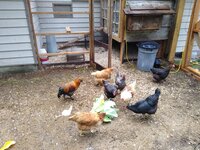
Everyone, just out enjoying the day! As you can see, they're still using the water bucket. They will drink water from those cups, but they have no idea how to get more. The cups have little yellow sticks that *as advertised*, they peck at and it'll release more water. Unfortunately, they do not work. I had to pull that lever UP in order to get the water to release in a decent manner. Pushing down, released almost nothing. Oh well...
I picked up a water play station from my daughters after school care. The kids didn't play with it, so I converted it into a thing for the chickens. The one time I saw a chicken floating in the water, she moved before I had a chance to grab a picture. The seem to like it. Plus, it's extra water.
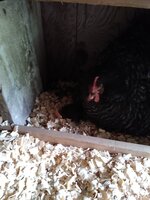
So, we then had something fun happen, one of my hens went broody! Unfortunately, she kept getting confused, and moving from one nesting box to the other after the other hens laid an egg. This means I need a separate area for her.
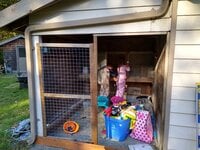
Enter, the alcove! This area is directly on the other side of the wall from the main coop, and was really only used to put the kids bikes, and random storage of stuff that really didn't need to be out there. No plan per se', just an idea. I grabbed more reclaimed wood, and started building. Much like the first coop. I can see it in my mind, so I build to suit.
I collected our hen, and her eggs that I decided for her to hatch, popped them all over in this new coop, made just for them!
A few weeks later, we had chicks! I wasn't sure until I head cheeping. I thought maybe only one hatched, but I was surprised to find all four had, and not a single one, was an egg my momma laid... lol
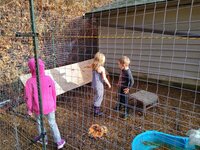
After a couple weeks, it was time to get the kids involved in handling these new chickens. Get our new flock accustomed to humans. The kids did it every single day, and loved it!
Now, as the chicks grew, I needed more than just the little coop I made. Time to block this whole alcove in!
The hen was getting picked on, so we used the area for her for a little bit. Turns out she was not well, and passed on to the free range in the sky a few weeks later.
Exploring!
Sadly, one day, I went out to open up the coops right before we left for the day. I opens both coops, ran inside, got the kids into the truck, went up to lock my door, and I hear something. I walked over and shone my flashlight into the grow out coop. Three raccoons found a way in, and killed the hen and all four chicks. I reached for the shovel just nearby, and found where they got in, because one was staring at me.
I hit him hard with the blade of the shovel to knock him back into the coop, and then ran around, and locked myself in this coop with all three, and started swinging. I killed one, and the other two got away with injuries. They've never been back.
I added electric fencing around the fence and also boarded up the spot that they got in.
Now, just to wait for another hen to go broody!
That's a lot for now, and I'll add more later!
Thanks for reading!
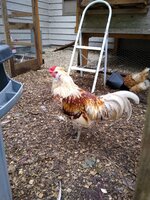
I almost forgot to add! This is my Alpha Roo, Bill. (Because, sometimes, I want to kill him)
He still occasionally thinks it's a good idea to challenge me, and in the beginning, he'd just end up flying upside down across the run, but now, I humiliate him in front of the girls. He challenges, I corner him, and then he gets to hang out under my arm for a while, as I do things around the yard. He's really a great rooster. I've picked a couple dead rats out of the coop that he's killed, and he's very protective of his girls. He just needs to be reminded that I'm the boss, and he's only the boss when I'm not around.
"I have made mistakes, and I have regrets." ~Bill
Also, any idea what breed he is? There seems to be a lot of debate.
This will be a slower posting build, but I want to get it going! After five years of, as I call them, "False starts", I finally have my own home, land, and a place to build! No more dealing with city bylaws, flip-flopping landlords, moves, etc.
This past weekend, I sold my RV, which was sitting right where I want my coop and run to go.
The neighbours have a massive coop they want gone, and have offered it to me. It's far too large for my needs (can house like 100 chickens), so I am cutting it all down and repurposing the wood.
I just so happen to have an alcove on the west facing side of my garage that was originally used for storing firewood when the house and garage both were heated by wood.
I live on Vancouver Island in BC, Canada, and I am built on top of bedrock, meaning everything is electric now. This alcove is 10' 7" long, by 6' 7" deep.
My plan is to build a coop to the right side, it'll be as deep as the alcove, and I'm thinking four feet wide. It'll be raised, so there will be space under the coop as well as to the side. It's covered by a glass roof, so there will be light, and due to the forest next door, not a lot of direct sunlight. The great thing will be during the rain, they don't need to hide under the coop. No rain will ever make it into the main run!
Then, after that area is built, as you can see in the pictures, there's an area of dead grass, with long dug out lines of dirt. That's where the RV sat, and will be an additional covered run for the chickens.
I have three Bantam hens and a rooster hanging out at my parents, waiting for me to get this coop built!
I start tearing down the neighbours coop this weekend, and then begin building mine!
Stay tuned!


[June 19, 2019]
Just a couple pics of my hens and rooster to add! My parents hatched out some more chicks, so my Bantam's are out in gen pop now with the standard sized chickens.


(Turns out thanks to help from the fine folks here, I don't have Bantam's, nor Hens... lol
[June 24, 2019]
I spent the weekend tearing down my neighbours old coop. This thing was a monster! It was 12x17, and up off the ground, overlooking the huge hill down towards my house.


Taking it apart was actually really easy, the windows were held into the frame with a few bent nails, the cedar panels popped off with a hammer, and only a small few actually broke. Then the tin roof came off easy. I had to sweep it as it had a few inches thick of plant matter and moss, but it was easy to get off with a push brush.


The walls were built with only one of the four corners having a proper butt against each other, so it was a little scary being up on the roof the building swayed. Slow and careful, and I was done! My phone died at this point (listening to music, so no pics of the coop without a roof, or down)
Grabbed hold of one wall, pushed and pulled until the walls came down. Pulled them apart, and threw them on the trailer.


Now everything is down at my house, and we'll be getting ready to build the entire thing this week!
[June 25, 2019]
Yesterday, I got to work on building the frame. It was a bit slower going as my daughter wanted to help pound out nails. Being six, she doesn't have the strength, nor coordination to really help, but I won't let that stop her!

I built the two ends of the coop, and cut the wood for the side wall and floor. That's the next job for today. It's looking great (to me
), and it's pretty big! I made it four feet wide, by six feet long on the outside. I'm also building it a lot more sturdy than it probably needs to be, but I like things to be secure.I still need to put new wood down where the bottom of the garage wall is, and cover the circular hole.
Because the coop will be under a roof, I'm not angling the roof when I put it up, unless there's a reason that I should?
[July 2, 2019]
Over the Canada Day Long Weekend, the kids went to visit their mom, so I was able to get a lot of work done on building the coop! I'm now at a point of being stuck on completion until I actually buy a couple things. So far, this entire build has been done with reclaimed everything, including nails!

As I started to get going on putting the walls in, I noticed that, being reclaimed wood, no matter how well I measured, not everything was straight. Some wood is crooked, others a bit warped. So, I started to build in place.
Basically, I laid the old exterior wood down, nailed it in, and then cut the boards. Worked pretty good! Needed to grab my father's saws-all to do some spots, but that was a bonus.


It wasn't as difficult as I was thinking it would be, given that these planks are so heavy. They're a foot wide, an inch thick, and very long. Still, the build came together nicely! You'll notice right off the bat in these pictures, that I do not have nesting boxes, nor any obvious ventilation.
Stay tuned.
Next came cutting out the nesting boxes. I built two, in between my 16" center beams. With the sides, the boxes nicely came to 12x12x12, and are also made out of the same exterior wood.


The hinges for the nesting box lid are from the old in floor door that the old coop had to allow the chickens outside, via the floor to underneath. The framing on the inside is the wood from the framing on the outside of the old coop that covered the gaps between the panels.
I'm really loving the rustic look of this coop!
Next, I started on framing the doors.
The old coop had three old windows, and by old, I mean thin single panes held in by small metal clips, and then sealed with that old putty, which breaks away with my fingers...

After building the frame of the two doors, I discovered that the windows fit inside perfectly!


I cleaned out the gunk, removed old paint, then put the windows back in, and caulked them in place. Afterwards, while looking at the doors, I decided that I'll remove the bottom left pane on the left door in order to get some extra space for the door, and I'm going to remove a top pane and add mesh over it for additional ventilation.


Next, I need to buy hinges for these doors. They'll be the first purchase I've made so far in this build!
[July 12, 2019]
So, it has been a week since I finished the coop, and got the chickens into their new home! I've been super busy this week, and didn't really have a lot of time to update.
Last Sunday, was my son's fourth birthday, and the first full day that the chickens were home. My son woke up at 6am, and really wanted to go see them. He was so happy that he nearly cried!

Anyways, I had purchased the new hinges, and hooked them up. Prior to that, I was looking at the doors, and decided that I would remove a pane from one, flip the filler boards around, install one door as a unmovable wall instead, and that is where my chicken door would go.


It wasn't much work to do, and I used the third window I had as a test to see how it would do. It worked as expected!
The next thing I needed to work on was ventilation. I knew I wanted to put it in the doors above the windows, but I wasn't sure just how I was going to do it at the time. I eventually opted to cut out holes for them. I borrowed an adjustable hole cutter from my father, and set to work!
I wanted three holes on each, but as I was making the middle on the one door, I realized that it would cut the supports holding the chicken door in place, so one side got two, the other three. I then covered them in left over chicken wire.

That was the last thing I needed to do in order to get this coop to "livable"!!! That evening (Saturday, July 6), we collected the chickens up after they went in to roost, and brought them down from my parents coop. They did not want to come out of the dog carrier we had them in! It took a bunch of coaxing, but they finally came out.
I had to block off the nesting boxes with cardboard, as three of them would cram themselves into one, while one would actually use the roosting bars. Now they all roost properly!


Now that the kids have gone to their mom's for the first half of summer, I have additional time to work on the outside run for the chickens. After work, I started to clean up all the left over wood, and put the long pieces on one side of my well house, and the shorter ones on the other side. Then I figured out how large I was going to make the run, and drove some of my poles into the ground. I still need a post driver to get them firmly in the ground, but I'll find one. Home Depot shows them on their website, but there's no SKU, and neither of the two stores I went to carry them.

I'm going to be buying hardware cloth next week to fence it all in, and bury some of the cloth under ground to prevent burrowers from getting in as well. The back side of the run is 12 feet long, the first side is an additional 16 feet, the angled part is 9 feet, and the last part, where the door will be is 6.5 feet. So I need nearly 44 feet of hardware cloth, and of course, more as it's not as tall as the fence is. I'm also going to add a bird netting to keep our resident hawks and bald eagles from swooping in for a snack.
More to come!
[March 5, 2020]
So there has been a lot going on over this past while since I last posted! Summer and fall were busy with kids, gardening, and collecting eggs. The kids started to collect the eggs daily and for that, any that we sold to our neighbours, they got to keep the money! They were very excited to start earning money for taking care of the chickens.
The last post was about starting to get the outside run fenced in. Well, that has been done, and I built a gate as well to get in and out.
Here, we have my four roosters hanging out. Little do they know, but I was heading out to get them some girls!

Here's the ladies! I picked up six hens for $8 each. Lady had a crazy amount, and was trying to offload as many as possible.

So, I knew that I would need to reduce my rooster count, but I wasn't sure which to deal with. What I decided on, was to let the girls in with the boys, and see who was nasty to them. The nasty ones were going in the freezer.

Meanwhile, I was starting on building the outdoor chicken run. I hammered the posts in where I wanted them, taking care to avoid my sprinkler system. This gave the chickens a much larger area to work in, and thus began the first thing I have needed to buy so far for this project. The fencing.

While working on that, I found two of my boys that were terrible to the hens. I was kinda happy that my white one was one of them, because I didn't really like him anyways...
One of the other boys seemed rather concerned that they were in the crate. He got to stay because he was really docile, and when he did try to mount one of the girls, she let him have it. The alpha roo, he's another pretty one. You may notice that one of the roosters in the crate is the one my son was holding above. Thankfully, I grabbed a hen that looked just like him, so when he goes away, my son won't notice.

My first egg!!!!!!

Here we have the bottom half of the fence wrapped, and the frame for the gate.

After that, I needed a door. I'm STILL using the reclaimed wood!

Finally, while I'm getting the upper part of the fence added, the chickens can explore their new area!

Chickaletta approves

All done!
Next steps, (which will happen this year, 2020) is to build raised boxes around the fence, with wire underneath. Then plant grapes.
I needed a water system. I don't really want to keep filling these little waterers daily, especially when I have so much else I need to do every morning, from getting the kids up, dressed, fed, lunches, and off to school. I needed something. I turned to the Marketplace, and found a guy selling 55 gallon plastic drums. They were in the city my ex-wife lives in, so I got her to pick it up for me! Great find, and only cost me $40! I cut half the top off, and added some hardware cloth, which is screwed to the wide end, but can be lifted to get into the water if needed.

The box that the barrel is resting on, is the old box used to contain the chicks in the old coop. Very solid.
Next, I bought some of the drinking cups off of Amazon. I had read some great reviews about them, so I figured I'd give them a try. (As a side note, they're not that great. I replaced them.) I ran pvc to both inside the inner coop run, and to the outside. I also bought some additional piping for the eaves, and redirected it to the barrel.


Now, it's only July 2019, but I'm collecting food from the garden and eggs!
With the midsummer heat, my chickens needed somewhere to be outside and still be shaded. So I built this shade real quick. They use it during the heat of the day.
It's not pretty, but it does what I need it to do!!!
Everyone, just out enjoying the day! As you can see, they're still using the water bucket. They will drink water from those cups, but they have no idea how to get more. The cups have little yellow sticks that *as advertised*, they peck at and it'll release more water. Unfortunately, they do not work. I had to pull that lever UP in order to get the water to release in a decent manner. Pushing down, released almost nothing. Oh well...
I picked up a water play station from my daughters after school care. The kids didn't play with it, so I converted it into a thing for the chickens. The one time I saw a chicken floating in the water, she moved before I had a chance to grab a picture. The seem to like it. Plus, it's extra water.
So, we then had something fun happen, one of my hens went broody! Unfortunately, she kept getting confused, and moving from one nesting box to the other after the other hens laid an egg. This means I need a separate area for her.
Enter, the alcove! This area is directly on the other side of the wall from the main coop, and was really only used to put the kids bikes, and random storage of stuff that really didn't need to be out there. No plan per se', just an idea. I grabbed more reclaimed wood, and started building. Much like the first coop. I can see it in my mind, so I build to suit.
I collected our hen, and her eggs that I decided for her to hatch, popped them all over in this new coop, made just for them!
A few weeks later, we had chicks! I wasn't sure until I head cheeping. I thought maybe only one hatched, but I was surprised to find all four had, and not a single one, was an egg my momma laid... lol
After a couple weeks, it was time to get the kids involved in handling these new chickens. Get our new flock accustomed to humans. The kids did it every single day, and loved it!
Now, as the chicks grew, I needed more than just the little coop I made. Time to block this whole alcove in!
The hen was getting picked on, so we used the area for her for a little bit. Turns out she was not well, and passed on to the free range in the sky a few weeks later.
Exploring!
Sadly, one day, I went out to open up the coops right before we left for the day. I opens both coops, ran inside, got the kids into the truck, went up to lock my door, and I hear something. I walked over and shone my flashlight into the grow out coop. Three raccoons found a way in, and killed the hen and all four chicks. I reached for the shovel just nearby, and found where they got in, because one was staring at me.
I hit him hard with the blade of the shovel to knock him back into the coop, and then ran around, and locked myself in this coop with all three, and started swinging. I killed one, and the other two got away with injuries. They've never been back.
I added electric fencing around the fence and also boarded up the spot that they got in.
Now, just to wait for another hen to go broody!
That's a lot for now, and I'll add more later!
Thanks for reading!
I almost forgot to add! This is my Alpha Roo, Bill. (Because, sometimes, I want to kill him)
He still occasionally thinks it's a good idea to challenge me, and in the beginning, he'd just end up flying upside down across the run, but now, I humiliate him in front of the girls. He challenges, I corner him, and then he gets to hang out under my arm for a while, as I do things around the yard. He's really a great rooster. I've picked a couple dead rats out of the coop that he's killed, and he's very protective of his girls. He just needs to be reminded that I'm the boss, and he's only the boss when I'm not around.
"I have made mistakes, and I have regrets." ~Bill
Also, any idea what breed he is? There seems to be a lot of debate.