This was my try at an incubator. I am confined to a wheelchair and had to solicit the help of my next door neighbor, Kenneth, for sawing the plywood and the big stuff. We finally got her done though. We didn't have the metal working tools to make the trays like the GQF and Dickey's have so we used Hovabator turning trays instead. Hey they do the job. We started off with a sheet of Sandeply hardwood plywood from Home Depot and four whitewood two by fours eight feet long. We ripped the two by fours to make most of the frame and tray slides. And not to forget one, one by four whitewood board eight feet long for the hatching tray. All of the miscellaneous screws, brads and etc. also came from Home Depot. The Control Panel lights and switches came from Radio Shack. It has five coats of clear Shellac on the outside and four coats of white gloss Laytex on the inside. The door in a solid sheet of one half inch acrylic for better visual access. It will hold eighty two eggs in the turning trays plus another forty two or so in the hatching tray. It has the hatching tray, a cleanout tray and an interior light to better see the hatching process. I have just hooked it up without the water pan and humidity setup installed and it has stayed on 99.8-100.0 for three days the humidity has held stable at 28 percent. I want it to dry out good and get rid of any paint fumes that it might have before setting any eggs in it.
SIDE VIEW

I wish that you could see the shiny finish on this thing. You can get some idea of it from this picture.
CONTROL PANEL
It has a main power control switch, a fan switch so that I can cut the fan off if I need to open the door without blowing all of the heat and humidity out, two turner control switches, a light switch and a heater light that blinks when the heater is on or off. The black knob at the far left is for the multi-turn electronic thermostat.
INSIDE TOP
You can get a good look at the innards here. It has a GQF fan, heater, humidity control (not shown) and electronic thermostat. It has a Dickey Hygrometer/Thermometer. You can see the fan, heater, electronic thermostat, two turning trays and the Dickey Hygrometer.
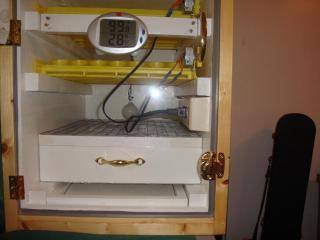
HATCHING AREA
This is the hatching tray. There is plenty of room for hatching with a hardware cloth bottom and mesh wire cover to keep the chicks in. You can also see the cleanout tray at the bottom.
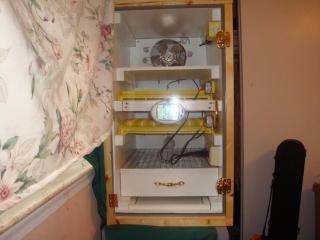
INSIDE VIEW
Complete inside view of the incubator. I love this acrylic door so that you can see everything inside especially when the light is on. When it dries good I am going to put her on her maiden voyage.
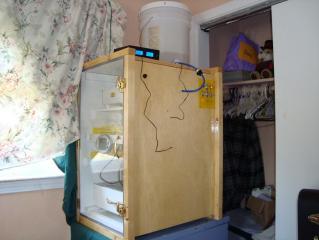
This is the finished unit with the humidity system connected. You might also notice the wires hanging down on the sides. They go to the digital temperature readouts on top of the unit. The Hygrometer/Thermometer and both digital readouts, which are at egg level, read within one half of one degree of each other.
The completed unit measures thirty inches tall by twenty four inches deep and is fifteen and three quarters of an inch wide. It has two, two inch vent holes in the back with louvered vents in them. I designed it off of the top of my head and by looking at other designs on the web until I had in my mind what I wanted. I'm sorry that I didn't take any in progress pictures but to tell you the truth I didn't even think of it at the time I was so carried away in building it. It is pretty, usable. as automated as I could get it. Now to see just how good it is at hatching.
UPDATE-I installed the Humidity system and have been able to regulate the humidity to 52% with the heat 99.8-100 degrees. I guess that's about right for hatching if not please let me know. I can easily adjust it to where I want it by manipulating the louvers on the back.
UPDATE- She hatched 50 out of 55 eggs on her first run. I think that was excellent!!!!!
Wish me Luck. John!
SIDE VIEW
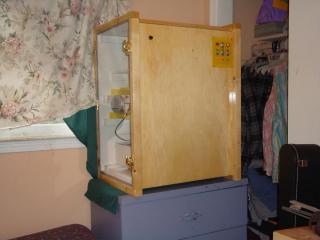
I wish that you could see the shiny finish on this thing. You can get some idea of it from this picture.
CONTROL PANEL
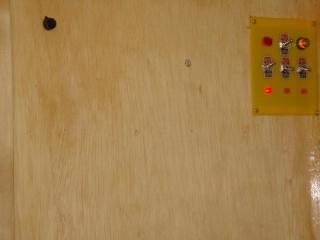
It has a main power control switch, a fan switch so that I can cut the fan off if I need to open the door without blowing all of the heat and humidity out, two turner control switches, a light switch and a heater light that blinks when the heater is on or off. The black knob at the far left is for the multi-turn electronic thermostat.
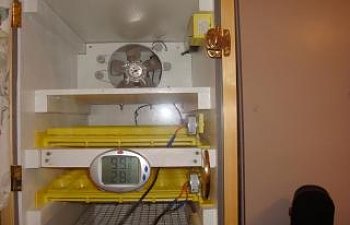
INSIDE TOP
You can get a good look at the innards here. It has a GQF fan, heater, humidity control (not shown) and electronic thermostat. It has a Dickey Hygrometer/Thermometer. You can see the fan, heater, electronic thermostat, two turning trays and the Dickey Hygrometer.
HATCHING AREA
This is the hatching tray. There is plenty of room for hatching with a hardware cloth bottom and mesh wire cover to keep the chicks in. You can also see the cleanout tray at the bottom.
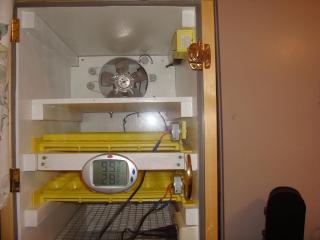
INSIDE VIEW
Complete inside view of the incubator. I love this acrylic door so that you can see everything inside especially when the light is on. When it dries good I am going to put her on her maiden voyage.
This is the finished unit with the humidity system connected. You might also notice the wires hanging down on the sides. They go to the digital temperature readouts on top of the unit. The Hygrometer/Thermometer and both digital readouts, which are at egg level, read within one half of one degree of each other.
The completed unit measures thirty inches tall by twenty four inches deep and is fifteen and three quarters of an inch wide. It has two, two inch vent holes in the back with louvered vents in them. I designed it off of the top of my head and by looking at other designs on the web until I had in my mind what I wanted. I'm sorry that I didn't take any in progress pictures but to tell you the truth I didn't even think of it at the time I was so carried away in building it. It is pretty, usable. as automated as I could get it. Now to see just how good it is at hatching.
UPDATE-I installed the Humidity system and have been able to regulate the humidity to 52% with the heat 99.8-100 degrees. I guess that's about right for hatching if not please let me know. I can easily adjust it to where I want it by manipulating the louvers on the back.
UPDATE- She hatched 50 out of 55 eggs on her first run. I think that was excellent!!!!!
Wish me Luck. John!