So there I was, eating my Costco eggs one morning and thought I want my own eggs. That's where it all started. I live in Denver, CO where it is legal to have chickens within the city limits (no roosters). I came across backyardchickens.com and have been hooked ever since. I started with two hens and an amazon ordered chicken coop. I quickly learned my mistake when I came home from work and the coop door was open, no hens to be found, and one very pleased dog in the yard. I have since spent many hours looking at coop designs and coming up with my own spin on one. Below is my build thread of Jurassic Bawk Coop...

I absolutely love the Jurassic Park movies so I figured why not come up with my own spin on it. I built a wood logo to look like this (photo at the bottom of the thread).
Here is the backyard we have. Where I live, a big yard is hard to find so you have to get creative. I have my two vegetable garden planters on the right and I have added a third planter and my fiancé's rose bushes in the left planter along the house.
We decided to put the coop location in the back corner. In this photo I started leveling out the ground.
I started placing pavers to help level everything out. (the plot is for the first coop that I purchased off Amazon)
Here is the Amazon coop I bought.
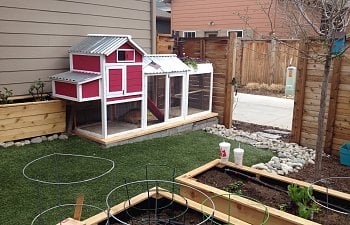
This is the coop after I spruced it up a little bit with paint, tin roof, and added a roof top garden and run extension.
After the dogs got to the chickens I decided to build a fence between the dog area and the garden/chicken area. While at Home Depot I was talking to an employee who wanted to get into raising chickens and I was able to sell this coop to him (with new latches on the run door). Now I needed another coop in less than 5 days before he came to pick up this coop. Spring weather in Denver is perfect for building. Our usual May snow hit and I had to build the whole new coop in the garage.
I started building a base for the coop to sit on out of 2x6s. The new size is 14' x 3'.
I painted the Hardy panels I got from Home Depot. I was able to build the coop with 3 panels. I probably could have gotten by with 2 if I had been smarter about my cuts. (measure twice, cut once people)
This photo shows the back side of the coop. I put a support 2x4 at 18" and 40". The total height is 60" tall. The width of the coop is 5 feet.
Framed with two sides up on the coop. Everything was built from 2x4 pieces.
I started working on the laying boxes. I knew I would only have 3-5 hens so I decided on 2 laying boxes. I used 1x3 piece of wood for this part. (and I convinced my better half I needed a nail gun to built this correctly)
I cut two rectangles in the back to place my two vents that will be behind the roost.
Next was cutting a side window. I got simple plexiglass from Home Depot and just cut the window to fit. It was trimmed with 1x2 trim wood. I did the same to the opposite wall as well. (these windows will be permanent because I will have plenty of ventilation around the roofline)
trimmed the inside of the windows as well.
Next was to build the doors. I built two doors from 2x4s as the frame then screwed the Hardy board to the back. I had never built doors before and If not for my power sander I would have gone crazy. After lots of sanding they finally fit perfectly.
A plywood floor was added the laying box.
I also placed plywood on the floor of the coop and then covered it with linoleum tiles. (very cheap, just peal the backing and stick) I also cut the coop door in the corner opposite from the laying boxes.
Here is the coop door. I took left over 2x3 pieces and cut half of the side out to create a groove for the door to slide up and down through.
My fur babies playing inside while I worked.
Once again I took left over 2x4 pieces and created a spot for the 2x4 roosting bar to sit. I did this so I could easily take out the 2x4 when the time comes to replaced the wood. I also got some shelving supports and placed the against the back wall to hold a piece of plywood. This is going to be my roost poop collecting area. It will make cleaning very easy.
This is Mrs. Foghorn Leghorn in my first coop bawking at me to finished her new one. Yes, I am a Georgia boy and love Chick-fil-a. So naturally that's the sign and name I gave the first coop.
The snow finally melted and the rain remained. So I started working on the run. I attached 2x4s to the framed bottom and finished the top of the frame. I placed roof 2x3 (fat part down) so I didn't have to make any roof hip cuts. There is a very low slope front to back (maybe 3 degrees). I then placed simple plywood sheet on top.
I extended the roof all the way along the coop top as well.
I did not take any pictures of installing the hardwire cloth. I got 1x2 field fencing from a local supply and feed store. I used simple wire cutters the used a staple gun to attach the field fencing to the run and under the coop. I also build a simple door for the run. I took simple trim wood and attached it below the roof. It left a 1.5" opening between the run frame and roof line. I then put a simple tin roof on top and attached. It's feeding time in the coop.
No coop is official without a weather vane in my opinion.
Here is the coop with the front doors open. I put simple tin baking pans below the roost and filled them with Sweet PDZ to eliminate odors. It also adheres to the poop and makes it easy to clean up. I use a litter box cat scooper. The chickens do touch the Sweet PDZ. Kaylee is inspecting my cleaning.
A leftover piece of plywood for a ramp. I put j hook hardware on the side wall and o-rings attached the the ramp for easy placement.
I saw this on many coops I looked at for designs and loved it. I used o-rings and ran a string of parachute cord through and attached it to the top of the coop door. It then extends through a small drill hole in the front of the coop for an easy open and close.
Below shows the small gap at the top of the coop (1.5"). I am not worried about a draft since the trim board is covering it from the outside. It should allow for plenty of ventilation in the winter. I do not plan on heating the coop other than a heat light when it dips into single digits or below.
We decided to add planters to the front of the coop so we can grow treats for the girls. Once again Kaylee is supervising our efforts. You can see a simple tie-down on the door with the coop door rope attached.
Wind chime I got from my mom years ago in the back right of the coop.
Barfield Urban Farm is coming together. The Elm tree we had got frost bite over the winter so I dug it up and planted corn in its place. The fencing will keep the dogs out when we aren't around to supervise. Simple 4x4 cedar posts with 2x4 cedar top and bottom pieces with 2x4 sized field fencing between.
Meet the girls... Foghorn Leghorn (white leghorn), Dottie Hinson (New Hampshire Red), Marla Hooch (Gray Easter Egger), and Betty Spaghetti (Barred Rock). I also put a 1/2 wooden dowel swing in the coop hanging from the roof. Betty loves to swing. And I can see you thinking of why you know these names... yes, it's from A League of their Own. If I could have a rooster it would definitely be Jimmy Dugan.
The girls trying to get to their treats.
Finished the wood burned sign...
Finished the wood burned sign...
Jurassic Bawk Coop Entrance...
I am working on building an outdoor roost and adding a door to the bottom run underneath the coop. I just finished a PVC pipe feeder to try and cut down on wasted food. And remember "Do Good Feel Good"...
I absolutely love the Jurassic Park movies so I figured why not come up with my own spin on it. I built a wood logo to look like this (photo at the bottom of the thread).
Here is the backyard we have. Where I live, a big yard is hard to find so you have to get creative. I have my two vegetable garden planters on the right and I have added a third planter and my fiancé's rose bushes in the left planter along the house.
We decided to put the coop location in the back corner. In this photo I started leveling out the ground.
I started placing pavers to help level everything out. (the plot is for the first coop that I purchased off Amazon)
Here is the Amazon coop I bought.
This is the coop after I spruced it up a little bit with paint, tin roof, and added a roof top garden and run extension.
After the dogs got to the chickens I decided to build a fence between the dog area and the garden/chicken area. While at Home Depot I was talking to an employee who wanted to get into raising chickens and I was able to sell this coop to him (with new latches on the run door). Now I needed another coop in less than 5 days before he came to pick up this coop. Spring weather in Denver is perfect for building. Our usual May snow hit and I had to build the whole new coop in the garage.
I started building a base for the coop to sit on out of 2x6s. The new size is 14' x 3'.
I painted the Hardy panels I got from Home Depot. I was able to build the coop with 3 panels. I probably could have gotten by with 2 if I had been smarter about my cuts. (measure twice, cut once people)
This photo shows the back side of the coop. I put a support 2x4 at 18" and 40". The total height is 60" tall. The width of the coop is 5 feet.
Framed with two sides up on the coop. Everything was built from 2x4 pieces.
I started working on the laying boxes. I knew I would only have 3-5 hens so I decided on 2 laying boxes. I used 1x3 piece of wood for this part. (and I convinced my better half I needed a nail gun to built this correctly)
I cut two rectangles in the back to place my two vents that will be behind the roost.
Next was cutting a side window. I got simple plexiglass from Home Depot and just cut the window to fit. It was trimmed with 1x2 trim wood. I did the same to the opposite wall as well. (these windows will be permanent because I will have plenty of ventilation around the roofline)
trimmed the inside of the windows as well.
Next was to build the doors. I built two doors from 2x4s as the frame then screwed the Hardy board to the back. I had never built doors before and If not for my power sander I would have gone crazy. After lots of sanding they finally fit perfectly.
A plywood floor was added the laying box.
I also placed plywood on the floor of the coop and then covered it with linoleum tiles. (very cheap, just peal the backing and stick) I also cut the coop door in the corner opposite from the laying boxes.
Here is the coop door. I took left over 2x3 pieces and cut half of the side out to create a groove for the door to slide up and down through.
My fur babies playing inside while I worked.
Once again I took left over 2x4 pieces and created a spot for the 2x4 roosting bar to sit. I did this so I could easily take out the 2x4 when the time comes to replaced the wood. I also got some shelving supports and placed the against the back wall to hold a piece of plywood. This is going to be my roost poop collecting area. It will make cleaning very easy.
This is Mrs. Foghorn Leghorn in my first coop bawking at me to finished her new one. Yes, I am a Georgia boy and love Chick-fil-a. So naturally that's the sign and name I gave the first coop.
The snow finally melted and the rain remained. So I started working on the run. I attached 2x4s to the framed bottom and finished the top of the frame. I placed roof 2x3 (fat part down) so I didn't have to make any roof hip cuts. There is a very low slope front to back (maybe 3 degrees). I then placed simple plywood sheet on top.
I extended the roof all the way along the coop top as well.
I did not take any pictures of installing the hardwire cloth. I got 1x2 field fencing from a local supply and feed store. I used simple wire cutters the used a staple gun to attach the field fencing to the run and under the coop. I also build a simple door for the run. I took simple trim wood and attached it below the roof. It left a 1.5" opening between the run frame and roof line. I then put a simple tin roof on top and attached. It's feeding time in the coop.
No coop is official without a weather vane in my opinion.
Here is the coop with the front doors open. I put simple tin baking pans below the roost and filled them with Sweet PDZ to eliminate odors. It also adheres to the poop and makes it easy to clean up. I use a litter box cat scooper. The chickens do touch the Sweet PDZ. Kaylee is inspecting my cleaning.
A leftover piece of plywood for a ramp. I put j hook hardware on the side wall and o-rings attached the the ramp for easy placement.
I saw this on many coops I looked at for designs and loved it. I used o-rings and ran a string of parachute cord through and attached it to the top of the coop door. It then extends through a small drill hole in the front of the coop for an easy open and close.
Below shows the small gap at the top of the coop (1.5"). I am not worried about a draft since the trim board is covering it from the outside. It should allow for plenty of ventilation in the winter. I do not plan on heating the coop other than a heat light when it dips into single digits or below.
We decided to add planters to the front of the coop so we can grow treats for the girls. Once again Kaylee is supervising our efforts. You can see a simple tie-down on the door with the coop door rope attached.
Wind chime I got from my mom years ago in the back right of the coop.
Barfield Urban Farm is coming together. The Elm tree we had got frost bite over the winter so I dug it up and planted corn in its place. The fencing will keep the dogs out when we aren't around to supervise. Simple 4x4 cedar posts with 2x4 cedar top and bottom pieces with 2x4 sized field fencing between.
Meet the girls... Foghorn Leghorn (white leghorn), Dottie Hinson (New Hampshire Red), Marla Hooch (Gray Easter Egger), and Betty Spaghetti (Barred Rock). I also put a 1/2 wooden dowel swing in the coop hanging from the roof. Betty loves to swing. And I can see you thinking of why you know these names... yes, it's from A League of their Own. If I could have a rooster it would definitely be Jimmy Dugan.
The girls trying to get to their treats.
Finished the wood burned sign...
Finished the wood burned sign...
Jurassic Bawk Coop Entrance...
I am working on building an outdoor roost and adding a door to the bottom run underneath the coop. I just finished a PVC pipe feeder to try and cut down on wasted food. And remember "Do Good Feel Good"...