KI4GOT's Small "Hoop Coop"
04.23.2011Getting back into chickens again, I decided to plan it out a bit more than the first time around...
Tractor Supply had a neat idea on their website of using a dog house, a few other people have/had 'hoop coops' I liked. My large coop I plan to do "My Way" but for now the Hoop Coop will do just fine.
Once I start putting it all together (next weekend) I'll post more pics of the progress I'm making. But I already have the doghouse and plywood I plan to use, as well as the pvc electrical conduit and connectors, so all I'll have to buy is the wood, wire and hinges..
I'm going to use the 1" hex wire on the body, and 2x4 welded wire on the bottom. I debated wiring the bottom but we do have predators of all shapes and sizes around here, so decided to err on the side of caution. Tho with my luck, the coop will be flattenned by a clumsy bambi before a fox/bobcat/raccoon/possum goes anywhere near it. I'm repairing my horse fence AGAIN thanks to these antlered rats.
Anyways, here's the design... Hope it's readable.

|
Well some things change and evolve as time goes on... The doghouse I'll be using is now bigger than originally planned (thanks to mominlaw). Only by about 6" in each direction but I'll take what I can get. *grin*
Also, the chickens I'd planned on picking up tomorrow... well the guy never emailed me back. Oh well. Saves me half a tank of gas and a deadline the rain wouldn't let me meet anyways. BUT! There's always a but, right? I was over at Tractor Supply, pricing the wire I wanted, and fell in love. A 'baker's dozen' teeny bantam chicks are now calling my basement home. (Well, it's a daylight basement actually so they get plenty of air/light - never fear no dark dank corners for my chickies.)
Of the chicks, 7 are feather-legged, 6 are clean legged. For breeds... take a guess. LOL I started a thread on just that. I think so far we've been able to identify a White Crested Polish (well that was obvious from the minute I saw it), a Faverolles (concensus says Salmon, but I'm still leaning to White), 4 Cochins (a buff, 2 partridge and a red - again, I THINK), 3 that may be either Old English or Dutch (one person suggested Phoenix), and a few question marks. So it's basically wait and see. (Here's the link for the thread https://www.backyardchickens.com/forum/viewtopic.php?id=495576 )
Also, since this IS my coop page, I should probably be talking about the coop... Well, it's evolved a bit more than just a bigger house. Instead of having doors on the ends, one end will be solid wire, no door, and simply hinge on the bottom and drop down as a ramp, with hooks on the sides of the hoop to attach to the main structure. One hoop tied in to a wooden base - that way the shape will remain constant, and it'll be easier to get inside if necessary without having to move the whole thing. Oh and one more change, instead of using the conduit straps, I'll just put a screw straight through and into the 2x4. Hubby's idea, but I'm still undecided about it. I think the straps would give it more stability. We'll try it his way and see I guess.
Anyways, tomorrow construction starts for sure (unless the weather man lied again) and I'll have new pics of my progress.
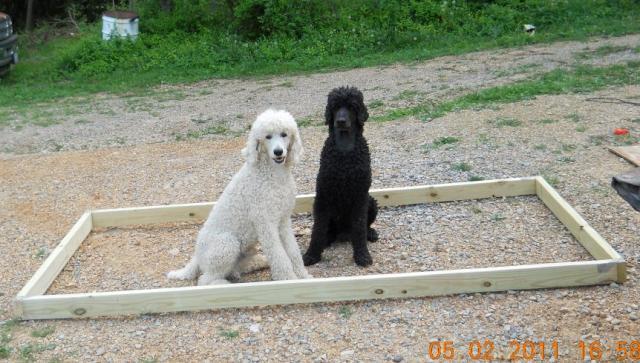
05.02.2011
Well, had to run around doing other stuff for most of the day but I did get started! YAY!
We had some joist brackets left over from when the house was built, so I used these to help strengthen the base. Then I added the 1x2s on the inside edge, to hold up the conduit hoops. I had to drill pilot holes, the screws just split the 1x2 otherwise.
| 
|
My helper dogs, Sunny & Shadow |
Tomorrow will start with (another) run to Home Depot. I decided instead of just stapling the wire to the underside, I'm going to sandwich it between the 2x4 and another 1x2. Then when we drag it to a new spot the wire's less likely to snag and pull free of the staples. Also, I need to go over to MomInLaw's and get the chop saw so I can hack off the enlarged ends pieces of the conduit. I'm also going to use more 1x2 pieces in between the hoops to attach the wire going over the top.
While I'm out I'm also going to head over to TSC and see if they still have any of the bantam babies... Now that I have an idea of what some breeds look like I'm hoping to find a faverolle or silkie (or both) to add to my small flock. Off to bed now though.
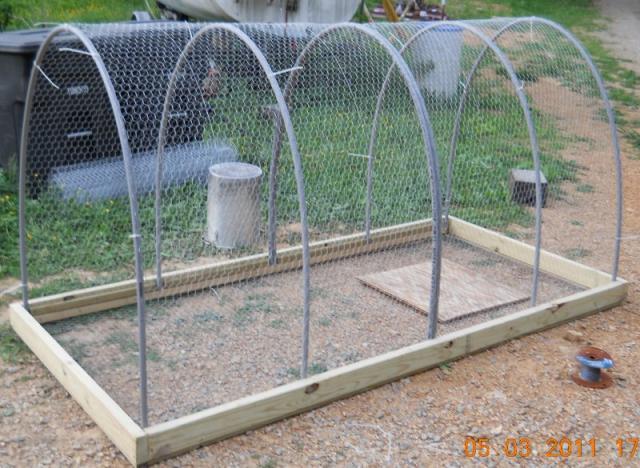
05.03.2011
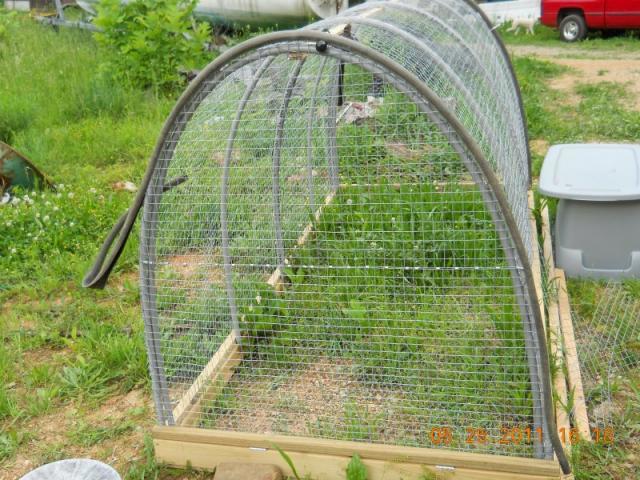
Ok, well so far so good. I cut the wire to length, attached with some staples, and then covered the edges with pressure treated 1x2s. Once the bottom wire was in place, it was time to turn back over and start adding my hoops. I put screws where the hoops were to go into the 1x2s, then ran 2 screws on each end of the conduit to anchor it to the frame. I did both ends, then attached the middle pieces by laying the frame on its side. Things went a bit faster this way.
Once the conduit pieces were bent, I got a little carried away and forgot to take pics for a while.
I used 1" hex chicken wire, on a 48" roll, and did 2 rows over the top. I doubled the conduit where the wire pieces met for added stability. The wire was stapled to the 2x4 frame butting up to the 1x2 used to support the conduit pices, and cut out to go around the bases of the conduit. Also, I used some zip ties to hold the wire in place while I stretched and stapled it. The piece of plywood was simply to sit on while I worked inside the coop.
I cut additional pieces of 1x2 to go in the spaces between the hoops, to secure and conceal the ends of the chicken wire. The last thing I did today was to 'sew' my 2 wire sections together. I used a piece of 14 gauge electric fence wire and looped it between the 2 pieces all the way over the hoops to prevent them from coming apart later.

| 
| 
| 
|
05.16.11
Ok, well the weather's been against me for a bit, but I managed in between thunder storms, work, etc, to wire the end hoops and build 1 door.
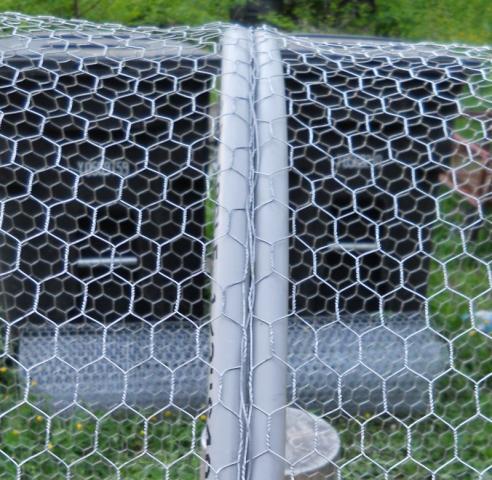
On the end hoops, they sort of 'evolved' as I perfected my technique. What I ended up doing was drilling thru the pvc pipe and feeding the wire thru, do one loop around to hold the wire down, and thru the next drilled hole.
For the end door (only have 1 done so far), I used another hoop for the shape, cut just long enough to fit over the outside edge of the first. I used zip-ties to hold it in place a few days to relax before adding the wire. Once the wire was in place (held with zip-ties) I wired it up with the electric fence wire, and covered the sharp edges with an old garden hose split down the middle and held in place with a few screws into the outer conduit. It's hinged at the bottom, and drops down for access.
The following pics show my progress this far. Sorry I forgot to bring the camera with me to take progress pics...
The first is showing the door closed. I don't have a latch yet so used a spoon (used for spreading the hose wide enough to go over the hoop) woven thru the wire enough to hold it shut. Next, from the other side... The second piece of hose is just draped over the top until it's needed. Sunny kept trying to kill the 'snake' LOL. Then showing the door open. If you look close you can see how I wired the chicken wire to the frame. The next pic is just a closeup of the door frame, with wire and hose. You are only seeing half of the wire used to loop around the conduit, since every other loop goes through the drilled holes. I'll try to remember the camera when I do the second door tomorrow. IF it doesn't rain all day that is.

| 
| 
| 
|
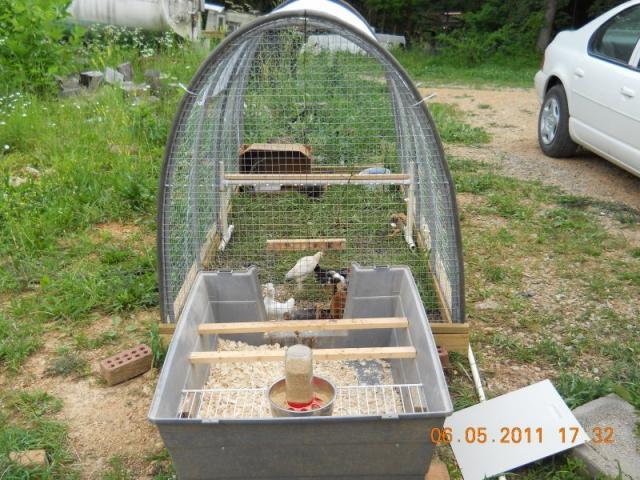
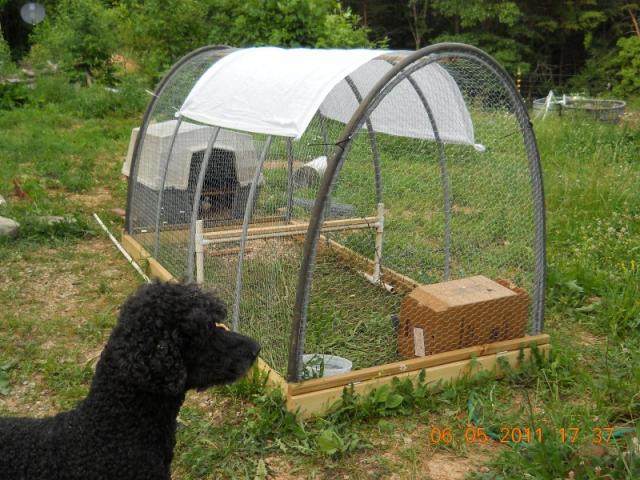
Ok, so it's more than a day or 3... Unfortunately real life gets in the way of updating blogs sometimes. But it's DONE!
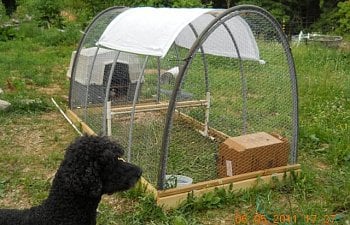
Lets see... I wired the second door with chicken wire, but didn't like the way it reacted when I cut a hole in it for their access door. So off the wire came, and I used 1x1 welded wire instead. I only had a 24" roll of it, but luckily the door was just shy of 4' tall, so I used J-clips to hook the pieces together, wired along the hoop like I did on the other side to attach the wire, cut off the extra bits, and then secured the hose over it to keep the sharp edges under control. I cut an access door for the chicks, secured a piece of 1x2 to the top edge to weight it down when it's openned, and used a piece of left over copper weld antenna wire to raise and lower it with. (Copper weld is almost as flexible as rope, and is very weather-resistant.) I tied a knot in the copper weld where it comes through the cage wire when the door is open, but could not reach it because it was below the top of the doghouse, so I left some extra length and tied a knot in the end. When the door is open, a bungee holds just the end knot, and when it's closed both knots are held in place at the same location. (see last pic)
| 
| 
| 
|

| 
| 
| 
|

|
The chickies have been outside in their new home since May 26th, and seem quite happy. I posted originally what I thought they were, but I was a bit off on a few... I think I have it narrowed down a bit. Here goes... white crested polish (roo), sultan (roo), porcelain d'uccle (roo), black Japanese (roo), blue o.e.g. (roo), red o.e.g. (hen?), another o.e.g. who's color I haven't identified yet (hen?), red (buff?) cochin (hen?), and 4 brahmas - 1 buff (roo?) and 3 dark (hens?). Only time will tell.
I am working on a feed/water solution so I am not having to fill both more than once a week, but due to a minor brainfart, I glued one of the pvc junctions upside down. Unfortunately it was the last part of the waterer, making the whole thing unusable. The feeder is done except for how and where to mount it. But hopefully I'll have that in place within a few days.