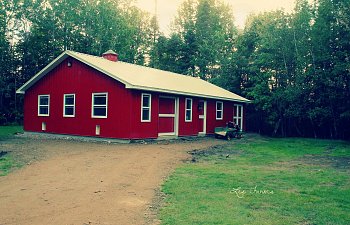
Our finished Barn

If we could do things differently (we still can adjust a few elements)
- Locks and handles inside and outside all doors
- Wish we had of had them install the brooder lower, so the top was easier to clean out.
- Made the breeding pens in the hallway with dirt flooring. The cement does not drain like the other rooms, but that's a given!
- Mad the eaves the opposite way of the entrance doors.. In winter the snow slides RIGHT off and makes a huge snow bank.
So where do I start.. at the beginning? How it came to be?
The STORY
I warn you.. To get where we are today we had to go through a tremendous tragedy. I have been through a lot in my life, but losing my barn, and all my animals was the worst. I am the type of person that connects more with animals than humans. The animals were my family. My love, my joy, my passion. When I get into something, I dive in, head first - giving it with my heart. My dream is to breed and raise poultry, goats, dogs, etc. I was right on track. We had finished building our first 12 pen breeding pen the night of the tragedy. I had separated my Houdans, Barred Plymouth Rocks, Silkies, Naked Necks, Easter Eggers, and Sizzles. We were exhausted. So tired..
I took a nice hot bath and went to bed. Our in-laws live with us for a few months of the year. I was awoken at 1:15am to my mother-in-law screaming "THE BARN IS ON FIRE!" Everything happened so fast. I ran up the stairs as fast as I could. Thinking she was obviously crazy. How could that be? And if it was, I could save them. Oh I was so wrong. I was so, so wrong.
February 11/2013
When I look at these pictures my heart aches. My father-in-law documented the fire. He was doing it for insurance purposes, and for us to look back and see that, there is no way we could have done a thing to save them. This was probably 2 minutes after I came up stairs. The roof had just collapsed.
We lost roughly 150 chickens, 6 ducks, 4 turkeys, 4 geese, 2 sheep and our beloved Livestock Guardian Dog Clementine. Not one of them escaped the blaze.
It's hard to explain the tremendous emptiness that accompanies a loss this large. Words don't even make sense. Nothing makes sense. Not eating.. not sleeping.. No there weren't any human lives lost in the fire, but that is no consolation to me at all. Some of those birds in there, and Clem, where my children. Honest.. and I grieved.. hard, but with darkness comes light. We have slowly come out of this tragedy and began to start all over again - from scratch.
Oh and we had 12 chicks in the basement at the time of the fire, and one REALLY lucky hen with frost bite.. Luckiest frost bite ever... She was inside recovering when it happened. Margaret is very special to us, and is the one remaining chicken from our previous barn:
Watch Margaret's video:
The fire Marshall determined the point of origin to be around the fuse box area. We had hay stored on top of a box next to a maze of extension cords. We didn't know. We did not know how incredibly dangerous extension cords are.. The heat lamps we had going on chicks were not even close to the Point of Origin..
Anyway.. To read more on Fire Safety please do so by clicking HERE.
Because I want to give you guys some perspective on what the barn looked like previously - it was beautiful. And large. It had an upstairs, and 5 different parts. It was bigger than our new barn if you consider the upstairs. We have maybe 3 feet extra on the end of our new barn's foundation.
This barn was insured. So if you have taken nothing out of the importance of fire safety, at least take the "Properly insure!" advice. It does not cost a lot to insure an outbuilding. It is well worth it if anything happens... Some insurance plans have a cap for livestock. I suggest choosing one that does. Unfortunately our insurance did not. Next time fore sure. We lost over $5,000 worth of animals easily.
The REBUILD
Now that the beginning has been explained in detail, lets get to the light at the end of the tunnel - the NEW barn. There will be twists and turns through this article. Don't expect your average coop page. I'll try not to make it too confusing, but if I lose you, I apologize in advance

I drew out all the plans. I wanted it just so... But after the barn was laid out, the windows/doors moved around a bit...
This first image is the original drawing. The barn all put together. After that, I created separate drawings for each room on the computer...
Note that the entire barn will be insulated.
The Chicken Barn. It's going to be big. Roosts tucked away into a corner so they are out of the way. We will be able to remove each roost for easy cleaning. The entrance has a big sliding door. All of the breeding pens have pop doors for access to outside covered runs for breeding season. There will be two pop doors under the windows on the left wall so I can 'try' to keep the goats out of the chicken part of the barn. Still not sure how well that will work.
This is the only heated room in the barn. It will be heated with forced air (wall unit) as per the Fire Marshall's suggestion. These units will need to be cleaned from dust, but are much safer than any other option we've checked on.
UPDATE 2016: Now using the goat barn for a very, very, very large breeding Pen. I plan to section it off this summer into a couple different pens instead. I have since sold the goats after splitting up with my wife and my only focus is CHICKENS. And I also have a trio of Muscovies, but chickens are my one and only real focus.
UPDATE 2016: My tractor is far too big for this room. It is now just storage of bulk feed.
The first step was clearing the debris from the fire. Unfortunately we had a terrible, awful person do it. They did not do as they said they would, and our building contractor had to hire someone to finish the job the first guy was supposed to do.
The lesson in this: Get some references..
This is what was left after they cleaned it up. They didn't take everything, and they were supposed to level it out. They didn't..
Watching the debris being removed was traumatic for us.
After that was done, we had to wait... wait for the darn snow to melt. At this time it was March, and we live in Eastern Canada.. It takes a long time for snow to melt.. and after it does, there is a sloppy wet mess that you have to wait for it to dry up.. The rain that comes with spring sure didn't help the land dry up - and we have a very low sitting property. Water takes a long time to soak in. This is very beneficial in the summer. When we have a drought, and everyone has drying grass, our property is lush and full. In the spring, it is wet, soggy and slippery...
If we were to wait for the property to fully dry up we would have to wait until summer to build, as they couldn't bring a cement truck down in the muddy mess without it getting stuck.. So we hired someone to come in and put a road in. Best idea ever. They were GREAT contractors. Timely, efficient and very pleasant to speak with.
They scraped up all the sod that was muddy and messy, and created a road flush with the property. This picture is when they first did it.
Late April - it was all packed firmly down. The re-build was able to be started!
Please notice the baby barn in the picture. After our barn fire, we needed immediate accommodations for the 12 chicks (and Margaret) that were currently living in pens FAR too small for them in our basement. We were going to put them in the barn the day of the fire, but due to the exhaustion from building the breeding pens - we decided to wait a day. Can you imagine? They would all be gone if it wasn't for our laziness.
This is the younger group in the playpen prior to getting our baby barn.
Thanks to everyone on our Facebook page who made housing these guys possible. We didn't have any money to put into building them a coop, as we had JUST spent everything on a feed run, and on the beautiful breeding pens we worked so hard on. There was nothing we could build outside in the snow in February. We had another wonderful contractor build the baby barn inside their garage and deliver it.
Here it is the day we had it delivered. Still a lot of snow on the ground. It was delivered February 28th 2013. 17 days after the fire.
We will use this baby barn for something, though we can't quite agree on what. I want to use it for chickens.. Susan wants to use it for the pigs or hay storage. Hard to say for sure yet. It will be put to good use, and was very well made. There is a pop door on the back.
Which is quite large. I COULD use the baby barn for the geese...
Anyway.. Let's get back to the actual BARN barn. On May 1st 2013 the first load of gravel was delivered, and temporary power was set up. Rod Spirritts is our contractor of this barn, with Spirritts Construction Ltd. Rod is a Master Craftsman and has a degree or something in something making him better at what he does. He is VERY good at what he does. So, yes.. They rigged up power and delivered gravel. We discussed our next step as Rod said we would need to raise up the base and make it level. The clean up crew was supposed to do this, but they didn't... so we had to hire the same guy that did our driveway, which made our end cost quite a bit more ($1,200 more) and we've already reached our insurance cap. Also our electrical was not up to code, another wham to our budget.
Breathe.. It will all be worth it in the end.
The chickens like to think they are the real brains behind this project

The chickens inspecting the work they did on May 6th. They cut down a dead tree that was burnt from the fire, and levelled out the plot (still a bit more of that to go in the picture) and extended the base.
Once they finished up with the plot, Rod's crew constructed the footings. We are counting May 6th as the official DAY ONE - May 7th 2013 above. The concrete was poured on Thursday May 8th.
and we drew Les Farms in the cement in the entrance of the hallway.
The concrete had to sit and harden over the weekend before the footings were removed. Counting the day of pouring the cement as day 3!
I'm not counting the day they couldn't work while waiting for the concrete to harden..
The fourth day they removed the footings and started framing up the walls. This is Monday May 13th 2013.
On Tuesday, May 14th they finished the entire external frame. You can see where the windows are to be placed.
At this point, everything looked incredibly tiny.
You will notice that we decided to have dirt floors in the livestock areas. We are big believers in deep litter, and it works so much better with dirt floors.
Really starting to look like something at this point.
The next day was incredibly rainy, so they set everything up that they would need to start putting up the trusses that Friday.
On Friday, May 17th the trusses were all put up and gorgeous.. So symmetrical....
End of week two. The shell is all complete.
I apologize for the quality of this picture. It was taken via cell phone.. On Tuesday May 21st they started putting up the steel roof (Note Monday May 20th was a Canadian Holiday), and on Wednesday May 22nd they finished the roof and put in all the windows!
The above picture shows the 4 windows in the breeding pens in the chicken part of the barn.
The goat area.
On Thursday May 23rd they worked on the siding. The back is complete! Oooo Pretty colour! and also started the trim work.

On Friday May 24th it was raining cats and dogs. They couldn't finish the siding until it let up, so they started building interior walls!
Inserting the plan layout again so you can follow along without having to go back up to the beginning.. You can see the entrance leads to the exit. People area only.
May 24th 2013
Entrance...
May 24th 2013
The right wing - where it will open to the goat area. To the right you have the brooder/tack room.
May 24th 2013
Like so. Looking bigger now!
May 24th 2013
The Tractor & Storage area.
May 24th 2013
The chicken part of the barn again.
May 24th 2013
You can see they've also started putting insulation along the trusses. The entire barn will be insulated. He is also very aware of the ventilation needs of livestock, so no worries there.
May 24th 2013
The big door in the chicken area. Because we will want to get our tractor in there for bedding clean up and what not. The door will be sliding, where we had thought at first to make it open by swinging.
So this is the progress end of day Friday May 24th.
Monday May 27th 2013
They have half the siding finished. You can really see that nice barn red from our sunroom windows in the house now!
Tuesday May 28th 2013
They finished all the siding. Isn't it beautiful? The electrician came and went over things with Susan. Rod is all good to start insulating
")
Friday May 31st 2013
The interior is all sided save a few places for the fuse box and wiring. Here is the Roost area in the chicken barn.. Koda will be your tour guide
")
They worked on this part Wednesday, Thursday and Friday - May 29th, 30th & 31st. Rod says they are still right on track with a completion date of June 5th 2013!
Friday May 31st 2013
The hallway leading from the chicken barn to the goat barn is quite dark with the OSB board. We plan on painting this in the future. Above you can see where we will have access to the attic.
Friday May 31st 2013
The empty part is where they are putting the fuse box.. They will take a foot out of the breeding pen to allow for access to it safely. This room is also quite dark, and does not have any windows (but will have the dutch door that will stay open throughout the day).
Friday May 31st 2013
This is the side of the larger breeding pen Wall is still not framed in there.
Friday May 31st 2013
The brooder room. This is also quite dark. Especially in the evening. Going to paint this for sure. Maybe do a mural.. It's going to be my favourite room after all

Friday May 31st 2013
This is the goat part of the barn. Windows are higher so that they can't directly kick them or anything.
Friday May 31st 2013
We realized we didn't make this area big enough for our tractor and our trailer.. and it would be a good walk in a snowstorm to retrieve the snowblower, so now it will just be storage (or possibly an area for our meat kings!)
Friday May 31st 2013
The West side of the barn where the breeding pens exit to runs. Pop doors are constructed.
Monday June 3rd 2013
Breeding pen construction is underway. As you can see, they started with our 4x4 pens in the chicken part of the barn. This is where we will house trios or quads. That gives them 4 square feet of indoor space each. We will be constructing runs as well. In time....
Monday June 3rd 2013
The doors will slide up and hook. We'll have to install some safety measures to ensure they are predator safe.
Monday June 3rd 2013
We painted this hallway/breeding room white over the weekend. Don't ever do that.. Well, at least not with properly researching how to paint OSB first.. 5 gallons, and $80 worth of paint later we have one room painted.. My muscles ache. Took me 4 coats. OSB is a pain in the butt to paint. Prime first.. Yes.. Should have primed first..
Anyway, here are the large breeding runs framed out. Koda again leading the way
Monday June 3rd 2013
Here is the fuse panel area. They cut out a bit of the breeding pen, but not much.
Monday June 3rd 2013
Only one has chicken wire on it today. I believe I'll use these to brood my layers and meaties until they can be free ranged - roughly 4 weeks for the layers and 2 weeks for the meaties. Pop doors will be situated on the outside wall.
Monday June 3rd 2013
We've decided that 4 feet deep is just too deep to clean properly. We are cutting it down to 3 feet and will have removable walls so that we can have 3 on the bottom, 3 on top, or one large brooder on each floor. Or 2 on each.. etc... Possibilities!
Thursday June 6th 2013
They have finished the brooders, small breeding pens and one of the large breeding pens. We are still waiting on doors and finishing touches. Delayed another week.
Here is the brooders after we painted them with two coats of primer. Still have to get the corners, but the paint has really made it look brighter, and this picture was taken at 9pm at night, so sun was down.
Note to self: Paint BEFORE pens are installed.. so much easier.
Barn was completely finished June 20th 2013 with all finishing touches.
It ended differently than we initially wanted, but we went for practicality and functionality and decided against the slanted roof on one side because of the snow load we get in the winter.
Finally photographed the entire interior to show you guys!
Starting here.. Hallway from the Exit to the Entrance door. Both are dutch style doors. We have them open 24/7 for air flow. Pens on left and right in the exit hallway.
Hallway from the front entrance to the exit. We painted this entire area.. A whole lot of work and paint went into that.. 15 Gallons!
It was too white so we hung chicken decorations!
This is my Barred Rock breeding pen now. I keep under 20 birds in this 6' x 14' breeding pen.
(ignore the Silkie mix... She lays white eggs and refuses to live with general population lol)
This is now the Copper Marans breeding pen. In this 4' x 14' I keep around 10 birds.
The pens from the hallway view. I've installed shaving barriers all along them now as well.
The hallway that leads to the heated brooder room, and the goat room.
These are no longer brooders... Wow I've altered the barn like crazy. Now I keep Silkies in here for breeding purposes as well as pairs or trios.
Storage room looking out to the brooder room.
Storage Room. Can you spot anything special on the shelves?
More of the storage room. Kittens get fed in here.
Now covered with a thick layer of bedding and this is the Naked Neck breeding pen since we do not have goats any longer. Spoiled chickens with lots and lots of room!
Hallway that leads to chicken part of the barn. Henry has been spending his days inside the barn with the kittens instead of his kennel while we are at work. Trying to desensitize him to the chicks, and giving him something fun to do (play with his kittens). He loves it!
The roosts.
I thought I would have to brace them, but three years later and they are still holding strong. No need!
The chicken barn (No longer have the geese)
Breeding pens in the Chicken Barn. They have been split with two levels in 2015. Each is 4 x 4. I keep small groups of breeding birds in here.
Last picture - the chicken barn again. The goats' feeding area. The chickens have taken to laying their eggs in the hay rack
See our sign: "Bless Our Farm"
** Update 11-09-13** Nesting boxes
Summer 2014
Fall 2014
Fall 2014
Fall 2014
Summer 2015
Late summer 2015
Winter is beautiful. That red stands out!