It's little, I know. But our plot of land in a big city is little too, with city ordinances up the wazoo to comply with so "roomy" just wasn't in the pot of options. This will allow us room for 3 or 4 hens. The coop is 12 square feet (2'x6'). The attached run, which is in progress of being built during these photos, will be 60 square feet (10'x6'). Our fence is much too low to free range in the area we have that is dog-free, so I've also built a 17.5 square foot (7'x2.5') chicken tractor to place on my garden beds when plants aren't growing that I want to grow. The coop could not be any taller than 4', again, those sticky city ordinances, so the original plan of a raised coop went out the window.
Building the frame. I'm not a builder and was going off of the minimal skill I gained completing projects with my dad over the years of growing up and what I've gleaned from watching my handy hubby. The latter of which didn't help with this project beyond nailing on the roofing tiles because he's not yet sold on the idea of chickens. I know when those eggs start rolling he'll change his mind. So for now this project has been all mine! The best part is I pillaged my father-in-law's scrap wood pile and am only into this project about $100 in treated lumber, paint, vinyl flooring remnants and hardware. Plywood, trim, windows and roofing materials are all reclaimed or found as new, unused and unwanted by my FIL.
I painted the interior wall pieces high gloss white after cutting to size and before screwing onto frame. I also covered the lower half of the interior walls with vinyl flooring for ease of cleaning. Outside: I've decided red paint is the color from H. E. double L. It took 5 coats total to make it look red instead of hot pink! The girls living in there probably wouldn't mind it pink, but I can tell you my hubby and neighbors wouldn't be thrilled with a hot pink structure sitting out there!
Above is the view into the nesting area. Floor is covered in vinyl for ease of cleaning. I caulked the seams that I could to hopefully keep out hiding places for mites, etc. Above the nesting box is a small storage area.
Above photo shows the rear of the coop. Small cut outs will be vents. Larger cut outs will be stationary windows for light. The windows will be made with plastic storm window covering type material (also pillaged from the FIL), reinforced with wire on the inside, and finished with trim.
Above photo shows front of coop taking shape and also view into the nesting box. The wired panel is where a window goes that will open for venting. At this point I was thinking a dirt floor. After the entire coop was finished I decided to add a floor.
All assembled! Front window is actually a kitchen cabinet I found. I had a piece of plexiglass cut to fit inside and used caulk to adhere and seal it in place. Chain hooks to a cup holder hook to allow for air flow if desired (it can be closed and locked too). The panel where the pop door is swings all the way open for cleaning the coop. In this picture the roof still needs flashing added to the front. I used composite roofing tiles for the roof over tar paper.
View upon opening the large front panel. Vinyl flooring. The u-shaped bar in front of the nesting box was actually taken off of an old broken down play structure (it was a handle on the ladder). I made the PVC pipe as a "backup" feeder to have inside the coop. There will be a larger one in a "feeding and watering station" I am currently building...an A-frame open-air covered structure next to the coop and in the run. In the photo above I still have to add a wood lip in the front to keep bedding inside.
Two roosting bars. This isn't the best angled photo...the top one really isn't as close to the back wall as it looks here.
This shows the back side/nesting box end. The little shingled roof is on hinges and lifts up to reveal a small storage area built in above the nesting box where I plan to leave a small supply of extra food, corn, treats and such. The black strip at the top of it is covering the hinges and also provides a seal so leaking doesn't occur since the roof does not hang over far enough to do so. I used pond liner from our local garden store and that pasty black tar patch stuff to adhere it (keeping free of the actual hinges, of course). It works better than I thought it would. The egg collection door will actually be outside of the run. I needed it to be designed that way as my kids, ages 3 and 6, need to be able to collect eggs without running the risk of letting all the hens out into the garden upon entering the run to do so. The windows for our hen's viewing pleasure face the street. I've had so many neighbors stop by with extreme interest in our building project! They've been very encouraging when they find out we plan to keep chickens.
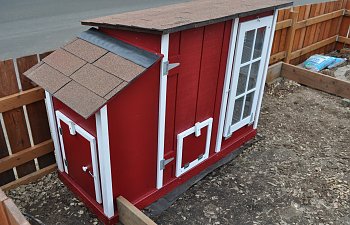
And once again...here it is in all its glory! Now if we can just get that run built and fenced in! My chicks are growing fast!