After convincing my husband in August we needed chickens, I quickly placed an order for day old chicks from Meyer Hatchery before he could change his mind. The chicks were to be delivered the first week of October, and everything I read said to have the coop finished before buying chickens, so we had already broken rule number 1. We set out to build a coop without plans and with my constantly changing ideas of what we needed. The original intention was to use a small stair platform that had been at my grandmother's before she died, but my chicken plans kept expanding, so we decided to build an 8x8 coop from scratch. We started by setting 4 4x4s in the ground, the framing a solid floor about 20 inches off the ground.

Then we framed the roof, insulated the portion of roof that would be inside the walls, and left a 2 foot overhang on all sides. We used the foam insulation panels and metal roofing panels from Lowes. I painted the floor with roofing sealant.
We moved on to framing the north, east, and west walls. We put studs every two feet. Since we are in Louisiana and summer is brutally hot, we wanted a lot of windows and ventilation, so we bought two windows (the windows were used on the set of the upcoming movie Twelve Years a Slave) and decided to make a screen wall on the east side of the coop.
Lacking a firm plan, we went about the project in an unfocused manner, so after framing the walls, we decided to bury wire on the two sides that would not be fence for the run (the chickens have access the area under the coop from the east and north sides). Of course, we dug the foot deep trench after work and were too tired to bury the wire that day. Then overnight the rain came....
We put T-11 paneling on the three sides (and discovered that we weren't quite square, so everything ended up taking lots more tries and time).
North side
East side
West side
We then moved on to tackling the wire wall and chicken door. The plan inside my head called for the wire wall to be movable so that we could open it to clean out the coop when needed. After lots of planing, the wire wall finally worked. And so did the chicken door.
Finally, we tackled the most difficult wall: the nest box wall with window! We started with framing the nest box; the box is 4 feet wide. then we framed the rest of the wall.
The finished walls before painting:
South wall
East wall
The interior before painting:
Next we built the run, and unfortunately, by this point the coop project had gone on for so long, my desire to photographically document each step in the project had died, so I only have the end results. The run is built off the north and east sides and goes 8 feet out in both directions. We buried hardware cloth 1 foot in the ground, and the fence height is 6 feet. We used 1 inch heavy duty game bird netting to cover the run. I broke my left index finger with a hammer early in the process of attaching that netting, so my husband had to do the heavy lifting in the finishing the coop.
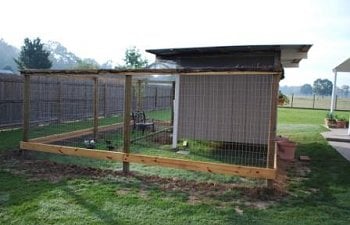
Here's the finished coop and run pictures.
West side
South side
East side
Northeast view
North side
Interior view
View of the roost bar (not sure if this will be the final design or not)
I covered the nest box, but it is painted the same olive green as the roost bar.
The girls are very happy with their new home, and we are very excited for the end of this project to be in sight! All that's left is a little touch up painting and some landscaping.
Overall, I am really pleased with the way the coop and run came out. I haven't had chickens before, so I am not married to the choices we made for the roost and nest box, and we left the run without amenities like an exterior roost because we want to watch the girls and come up with good, informed plans for semi-permanent coop fixtures.
If I had to change something, we would definitely have found a plan and worked from that. It was a lot of work and then redoing that work to finish this coop, but for us it was a matter of sitting around for a few weeks looking for the perfect plans or just jumping in and getting to work. We decided to just jump in.
Also, I had made planting choices for the perimeter of the coop before I built the coop, and now I am having to rethink that since the coop structure makes a lot more shade on the north and east sides than I was expecting.
Update
I thought I would give a brief update on the coop since it has been in use for about seven months now. The girls love their home; we added three new chickens, so we added a bit more roosting space. We started with a communal nest box, but decided to add dividers shortly after the girls started laying. Of course, the grass in the run disappeared quickly, but we added a couple of inches of mulch, and the girls love to scratch in it. After they have the mulch broken down into compost, we will remove it for use in the garden and add more mulch. I use the deep litter method in the coop, so I turn the litter once a day and then do a quick weekly clean of the coop (wipe down the roost bars, wipe any dirty spots from the walls, add shavings if necessary, etc.) With about 20 minutes of work a week, the coop stays clean and has no smell.
We sited the coop close to our house because our yard has no other shade. While we are planting fruit trees around the yard, it will be years before those trees can offer any sort of relief from the relentless heat of the summer. The house shades the coop, and the coop location actually works out perfectly because we are constantly going to visit the girls, get eggs, give the girls treats (i.e. vegetable scraps from the kitchen), and just watch them for entertainment. We keep the coop and run clean and there is no odor, so it works out great: we get the fun of having the girls close by for entertainment and they get the only shade around the place.
The two windows and the open screen wall are really keeping the coop cool and breezy so far (though the temperature so far has only been in the lower '90s; hopefully this will still hold when the real heat begins next month.) Having the coop off the ground so that area under it is open for the girls, is also really helpful. The girls hang out under the coop during the hottest part of the day.
Here are a few pictures from this morning:
We got 5 inches of rain this week, but with the mulch, the run does not turn into a mud pit.
The girls are constantly scratching in the mulch, so they incorporate their droppings into the mulch and the run doesn't smell.
A view of the extra roost space we added.
The nest box, with dividers added (and Rosalita, our broody easter egger).
Thanks for looking at the coop.
Then we framed the roof, insulated the portion of roof that would be inside the walls, and left a 2 foot overhang on all sides. We used the foam insulation panels and metal roofing panels from Lowes. I painted the floor with roofing sealant.
We moved on to framing the north, east, and west walls. We put studs every two feet. Since we are in Louisiana and summer is brutally hot, we wanted a lot of windows and ventilation, so we bought two windows (the windows were used on the set of the upcoming movie Twelve Years a Slave) and decided to make a screen wall on the east side of the coop.
Lacking a firm plan, we went about the project in an unfocused manner, so after framing the walls, we decided to bury wire on the two sides that would not be fence for the run (the chickens have access the area under the coop from the east and north sides). Of course, we dug the foot deep trench after work and were too tired to bury the wire that day. Then overnight the rain came....
We put T-11 paneling on the three sides (and discovered that we weren't quite square, so everything ended up taking lots more tries and time).
North side
East side
West sideWe then moved on to tackling the wire wall and chicken door. The plan inside my head called for the wire wall to be movable so that we could open it to clean out the coop when needed. After lots of planing, the wire wall finally worked. And so did the chicken door.
Finally, we tackled the most difficult wall: the nest box wall with window! We started with framing the nest box; the box is 4 feet wide. then we framed the rest of the wall.
The finished walls before painting:
South wall
East wallThe interior before painting:
Next we built the run, and unfortunately, by this point the coop project had gone on for so long, my desire to photographically document each step in the project had died, so I only have the end results. The run is built off the north and east sides and goes 8 feet out in both directions. We buried hardware cloth 1 foot in the ground, and the fence height is 6 feet. We used 1 inch heavy duty game bird netting to cover the run. I broke my left index finger with a hammer early in the process of attaching that netting, so my husband had to do the heavy lifting in the finishing the coop.
Here's the finished coop and run pictures.
West side
South side
East side
Northeast view
North side
Interior view
View of the roost bar (not sure if this will be the final design or not)
I covered the nest box, but it is painted the same olive green as the roost bar.The girls are very happy with their new home, and we are very excited for the end of this project to be in sight! All that's left is a little touch up painting and some landscaping.
Overall, I am really pleased with the way the coop and run came out. I haven't had chickens before, so I am not married to the choices we made for the roost and nest box, and we left the run without amenities like an exterior roost because we want to watch the girls and come up with good, informed plans for semi-permanent coop fixtures.
If I had to change something, we would definitely have found a plan and worked from that. It was a lot of work and then redoing that work to finish this coop, but for us it was a matter of sitting around for a few weeks looking for the perfect plans or just jumping in and getting to work. We decided to just jump in.
Also, I had made planting choices for the perimeter of the coop before I built the coop, and now I am having to rethink that since the coop structure makes a lot more shade on the north and east sides than I was expecting.
Update
I thought I would give a brief update on the coop since it has been in use for about seven months now. The girls love their home; we added three new chickens, so we added a bit more roosting space. We started with a communal nest box, but decided to add dividers shortly after the girls started laying. Of course, the grass in the run disappeared quickly, but we added a couple of inches of mulch, and the girls love to scratch in it. After they have the mulch broken down into compost, we will remove it for use in the garden and add more mulch. I use the deep litter method in the coop, so I turn the litter once a day and then do a quick weekly clean of the coop (wipe down the roost bars, wipe any dirty spots from the walls, add shavings if necessary, etc.) With about 20 minutes of work a week, the coop stays clean and has no smell.
We sited the coop close to our house because our yard has no other shade. While we are planting fruit trees around the yard, it will be years before those trees can offer any sort of relief from the relentless heat of the summer. The house shades the coop, and the coop location actually works out perfectly because we are constantly going to visit the girls, get eggs, give the girls treats (i.e. vegetable scraps from the kitchen), and just watch them for entertainment. We keep the coop and run clean and there is no odor, so it works out great: we get the fun of having the girls close by for entertainment and they get the only shade around the place.
The two windows and the open screen wall are really keeping the coop cool and breezy so far (though the temperature so far has only been in the lower '90s; hopefully this will still hold when the real heat begins next month.) Having the coop off the ground so that area under it is open for the girls, is also really helpful. The girls hang out under the coop during the hottest part of the day.
Here are a few pictures from this morning:
We got 5 inches of rain this week, but with the mulch, the run does not turn into a mud pit.
The girls are constantly scratching in the mulch, so they incorporate their droppings into the mulch and the run doesn't smell.
A view of the extra roost space we added.
The nest box, with dividers added (and Rosalita, our broody easter egger).Thanks for looking at the coop.