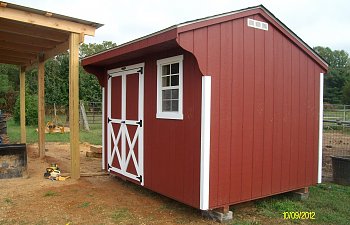
We are a military family, so we move often. We started into chickens recently, in the fall of 2010 while we were living in Oklahoma. In the spring of 2012, we had to move to Maryland, and have been slowly getting back into chickens again. We purchased an Egg Cart'n tractor, and while I love it, it does not have the capacity I need. So, we decided to build our own coop. It would be simple, right? After all, we've been married 16 years, and have built things together in the past. In fact, we had just built a 10Wx20Lx11H tractor shed together, and I had grand plans of adding a covered run and coop to the south side of it. But, after weeks of heated discussion, we decided we were better off purchasing something... So the hunt was on... And what an education - pre-built coops are extremely expensive! And they are single purpose, meaning they can only be used as a coop, which may not be that attractive to propspective buyers when we sell our property in a few years. We decided to stretch our dollar, and purchased a new 8x10 quaker garden shed, that we will gently modify into a coop (that way the next homeowner can use it as a shed or coop). And we want to use as much reclaimed/left behind supplies as we can.... So here we go!

Below: I bought the cheapest vinyl floor that I could find at Lowe's, which was a pre-cut 8x12 roll. It was extremely easy to work with. I made a rough measurement sketch on graph paper, and cut it out. I did not do the whole paper pattern routine. Seemed like overkill for chickens...
I decided not to spend money purchasing glue for the vinyl, and instead secured it using whatever 1/4 round moulding scraps I could find laying around at home, and whatever screws I could find.
I am using leftover nest boxes that we brought with us from Oklahoma. They are actually stacking bins that we bought at Lowe's. They work awesome, and are easy to clean when needed. BUT - I will still need to construct a slanted roof above them, otherwise, the hens like to roost on the edges, and poop all over in them.
Hanging roost - it is 10' long. Braced on each end, and suspended from the ceiling in the middle. I will probably put another roost in along the 8' wall, too. Again, I used stuff laying around, but I did make the roost level. Not sure it matters to the chickens, but it looks better to me...
This will be the chicken door. We used the same model in Oklahoma, and were totally pleased with the ease of use and performance. If it were an issue to walk into the run to lock/unlock it, then we would probably put in a traditional sliding/drop door.
Started working on the run this weekend... It will share a fenceline with the horse's dry-lot paddock/arena. So we had to take down a section of fence to put up the posts... removed 2 rotted wood posts and leveled the area, too.
We were impatient, and didn't want to wait for the posts to set completely in their concrete, so we had to start framing them. If we didn't, they would lean when we tightened the fence onto them with the tractor.
And this is how far we got this weekend... Enough fence put back up that the horses could go back in the drylot at night, instead of being locked in their stalls. The roof will be sheet metal. We still have a lot of work to do to get it completed...
More work done... We have it all framed and fenced in. Sheet metal is ordered, and should be here this week (Nov 26-30th). This fenceline is shared with the horse's area. So we put the fencing on the outside of the posts. That way the horses cannot push it in. All the lumber bracing the fencing was reclaimed from the raised garden bed the previous homeowner had on the property. We are not "raised bed" people - it's hard to fit a 45hp tractor with 6' implements into a 4' wide raised bed.... But anyway...
We even covered the angles with the woven wire. The remaining portions of fencing are sandwiched between the posts and the rails. That gave us a cleaner look, and allowed a flat surface to make it easier to attach the sheet metal siding that will be on the tractor shed.
We still need to come up with a way to cover the gap between the shed and the coop.... The angled "corners" will be completed this week using more 2x4 mesh fence and welded wire cattle panels cut to fit the width and height. I did not, anywhere in the run, bury any wire. I am 99% confident that digging predators are not a big risk with my LGD and critter-hating horses (they only love the LGD, anything else, look out!). Part of the reason we did not bury anything is because we KNOW we will be selling this property in 12-24 months. We do not want the next people to deal with buried stuff - we've been pretty frustrated at the amount of buried landscape fabric we've found so far.... It's great stuff, but not very forgiving when it comes to a change in plans with the ground above it...
These gaps I plan to fill with plain old 1" chicken wire, just because it will be easier to deal with up here.
And here's a look at the whole package so far... The sheet metal to enclose the tractor shed, sheet metal for the run roof, and all the trim just needs to be installed. Should go quick once it gets here...
And finally - we are done! Well, almost. Still a few more things to complete, but it is inhabitable as it is. Here are some exterior shots - I am headed out to take some interior shots. We ran out of white sheet metal trim, so there is some bare wood visible on the shed. We'll get it all enclosed as soon as the order gets here. We built this completely on our own, from bare ground to completion. Total cost for wood, concrete, sheet metal, screws and hardware was ~$2500. The 26g painted cut-to-length sheet metal was 75% of the cost. We saved approximately $5K by doing it ourselves - it is staggering how expensive the quotes were that we got from local barn companies.
View of the orientation of the tractor shed, run and coop.
View of the run from the horse dry lot and from the SE.
This is actually a 'bucket hook" meant for hanging water buckets in horse stalls. I have a ton of them, and really like using them to latch gates. To the right you can see the chain I have attached to the door into the chicken run. I just drop the last link of the chain over the hook to lock the door closed. I really like that it is a simple foolproof operation that even my kids can handle.
The "door" is nothing more than a section of welded-wire cattle panel, covered with 2x4 woven field fence and stapled to PT 1x3's using fence staples. It is extremely sturdy - enough so that I just attached the hinges directly to it. I also have a screen door spring on it so it automatically closes - great for forgetful kids or when my hands are full.
Another section of cattle panel and woven wire to cover the gap between the coop and run.
Hanging feeder and waterer, and bins for oyster shell and grit. And a chair for hanging out....
Inside the coop - water and feed - traditional style. I don't want to put too many mods or holes in the coop in case we need to re-sell it as a "shed". You can also see the roost in the background. I have not fully lined the shed with OSB yet. I ran out... But I made sure to cover all the "peckable" areas so nobody eats any insulation.
My Lowe's bins as nesting boxes. Cheap and easy. They are situated right by the door - I don't have to go in to get eggs.
The ceiling is also insulated, and I have 4 strands of LED C9 lights up, connected to a timer. I took advantage of the Christmas season, and liked the fact that they use 98% less energy.
Another view in the morning sun...
Hard at work making breakfast!
And this is the Egg Cart'n that I have 5 hens in. Five is pretty much the limit for it. I don't have issues with fighting because I move it 2x a day, so they are always busy munching on fresh grass. I do really, really like the design and the quality of the workmanship. My 60lb daughter can easily move it around!