My daughter had ben asking for chickens for almost a year. I'm a pushover but it took a long time for my wife to relent. We went and checked out some other chickens and coops in the area to make sure it was something we really wanted to do. Once deciding we were going to raise chickens I got the book "Raising Chickens for Dummies". It was great. I didn't do any other reading other than that and this site helped a lot as well.
Here we are unloading the lumber. I think I spent about $300 in my first run to Home Depot. I think I have spent about $700 total and it was a little more than I had expected.
I didn't make a plan at all and am pretty terrible with building stuff but I was just going for it regardless. I used the existing fence as one of the walls for the coop and run. I knew that I had 16ft between three posts so I just worked from that and made the whole unit 16ft long. It is 4ft wide and the coop is 4X4ft.
The roof plastic and translucent. It measures 8ft across. I used 2X4 inch black welded wire for the fencing. I ended up using some boards under the roof just in the coop portion just so my chickens wouldn't get cooked from the greenhouse effect.
Next up was the paneling. I just used the cheapest exterior paneling I could find since I was going to cover it anyways with siding. My three nest boxes here are 16in square.
The coop got vinyl tile for the flooring. A 12X20in hole to the ramp to leads to the run. I installed two roosts at different heights. The feeder there is a design I got from this site and has plexiglass at the front so I can see how much feed is still in there.
The door scared me the most for sure. Since I'm such a terrible contractor and my coop was pretty crooked already I had visions of my door opening and closing poorly with too big of gaps or not enough room. Somehow I pulled it off and the door works perfect. I just nailed a few 2X4s together and used a couple L brackets on the back so it didn't tilt on me.
Door on the outside of the coop big enough to throw a small kid into and make her clean it out. Also easy access to put a wheelbarrow under and just rake all of the bedding straight into it. See the wood slats on the roof. Good enough to not overheat my coop but still let light in I hope.
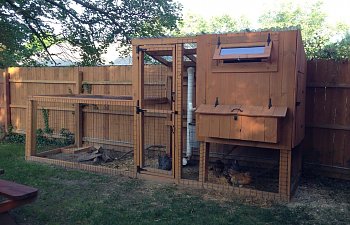
Finished product with siding on. I just used the same pieces that are part of my fence for the siding. I bought them as individuals at Lowe's and stained them the same color as the fence before installing them. The window up top is plexiglass and has a brace to keep it open in the summer. The lid on the nesting boxes has a thick piece of vinyl that runs along the entire seam to keep water from dripping in.
Total dimensions are: Run 16X4ft Coop 4X4X4ft
Chicks are here! They came from Meyer Hatchery in Ohio and they did a great job.
We got 4 chicks total. Two Easter Eggers and two Barred Rocks.
Our dog is scared to death of the chicks. I am sure the will be friends soon enough though.
16X16X20 inch dust bath in he corner of the run with playground sand.
Feeder made with 5 feet length of 4in drain pipe. it has a bucket screwed to the bottom. The bucket might be a little flimsy and I might have to replace it with a 6in pipe end cap if it won't hold the weight of the feed.
5 gallon bucket with automatic watering nipples at the bottom. I put it on an adjustable chain anchored to the roof because I'm not sure how tall they will want it and need to adjust it. The automatic watering nipples don't leak at all if you install them correctly. Just need a nut driver with the recommended size bit to get them in.