This is was a quick 2 day project that neede5d to be done because my chickens needed out of their brooder. They needed to get outside, but we were a long ways from finishing our big coop.
Here they are in their 2nd stage brooder in the garage.
Adorable
Surprivised time outside in the playpen
This way my first independent construction project (as simple as it was) and I did not have the proper tools so I am glad I did this it helped me gain confidence to work on our big coop and many other projects. Needless to say there are a few things I plan to change to upgrade this mini coop in the future so that it can be used as a sick bay or a broody hen nursery.
So here we go first I started with a crate and pallet I received for free from a company around us for free. The crate itself is
30" wide x 34" long x 32" high
This is one of the things I would have changed I used 2 pieces of scrap wood already angled to give the pallet roof system it's slope. It works because I added extra support later but it's not very professional haha! You can see I used sticky back vinyl floor tiles. I removed them later they were to slippery the wood chips would shift and then the chickens nearly fell every time they entered the mini coop.
Added some roosts,and the metal green roof was one 8ft sheet cut to about 45" in the future I would go to the local amish company and have them cut it to the size I need so I don't have extra
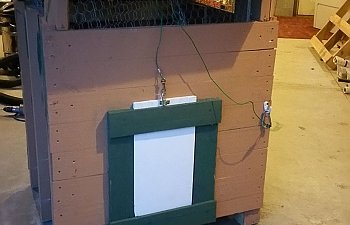
You can see I already cut an opening for chicken door and used an old shelf as a door with a pully action (completely unnecessary lol but the kids loved it)
Here you can see the opening I cut out for the access door
Making the acess door (a few oops but ya know you live and you learn)
You can see I used sticky back vinyl floor tiles. I removed them later they were to slippery the wood chips would shift and then the chickens nearly fell every time they entered the mini coop.
Added some roosts,a nd the metal green roof was one 8ft sheet cut to about 45" in the future I would go to the local amish company and have them cut it to the size I need so I don't have extra.
The roost on the right was way to close the the wall. I adjusted a center roost only later.
You can see the crew in here very crowded on the right roost.
Here is the chicken door pully opened with the pulley.
You can see i used chicken wire to close up the rest I left it open like that since it was summer. * I plan to replace this with hardware cloth when I do my upgrades and leave a smaller opening because It was overkill and rain could blow in if the wind was strong enough.
Tucked in for the first night.
I quickly put together a lil playpen area for them the next morning
I turned their coop around and expanded their run area since they were getting bigger. The mini coop and run area is right outside our bedroom windows so we would open them and toss food to them.
It's starting to get crowded is the Hespo-clucky Inn fished yet?
Not yet but here enjoy some slugs and worms from the garden
The boys served them and the chickens gobbled them up so fast.
Still waiting.. here guys chill out with some watermelon
Ok guys it's time... are you ready to upgrade to the Hespo-clucky Inn! ?
Moving on up!! Even if it wasn't completely finished they had more room.
You can find more pictures of the Hespo-clucky Inn on BYC I will post a link.
https://www.backyardchickens.com/a/hespo-clucky-inn-pallet-coop