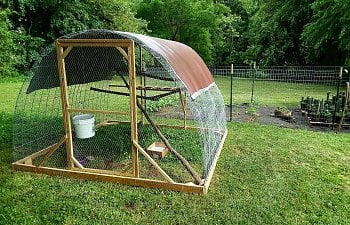
We use an 8.5'x8.5' cattle panel hoop coop to house our 4 Plymouth Barred Rock hens, Red, White, Blue, and Pink. I have about $250 in it to build. Maybe $300. We built it on a Sunday afternoon a week before our ladies were to arrive via post. We ordered them as 15 week old pullets, and they arrived safely in the beginning of June 2018.
This is the summer configuration:

We live in the Southern Appalachian Mountains on about half an acre of gently sloping hill. The lot is nicely 'pastured' with a mix of grass and plants the ladies love to forage on and there are nice mature trees that line most of the lot. The climate is fairly mild, but it does snow and get cold in the winters. It rains a bunch and can get windy during the winter, but overall not too bad. Predator pressure is fairly low here. We have possums, raccoons, foxes, and coyotes, but I haven't ever seen any evidence of them even checking out our coop. I think their numbers are fairly low since we live in the country, but it's fairly a well populated area (People like to shoot around here, let's just put it that way). The biggest threat is neighbor dogs and hawks. We have an unfenced lot, so it's hard to keep out the loose dogs.
On to the coop... There are plenty of "how-to's" out there for the basic building of a cattle panel coop and I didn't take any pics of the building process so I can really only show you the after shots. The coop is 103"x103", so roughly 8 and a half feet. It's about my height in the center, 6'1". I can move it easily by myself. Here is a brief list of the materials:
4 - 10' 2"x4" Pressure treated
12 - 8' 2"x2" Pressure treated
2 - cattle fence panels, 16' x 50"
1 - roll of chicken wire, 3'x100'
Plus hardware, deck screws, staples, branches for roosts, etc.....
To build it we laid the cattle panels flat on the ground and then put the cut 2x4's laying next to them. We fastened the cattle panels to the narrow edge of each the 2x4 with fencing staples, but only a few on the corners of the panels, and we left them loose. Once we were done with both sides, we bent the panels and moved the boards closer to one another. While my girlfriend was holding the far side 2x4, I bent in the other side and then screwed in the front and back 2x4. We then swapped sides and I screwed in the other side. So we now had a hoop coop, with a square base. We finished hammering in the existing staples, and added the rest of a one pound box of fencing staples. We cut the leftovers from the 2x4 for corner braces. The base and corner braces are screwed using 4" decking screws and 2.5" decking screws for the rest of the frame. After the base/hoop we framed up the door, the back support, added some bracing, added some climbing/roosting branches, a base for nesting boxes on the back wall, and built the door. This is the only pic I took during construction. But here is what she looked like before hanging the door and putting on the wire:

One thing I will note is that I decided to put the panels on the 'top' of the 2x4 base, as opposed to on the 'inside' of the 2x4 base like most "how-to" pages explain. It is secure and the staples have not moved at all through me moving it for the lat 6 months. It also adds a bit of head room, which is good for the taller folk, like myself. You can see what I am talking about by this picture below. Notice how the cattle panels are stapled down the center of the top of the 2x4 base, not on the wider inside part.

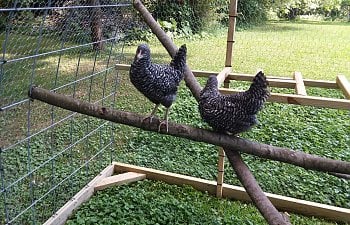
We added chicken wire and a tarp. The first pic below is right after I picked them up from the post office. Notice we hadn't got the tarp on yet. They did not like us putting the tarp on.... I would get it on before putting the chicks in. Just a heads up. I used maple branches, which became slippery over time so I put in some cross hatching with a branch saw for them to grip better.


------------------
In winter I rotate the coop so the front door is facing south. We removed the top tarp pictured above and folded it up for use next summer. Bought a larger one to replace it with and then moved the torn-up old tarp on the back further down to block the backside. If you'll notice in the below picture, we didn't secure the tarp along the base at the back. This is to provide ventilation. We stuff two upright bricks between the base and the tarp to give it good air flow.

After that we covered the hoop with a long section of 6-mil clear contractor plastic. This makes sure it is waterproof on the top and blocks the wind along the bottoms. We just had it weighed down with bricks for awhile, then it got real windy one night and blew off. The ladies were fine, but we needed to figure out how to secure it down better. I ended up taking a 4' piece of 2x2 and rolled it up in the extra plastic. I then screwed this into the base. I tried to take a pic of that below. It works really well. Haven't had any tearing or movement from it since. I only did a 4' section so we could still open the corners for ventilation on hotter winter days. Those extra ends are weighed down with bricks. It's not too windy here, but can be. If it were windier I would use bungy cords to hold down the back better, or even buy 20' wide contractor plastic and cover the whole thing better. It just doesn't get that windy here, so the fiber tape works good enough.

Here is the front. Two side pieces held on with a few staples at the door frame, and tape/stuffed under the tarp on the sides. A top door piece, stapled all around, and a bottom piece I open every day and shut most nights. Notice the vent area above the door. Sticks hold the clear plastic off a bit to leave it open for air, but not let any rain in. Again not too windy, so fiber tape works for holding it secure.

And finally here are the ladies wanting me to let them out instead of take these pics.

White on the left, Blue in the middle, Pink on the right, and you can see Red up in the nest box. Nice work, Red!
This is the summer configuration:
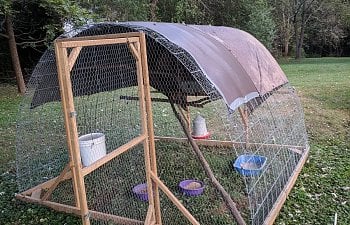
We live in the Southern Appalachian Mountains on about half an acre of gently sloping hill. The lot is nicely 'pastured' with a mix of grass and plants the ladies love to forage on and there are nice mature trees that line most of the lot. The climate is fairly mild, but it does snow and get cold in the winters. It rains a bunch and can get windy during the winter, but overall not too bad. Predator pressure is fairly low here. We have possums, raccoons, foxes, and coyotes, but I haven't ever seen any evidence of them even checking out our coop. I think their numbers are fairly low since we live in the country, but it's fairly a well populated area (People like to shoot around here, let's just put it that way). The biggest threat is neighbor dogs and hawks. We have an unfenced lot, so it's hard to keep out the loose dogs.
On to the coop... There are plenty of "how-to's" out there for the basic building of a cattle panel coop and I didn't take any pics of the building process so I can really only show you the after shots. The coop is 103"x103", so roughly 8 and a half feet. It's about my height in the center, 6'1". I can move it easily by myself. Here is a brief list of the materials:
4 - 10' 2"x4" Pressure treated
12 - 8' 2"x2" Pressure treated
2 - cattle fence panels, 16' x 50"
1 - roll of chicken wire, 3'x100'
Plus hardware, deck screws, staples, branches for roosts, etc.....
To build it we laid the cattle panels flat on the ground and then put the cut 2x4's laying next to them. We fastened the cattle panels to the narrow edge of each the 2x4 with fencing staples, but only a few on the corners of the panels, and we left them loose. Once we were done with both sides, we bent the panels and moved the boards closer to one another. While my girlfriend was holding the far side 2x4, I bent in the other side and then screwed in the front and back 2x4. We then swapped sides and I screwed in the other side. So we now had a hoop coop, with a square base. We finished hammering in the existing staples, and added the rest of a one pound box of fencing staples. We cut the leftovers from the 2x4 for corner braces. The base and corner braces are screwed using 4" decking screws and 2.5" decking screws for the rest of the frame. After the base/hoop we framed up the door, the back support, added some bracing, added some climbing/roosting branches, a base for nesting boxes on the back wall, and built the door. This is the only pic I took during construction. But here is what she looked like before hanging the door and putting on the wire:
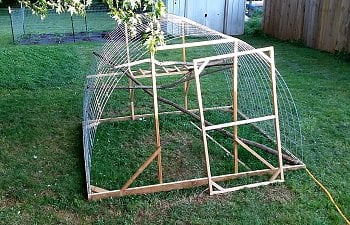
One thing I will note is that I decided to put the panels on the 'top' of the 2x4 base, as opposed to on the 'inside' of the 2x4 base like most "how-to" pages explain. It is secure and the staples have not moved at all through me moving it for the lat 6 months. It also adds a bit of head room, which is good for the taller folk, like myself. You can see what I am talking about by this picture below. Notice how the cattle panels are stapled down the center of the top of the 2x4 base, not on the wider inside part.
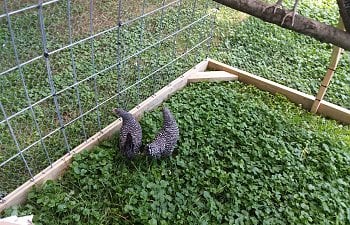
We added chicken wire and a tarp. The first pic below is right after I picked them up from the post office. Notice we hadn't got the tarp on yet. They did not like us putting the tarp on.... I would get it on before putting the chicks in. Just a heads up. I used maple branches, which became slippery over time so I put in some cross hatching with a branch saw for them to grip better.
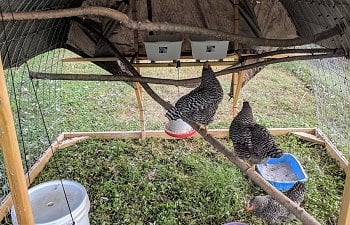
------------------
In winter I rotate the coop so the front door is facing south. We removed the top tarp pictured above and folded it up for use next summer. Bought a larger one to replace it with and then moved the torn-up old tarp on the back further down to block the backside. If you'll notice in the below picture, we didn't secure the tarp along the base at the back. This is to provide ventilation. We stuff two upright bricks between the base and the tarp to give it good air flow.
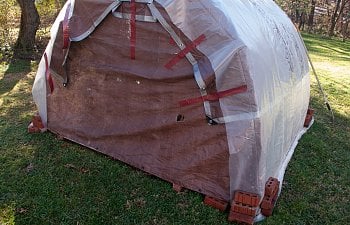
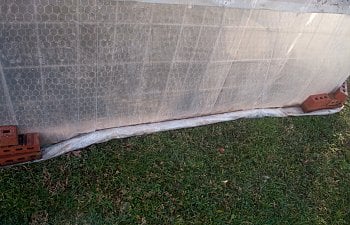
After that we covered the hoop with a long section of 6-mil clear contractor plastic. This makes sure it is waterproof on the top and blocks the wind along the bottoms. We just had it weighed down with bricks for awhile, then it got real windy one night and blew off. The ladies were fine, but we needed to figure out how to secure it down better. I ended up taking a 4' piece of 2x2 and rolled it up in the extra plastic. I then screwed this into the base. I tried to take a pic of that below. It works really well. Haven't had any tearing or movement from it since. I only did a 4' section so we could still open the corners for ventilation on hotter winter days. Those extra ends are weighed down with bricks. It's not too windy here, but can be. If it were windier I would use bungy cords to hold down the back better, or even buy 20' wide contractor plastic and cover the whole thing better. It just doesn't get that windy here, so the fiber tape works good enough.
Here is the front. Two side pieces held on with a few staples at the door frame, and tape/stuffed under the tarp on the sides. A top door piece, stapled all around, and a bottom piece I open every day and shut most nights. Notice the vent area above the door. Sticks hold the clear plastic off a bit to leave it open for air, but not let any rain in. Again not too windy, so fiber tape works for holding it secure.
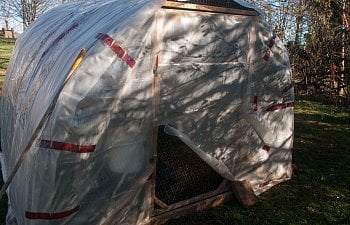
And finally here are the ladies wanting me to let them out instead of take these pics.
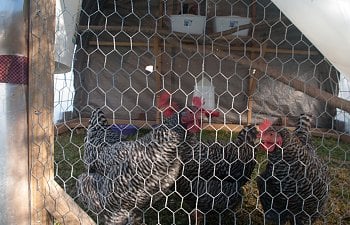
White on the left, Blue in the middle, Pink on the right, and you can see Red up in the nest box. Nice work, Red!

