I always wanted an aviary! Now I have a poultriary. Although I planned what I wanted to build for weeks, I never made a real 'plan'. Sometimes I just have to start sawing and hammering or I'll get so caught up in creating the perfect plan that nothing will ever get done. So, it may not be perfect, but it's mine!

The poultriary, aka 'outdoor coop' under the small deck has now become their run. I attached the coop and run to the exposed concrete of the walkout basement, so I can easily access the chickens, keep predators out with the concrete floor, easy cleaning, and it even insulates part of the water wall.
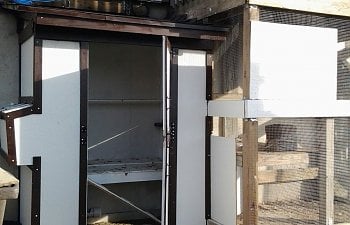
This is the frame of my coop of my enclosed coop. The run/aviary/previous coop I made with the much appreciated help of my youngest son. The enclosed coop is all me.

The main structure is 36" deep by 56" wide, about 67" tall in the front and 81" tall in back. The area under the porch is 54" x 7' and is enclosed this with hardware cloth and reinforced with reclaimed lumber. I had a fence gate laying around and added hardware cloth to it, then hung it from the existing deck post. The entry isn't tall enough for a person to walk in, but it is pretty darn secure. I researched like crazy and I know it is sort of small for 6 bantams, but the new coop has two levels plus the roost, and they have ready access to the outside poultriary whenever they want. The extra boards on the run are to provide shelter from North wind and Summer sun.
I had to rig some of the walls too keep maximum interior space. Not what I had hoped for, but some of the screws went in and would not come back out, so I just kept trudging along.

The previous owners had left me a generous supply of 4' X 8' particle boards. I'm not sure if they are outdoor rated, but I painted the crud out of them after verifying the fit. Simpson Strong tie screws allowed me to remove everything once I tested the fit. What wasn't recycled, like old boards from the collapsed deck or the particle board, I purchased from Home Depot, like the door handles, trim, paint to match the house, shingles, and gate hinges and latches.
Copper, my friendliest hen, (peeking out in the pic) was my supervisor and would fly in to check out construction. I think she actually wanted to see if those fingers had treats, and if those boards made nice perches. This shows the interior second story platform with the poop board, which is just a second board sitting on top of the platform and which is smaller so I can remove it easily. The PVC is my experiments with building a feeding system I can access from outside the coop.
--------------------------------------------------------------------------------------------------------------------------
Finished Product!
Well, I could add a few more bits of trim, and I want to replace the egg box/feeder cover because it is about 1/8 inch too short. I used Simpson Strong tie screws for building because I use them for everything. Yep, pretty much everything. I will get them painted to match the brown, which is spray paint from a can. The trim is 1/2" by 4". The blue cord is an outdoor extension cord I used to provide electricity for the heat lamp. I stole some of their outside space to install a hanging heat lamp by recycling their chick heat lamp, in an attempt to keep their water from freezing.
A close up of the open Dutch door. I made the doors from the same particle board, trim, and a second layer of smaller trim board around the inside to provide strength and cover the strong tie screws. I LOVE my Dutch doors. I have three gate latches, one at the bottom of the top half door, one at the top of the bottom half door and one at the bottom of the bottom half door to keep it snug against the bottom board.
I shingled the roof, which is 2" x 4" lumber about 4' long and angled so the fascia board could be flat. The ventilation at the top has construction cloth sandwiched between the main structure and an outer board, as well as being fence stapled to the outer board.
The chicken opening goes directly into the run. The angle of the ramp is sort of steep, even with the rails, but it is rather a tight space. I DryLocked the back concrete wall, the floor, and the wood that touches the concrete although it was already treated lumber. Every inch of wood is, or will be when Spring allows, painted on all sides with at least two coats of outdoor semigloss paint.
The heater system of their recycled heat lamp hanging from wires in the enclosed 'box' I stole from their outdoor space, to the left of the chicken opening. I braced the ramp with a couple of concrete landscaping bricks. The wire runs through a plastic tubing which was part of the packing for an outdoor carpet. The extension cord attaches to an outlet which turns on at 32ish and off at 40ish F. It is supposed to help keep the water from freezing and encourage the chickens to use the coop. It is sort of doing its job.
Below is of the egg access door open. I am using an old rubber feeding tub for their egg box. They got used to using it in the outdoor coop. I may get a second so they don't pig pile on top of each other when they need to lay an egg! The feeders I can access from outside the coop and add enough food and water for about a week. They ended up costing a lot! Maybe 60 bucks a piece, maybe more. Ouch! I used plumbing strap with, yes, Simpson Strong Tie screws, to keep the water tube in place since it gets heavy.
I need to readjust the angles on the feeders so the water cups sit better and the feed falls easier. I might paint them, too. The little roof helps keep the poop off the feeders and defines the egg box area for a hint of privacy.

The feeder system was supposed to go the other direction, water where feeder is and vice versa, but I wasn't confident about putting in the water cups so ordered them off Ebay. Unfortunately, it didn't specify they only came in the one direction, so I had to punt. So, the whole purpose of having the heater to keep the water from freezing didn't work since it is hiding behind the ramp . I adjusted the heater down a little and it worked better, but at -10 I don't think it will matter. I also need to adjust the angle of the waterer so the cups sit better. Given the cost I'm not likely to try to rebuild it any time soon! I might redo the feeder into a waterer next summer and switch them back the way I intended. The insulation layer put on by the seller was pointless, and removed by the chickens in short order.
Sand has worked so far for this inside coop. Initially I used sand in the outdoor coop but it became a disgusting, putrid pudding after it rained. I'll just let that stay concrete and spray with hose. I would like to put a dog door flap on their outside access and seal it up better, but it is OK for now. I think I need a window on the north side, since that is the only wall really big enough, but I need more how to on building a secure, tight window first.
If I were doing again, I would put in my own water the way I intended. Of course I would try to make it larger, but I like the size for just 6 little chickens. I would have painted all the 2"x 4" boards prior to nailing anything. And maybe I would have made fewer mistakes which kept me from doing other things the way I had originally envisioned.
I had a great time building this and am so happy with the way it turned out, even with its flaws! Now I just need to convince the chickens to use this new, fancy coop instead of freezing in the outdoors!