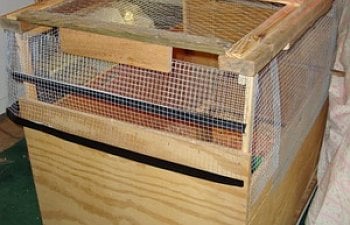
I got my girls before I built this brooder, so I used a cardboard box for their brooder when I first brought them home as three day old chicks in early November. However, I knew I was going to need something larger and more sturdy for them than a cardboard box, as they were going to need to be inside for a while, since I got them just as winter was heading our way. (I don't have electric out in the coop down the back hill, so they're staying inside until winter is well on its way out of here!) I used all scrap/leftover lumber and supplies. Here is a picture of the finished "second stage" brooder that I built recently, in one day.

I built the body of the brooder out of some heavy lumber panels that a friend had given me last summer. I had several large pieces that were roughly the same size, so I matched them up to make the sides and the front and back. The wooden sides are approximately 21" x 48" and the front and back are roughly 24" x 32". I wanted it to be about 3 feet tall, to prevent the girls from possibly getting out as they got bigger when I remove the top to take care of them, so I decided to add hardware cloth around the top of the sides to bring them up higher. The day I started building this was the same day that our 14 year old kitty passed away. I didn't take pictures during the actual construction, as I was concentrating on staying busy with this project to help work through/ease the loss of our dear Lucky, but I can describe how I put this together.
The brooder is located in the laundry room, and I started by putting an old shower curtain liner down on top of the laundry room rug, folded to be slightly larger than the brooder floor. On top of the liner, I placed a heavy piece of scrap lumber for the brooder floor, which measures 36" x 48". I had a leftover piece of linoleum that was just about the same size, and that went on top of the brooder floor. In this picture, you can see the shower liner to protect the rug, and you'll notice that the sides of the brooder simply sit on top of the brooder floor.
The wood panels I used to construct this are so heavy that I didn't feel the need to connect the sides of the brooder box to the floor. If the side panels had been thinner and lighter, I probably would have used some braces to connect the sides to the floor. You can't see the linoleum floor liner from outside the brooder, as it just barely reaches the inside edges of the box.
To construct the walls, I decided to use some scrap 2x2 lumber in the inside corners. This gave me something solid to screw into to join the sides together. I screwed the 2x2s to the end panel, then fit the end panel to the side panel, drilled the holes through the side panel, and screwed the side panel to the end panel, securing into the 2x2 in the corner. I did this in all four corners of the box.
I was going to need to some way to attach the hardware cloth around the top of the box sides. If I had had longer 2x2s to use for the corner connection pieces that would have come up higher than the wooden panels, I could have attached the hardware cloth to those. But all I had was scrap 2x2s about 10 inches long to use in the corners, so I added some garden stakes above the 2x2s to give me the added height I needed for attaching the hardware cloth. This next picture shows how that worked out pretty well!
I had some furring strips left over from another project, and used those to run from front to back on the sides, at the top of the garden stakes. Then I cut some hardware cloth and attached that to the panel extensions, and all this ended up giving me the height that I wanted. On the end panel, you can see that I did not attach the hardware cloth to the garden stakes. This was so that I could bend the cloth down, to make it a little easier to reach in the box for cleaning it out and for changing out food and water.
In order to keep the hardware cloth on this end up and secure when the lid was on the brooder, I attached an extra piece of wood under the edge of this end of the brooder top, and it holds the hardware cloth snug by tucking it under the end of the lid, as seen in this next picture.
You'll notice that I have some heavy duty black tape along the edges of the hardware cloth. I added that so that I wouldn't get snagged by the sharp ends of the wire when I was taking care of the girls! I simply pressed it firmly to cover the rough edges that I might come in contact with, and it's holding in place very well. I used Gorilla tape, which is quite a bit stronger and stickier than regular duct tape.
The removable top to the brooder is the same top I used on the cardboard box I had the girls in when I first got them. It was originally an access lid to a small outside pen that is no longer being used for anything, and while it covered the cardboard box with room to spare, it wasn't quite big enough for this new brooder. Instead of building a new lid, I simply added hardware cloth to the top of the brooder at the back end to cover up the space that the lid didn't cover, as seen in this next picture.
You can see the edge of an old bankers light in the bottom of the picture above. I have that light sitting on a little stool next to the box, to provide a nice bright light for the girls during the day. You can see the light a little better in this next picture, as well as see the heat lamp that I have over the brooder. Since the girls are bigger now and don't have the heat requirements they had when I first got them, the heat lamp is kept higher now, which also means I don't have to move it every time I take the top off the box! You can also see where I hung up some old sheets, to keep the dust they kick up off of the items I have stored on shelves in the back of the laundry room!
Speaking of heat lamps and heat requirements for the brooder, I have the neatest thing that a friend of mine gave to me when I got my baby chicks - an antique "Adjusto-Brooder" thermometer! It has markings down the side, showing what temperature the brooder should be kept for the first, second, third and fourth week, and I just love it!
One final thing that I added are a couple of roosts (or "jungle gyms" as I fondly refer to them for the babies!) which can be seen in the picture above. One is free standing which I built out of scrap wood that's about 8 inches off the ground, and the other is a garden stake that I simply ran from one side of the box to the other. It fits into cutout handles that were in the wooden panels I used for the sides of the box. Here's another view of the "jungle gyms", where you can also see the cut out handle on one of the sides of the panel.
So after waiting patiently for me to do the construction, the girls finally graduated ......
I'm pretty pleased with how this turned out, and definitely pleased that I didn't have to buy wood, wire or screws in order to build it, but made use of scrap and left over supplies that I already had on hand. It would have been easier and quicker to build if I had had longer 2x2s to use for the corner assembly of the side and end panels, for attaching the hardware cloth to give it the extra height I wanted. But you do what you gotta do and make do with what you have on hand! The end result is functionally the same, and it didn't take that much extra time to do it the way I ended up doing it. I might add a piece of wood across the top towards the back in a couple of weeks, and hang the other feeder I have from it. Once they are out in the coop they'll be using the bigger, hanging feeder (which I made last summer out of a large coffee can and a plastic houseplant drip saucer!) instead of the chick feeder. Hanging it in the brooder would give them a chance to get used to it before the move to the coop in the spring, so that there will be something familiar to them in the outside coop!
I built the body of the brooder out of some heavy lumber panels that a friend had given me last summer. I had several large pieces that were roughly the same size, so I matched them up to make the sides and the front and back. The wooden sides are approximately 21" x 48" and the front and back are roughly 24" x 32". I wanted it to be about 3 feet tall, to prevent the girls from possibly getting out as they got bigger when I remove the top to take care of them, so I decided to add hardware cloth around the top of the sides to bring them up higher. The day I started building this was the same day that our 14 year old kitty passed away. I didn't take pictures during the actual construction, as I was concentrating on staying busy with this project to help work through/ease the loss of our dear Lucky, but I can describe how I put this together.
The brooder is located in the laundry room, and I started by putting an old shower curtain liner down on top of the laundry room rug, folded to be slightly larger than the brooder floor. On top of the liner, I placed a heavy piece of scrap lumber for the brooder floor, which measures 36" x 48". I had a leftover piece of linoleum that was just about the same size, and that went on top of the brooder floor. In this picture, you can see the shower liner to protect the rug, and you'll notice that the sides of the brooder simply sit on top of the brooder floor.
To construct the walls, I decided to use some scrap 2x2 lumber in the inside corners. This gave me something solid to screw into to join the sides together. I screwed the 2x2s to the end panel, then fit the end panel to the side panel, drilled the holes through the side panel, and screwed the side panel to the end panel, securing into the 2x2 in the corner. I did this in all four corners of the box.
In order to keep the hardware cloth on this end up and secure when the lid was on the brooder, I attached an extra piece of wood under the edge of this end of the brooder top, and it holds the hardware cloth snug by tucking it under the end of the lid, as seen in this next picture.
The removable top to the brooder is the same top I used on the cardboard box I had the girls in when I first got them. It was originally an access lid to a small outside pen that is no longer being used for anything, and while it covered the cardboard box with room to spare, it wasn't quite big enough for this new brooder. Instead of building a new lid, I simply added hardware cloth to the top of the brooder at the back end to cover up the space that the lid didn't cover, as seen in this next picture.
You can see the edge of an old bankers light in the bottom of the picture above. I have that light sitting on a little stool next to the box, to provide a nice bright light for the girls during the day. You can see the light a little better in this next picture, as well as see the heat lamp that I have over the brooder. Since the girls are bigger now and don't have the heat requirements they had when I first got them, the heat lamp is kept higher now, which also means I don't have to move it every time I take the top off the box! You can also see where I hung up some old sheets, to keep the dust they kick up off of the items I have stored on shelves in the back of the laundry room!
One final thing that I added are a couple of roosts (or "jungle gyms" as I fondly refer to them for the babies!) which can be seen in the picture above. One is free standing which I built out of scrap wood that's about 8 inches off the ground, and the other is a garden stake that I simply ran from one side of the box to the other. It fits into cutout handles that were in the wooden panels I used for the sides of the box. Here's another view of the "jungle gyms", where you can also see the cut out handle on one of the sides of the panel.
So after waiting patiently for me to do the construction, the girls finally graduated ......
I'm pretty pleased with how this turned out, and definitely pleased that I didn't have to buy wood, wire or screws in order to build it, but made use of scrap and left over supplies that I already had on hand. It would have been easier and quicker to build if I had had longer 2x2s to use for the corner assembly of the side and end panels, for attaching the hardware cloth to give it the extra height I wanted. But you do what you gotta do and make do with what you have on hand! The end result is functionally the same, and it didn't take that much extra time to do it the way I ended up doing it. I might add a piece of wood across the top towards the back in a couple of weeks, and hang the other feeder I have from it. Once they are out in the coop they'll be using the bigger, hanging feeder (which I made last summer out of a large coffee can and a plastic houseplant drip saucer!) instead of the chick feeder. Hanging it in the brooder would give them a chance to get used to it before the move to the coop in the spring, so that there will be something familiar to them in the outside coop!