
In a few days, I'll be getting some laying hens from my sister along with a couple of Guinea keets! Since I didn't have a chicken coop, I had to design and build one (by myself). It's been an interesting process for someone with very few tools and very little clue as to what she was even "doing"!
There are some pretty elaborate "hen houses" out there on the Internet (complete with mood lighting, restrooms, skylights, and snack bars - or so it seems, lol), and while mine could have been "better", I'm still quite proud of it! I thought some of you might like to see it!
Since I'm working on a fixed income, I had to keep the cost as low as possible. Please keep in mind that the only tools I had for this project were a hammer, a circular saw, a tape measure and a screwdriver...oh, yeah, and my "brain" with it's limited understanding of construction.
")
The idea was to create a portable, low maintenance unit, for up to 6 hens, that could easily be moved from one place to another around the property. What I've constructed (and I use that term "loosely"), however, is a bit...okay, a LOT heavier than I was hoping for...so, if you (and 5 of your buddies) happen to be around in the spring to help me move it out back...uh, please stop by!
With your truck.
And...a winch.
The First Day...first steps of framing: I spent more time sitting and staring at the wood than actually "touching it"...trying to mentally "work out" how I was going to pull this off. I wanted to utilize the standard board widths and lengths to avoid as little scrap as possible, so the 2'x4' "coop" with attached 1'x4' nest box will be suspended over a run of 4'x8'. Doesn't look like much here...this is after the sides are built and stacked up to cover in case of rain that night.

The Second Day: With the help of my youngest son, we stood the sides up and started "putting it together". I highly doubt anyone could do this part without someone to help "hold stuff". Thanks, son! He also put up with my frustration and took orders like a champ (well, mostly) while cutting boards to my specifications. The roll of wire shown below is the green, vinyl-coated fencing - I got the 50' roll, 36" high, for $32. Chicken wire bends/breaks easily and rusts out really quickly. Not a good choice (for pretty much anything).


Day Four - beginning of nest boxes, roof and some paint: Before adding anything more, I moved (er, drug the structure inch by inch) over to the edge of the driveway and placed it on somewhat level ground where it will remain through the winter (easier for me to access during the cold, windy months and will provide a bit of extra wind protection/shelter in this location for the birds). Luckily, we have lots of scrap lumber around, so I used these old fencing panels for the nest boxes and layered them on the roof as well. For the floor of the coop, and between the staggered layers on the roof, I tacked down large scraps of pond liner. This will protect the wood, keep the rain out and make it easy to clean up the floor inside. Some people use linoleum over the floor.


Next time, I would use 2x2's for the framing and a more lightweight material for the sides and floor. Also, I would attach the framing with screws rather than large nails (so they won't pull apart when moved). One "smart" thing I had chosen to do was use hinges with removable "pins" so that I can easily remove an entire door if needed (for any reason) without having to unscrew the hinges and re-attach them.
Edited to add: I forgot to mention there is some "natural" ventilation here and there where some boards didn't fit snugly together and also between the first row of three fencing panel boards layered on the roof (about 3/4 of an inch in two places on each "side" of roof). It is staying perfectly dry inside though, even with heavy fall rains, YAY! Depending how "hot" it gets inside during summer, I might add a "shutter" near the top somewhere that I can close and latch over hardware cloth. More than likely, though, I'll just move it (ha, "move it"?, yeah right!) under a shade tree in summer.
Edited to add - The hens are here! I have a gorgeous Buff Orpington, a Barred Rock, a Rhode Island Red and a Black Australorp! They are SO fun to watch
 They seem very content in the coop/run - maybe a bit spoiled too! Already laying in the nest boxes but tapering off now that cold weather and molting is happening.
Edited to add a link to the "Summer Digs" I just made (April 2014) that is actually a PORTABLE tractor. Used entirely reclaimed materials for this, except for the staple-gun staples. So the whole thing cost the same as a box of staples.
https://www.backyardchickens.com/a/summer-digs-tractor-coop-using-100-reclaimed-materials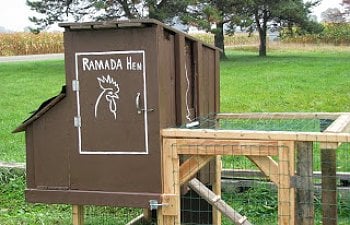
")