I have been gardening and growing fruit/fruit trees for several years. My wife generally tries to make sure I don’t go too far overboard and turn our very visible .3 acre corner lot in the suburbs into a farm or orchard. So when she suggested that chickens might not be a bad idea I took that as permission to start planning a coop.
We live in southern New Jersey near Philadelphia so our winters are mild compared to many places, but we typically see lows in the single digits for a few nights and possibly as low as slightly below zero every few years. In the summer we have many days in the 90s and an occasional day over 100.
We started with 4 hens but wanted to have room to expand slightly in the future. We also have limited space and being on a corner lot across the street from a busy playground and park we wanted the coop to look good. Our requirements were:
1. Curb appeal
2. Room for 4-6 chickens
3. Easy to clean, water, and feed
4. Rectangular shape to fit our property
5. Secure from predators
6. Good for hot and cold weather
I started the design based on what has worked well for my parents on their small farm in Virginia. The chickens there enjoy having a run under the coop and an attached run. The picture below is from the back of the coop, and also includes their ‘summer’ run that can be moved around.
My parents' coop.
After finding BackYardChickens I discovered the Wichita style coops. They look good and their shape and size work well on our property. After I started designing the coop I read about open-air coops and really liked how their open design ensured abundant fresh air. I didn’t have the space to build a Woods coop, but I wanted to adapt the idea of an open coop to the Wichita style. Having lived in an apartment some years back that had large windows, but only on one side, I came to appreciate just how little air will flow through openings when only one side of a structure is open. I decided to adapt the Wichita design to have the back mostly open. Skipping ahead a few steps, this is a picture looking through the open front doors to the open back of the coop.

Looking through open front doors to the open back.
Reading about Woods coops it seemed like they are sometimes treated not as a concept (i.e. coops open on one side that allows fresh air but not drafts), but as a design that had to be replicated exactly. I am sure the Woods design works very well, and most likely better than mine, but it seemed like there should be a way to adapt the principles to a different design. The coop area in my design is 5’ 4” deep and 5’ wide. Since I had no experience designing coops or raising chickens, I decided to test it and see if windy days caused any significant air movement in the coop. The testing was a bit involved, but the basic answer is no matter what direction the wind blew from, and no matter what the speed (up to about 20 mph that we had while I was testing) there was no significant air movement on the roost. A speed of 1 mph (as registered by this sensor) was noticeable to my bare hand, anything below that I could not feel, so I assume it would not disturb chickens. Only 14 of the over 35,000 data points taken over about a month exceeded 1 mph.
To measure the wind speed I used a Hotwire anemometer, which was read by an Arduino micro-controller connected by USB to a Raspberry Pi to record the data and connected to Wi-Fi so I can read the data from inside.
The plots below show over 35,000 data points from the hot wire anemometer sorted by the wind direction at the time (taken from my weather station) and the wind speed in the coop. These data points represent the maximum gust within about a 30-second sample. To give an idea of what the speed was like during testing there is also a plot of the 10-minute wind gust speed measured at my weather station versus wind direction for the same times the readings were taken inside the coop. My weather station sits about 30 feet from the coop, so should give a decent idea of what the winds are at the coop.

Picture of the test setup and wind speed data
I took measurements in the coop with the sensor in both a vertical and a horizontal orientation (at different times). The sensor orientation did not affect the readings much.
Assuming that I am right that a 1 mph wind speed is what it takes to ruffle feathers and cause chickens to get cold, it seems like this design should provide adequate protection. If it looks like there are any problems with the design after the chickens live there I can also always cover the back openings during the winter and add more traditional ventilation. I also plan to leave the hot wire anemometer in the coop permanently along with a temperature and humidity sensor (in an encloser), so I should have additional data in the future.
Now to cover the construction. Construction started in July the summer before we wanted to get chicks in the spring. It took until the next spring to finish it (working slowly as I had time). There are many cheaper and easier ways to build a chicken coop, but I enjoyed the project and I think it turned out well in the end.
The first step was to draw some basic plans; these plans show the basic dimensions and are attached to the article.
The spot where we built the coop is in the corner of the property next to our existing garden shed. Our lot is much longer than it is wide, so the house is about 150’ from the coop.

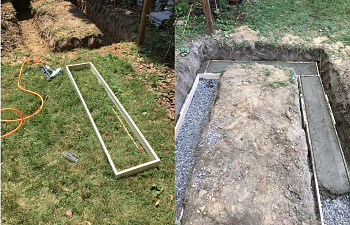
Location and foundation construction pictures
I decided to use a CMU block foundation to ensure nothing could burrow under the coop and also provide a rot-proof base to fill with leaf litter and other compost material as part of the deep litter method. Construction started on the hottest day of the year by excavating a trench using a shovel for a footing (not something I recommend doing on the hottest day of the year). The coop is 12’ long and 5’ 4” deep, which is 9 by 4 CMU blocks. This was a reasonable size for the location and did not require cutting blocks.
As an aside for any gardeners, I had to relocate a two-year-old Illinois Everbearing Mulberry tree from the hole in the picture above. I had planned to just cut it down, but that day it had a delicious berry on it (the first ripe one not eaten by the birds). The process of moving it caused it to lose all its fine roots and it looked like a bare root tree. I trimmed off most of the branches and watered it frequently for a couple of months and amazingly it recovered completely and is doing well. Sometimes you can break all the rules and get away with it.
Next, I made forms out of 1X4s for the concrete footers. This was an easy way to level the CMU blocks. The footings are at a depth of about 18”, which is less than the required frost depth code of 3’ that is typical for most towns in the area but is below any recent frost depths. Sometimes I had to remind myself that it is only a chicken coop.
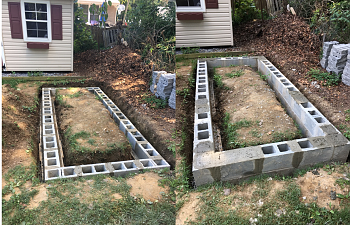
Next up were two courses of CMU blocks to make the main foundation. I filled in some CMU blocks with concrete so I could put anchor bolts into them later to hold the coop structure to the foundation. I had leftover Techo Bloc wall units from building a knee wall around my patio, so I added a course of them to raise the foundation up more, close the top of the CMU, and provide a nicer look. Next, I painted the CMU to match our house’s foundation and make it look a bit better.

CMU block foundation
The next step was to start painting. I used pressure-treated 2X6s as the base for the wood framing. I probably should have let them dry longer before painting them, so I will not be surprised if I have peeling problems in the future. I painted most wood before I put it up. This took time but was much easier than painting after it was constructed. Unlike a shed, most of the wood is exposed in a completed coop, so it makes sense to paint or treat all of it. I used a paint sprayer I had around which made quick work of the painting, but made a mess of my lawn and wasted many times more paint than using a brush would have. I had a bunch of leftover paint from painting my house that was due to be used up, so it worked for me, but I would not necessarily recommend buying a sprayer for this job.

Painting pressure treated 2X6s.
In building the 2X6 base I was careful to leave an opening where I planned to put the door to the run. I used expansion bolts to secure the 2X6s sill into the concrete-filled CMU blocks. It is a good idea to wait several days after pouring the concrete before drilling it for bolts so that the concrete has time to set up. I managed to use my corded drill to drill the holes in the concrete using the hammer feature and a concrete bit. The drill got pretty hot while doing it though, so renting a higher power drill would be a better idea.

Expansion bolts, bottom frame, and some ‘help’ from my son inspecting my work.
I have always built walls in the more traditional manner of putting studs perpendicular to the footer, but I decided to try the approach others on BackYardChickens.com have used on their coops. I liked the fact that it leaves more open areas and it left plenty of room to attach hardware cloth later. In order to attach the studs to the base, I used nail plates attached with screws in addition to some toenails (the toenails held things in place so I could attach the plates). The corner studs are also screwed together.

Framing attachment detail
I started framing on one side and worked my way around. I checked plumb frequently but didn’t need any temporary bracing. Starting with the 2X6 corners helped to brace things.

Framing always goes quickly and makes you think you are close to done.
I decided to run the roof joists the long way. By the time I actually started framing I had already purchased and painted the 14’ 2X4 roof joists. If I hadn’t I probably would not have done the roof this way and would have had the joists run front to back as is more conventional. Either way works, but front to back would have been easier.
Roof joist run the long way.
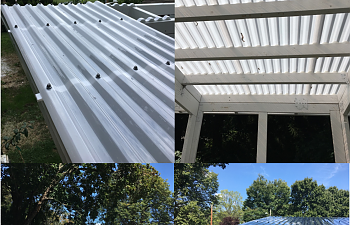
The next step is the roof. I added some more blocking to support the front and back 14’ 2X4s and added a drip edge around the whole perimeter (it is cheap and easy to put on). I picked the Tuftex product for the roof because I liked the semitransparent option to let light in without creating a greenhouse. Building a conventional roof with plywood and shingles was not going to be much cheaper, but this was one of the more expensive parts of the project. The panels are installed over shaped foam strips using special (and expensive) screws with rubber gaskets to keep out water. The panels overlap and go up pretty quickly.

Roofing progress
At this point, I decided to jump-start the deep litter method by adding my leaf compost from the previous year. My compost pile is always a mess since vines from the other side of the fence in my neighbor’s yard send roots throughout the pile as soon as it gets useful, which makes it very difficult to dig. Hopefully, they won’t find their way under the footings and into this pile.
Starting the deep litter method early.
For the open areas of the run, I decided to use ¼” hardware cloth. I liked that it was smaller and would keep out more small animals, but it is also not nearly as strong as the ½” cloth. I purchased it off of Amazon, so once it came I was committed (the price on Amazon was much better than I could get locally though). One benefit of the ¼” cloth is that it is very easy to cut. After seeing videos of people using grinders to cut hardware cloth and having used ½” cloth for other projects I was concerned about how I was going to cut large quantities, but the ¼” cloth cuts easily with tin snips. I never needed to get out my grinder.
I secured the hardware cloth using stainless steel staples driven by a pneumatic stapler. Even after adjusting the stapler, I could still put a staple straight through a single strand of hardware cloth wire, so I tried to hit the corners and cross two strands. I put lots of staples in, plus I added a strip of wood over it in the end, so it seems pretty secure.
The next step was attaching ¾” plywood to the outside and floor of the coop area.
More help, this time from my daughter.
Next, I used more ¾” plywood to build out the nest boxes and cover the coop walls. The nest boxes were designed so that the door would swing down. The goal was to make it easy for the kids to look in and collect eggs. The nest box dividers were attached by screwing in from the top and bottom.

Next box and plywood detail
It is September now, but at least it is starting to look a bit like a coop! I also planted a cherry/plum cross fruit tree near the coop. I knocked one of the three main branches off when I dropped a piece of plywood on it, but it seems to be recovering.
More help testing out the structural integrity of the floor
In order to keep air from flowing through the coop when the windows are closed, I used blockings and caulk to seal up all gaps on three sides of the coop. Note also that I spray painted white the nail plates and hurricane ties to improve the appearance.
Copious amounts of caulk are used to seal gaps on three sides.
Next, I applied the hardware cloth around the whole coop.

Hardware cloth attached to the coop and run.
I used plywood for the coop doors with 1X2 trim. Shed hinges attach the doors to the coop. Working alone I used the shims on the bottom to create a gap while I screwed in the hinges.
The coop doors have a shed-style key lock to keep out predators. You can purchase the locksets and shed hinges on Amazon. The lock holds the two halves of the doors together in the middle and one side has bolts that go into the floor and trim at the top of the door to hold the top and bottom securely. I also added bolt latches at the top and bottom of the outside of the door later to hold the doors securely together and close any air gaps. Without these, the doors were warped a bit and there was an air gap.

Coop door details
I put two roosts in the coop section using 2X4s with their wide side up. I also put in a 1X12 as a poop board under the top roost. Also, note the 1X10 board directly behind the door opening in the picture on the right; this will prevent the bedding from falling out when the door is opened. Because of the bottom bolt for the door, I had to make a 1X10 board fit loosely so I could push it back to undo the lower bolt.
2X4 roosts and poop board.
Next, I made the windows for the coop section. I used 1X2 trim boards for the frame and Lexan for the glazing. I routed (poorly since I was too cheap to buy the right bit) a roughly ½” wide by ¼” deep section of the 1X2 before cutting the frame pieces. This resulted in a space on the back of the window frame that I could place the Lexan and then drill through and screw down the Lexan to the window frame. Screw holes are countersunk to allow the window to sit flush with the wall.

Window construction details.
I also used super glue to glue small strips of wood onto the Lexan to make false muntins.

Window muntins made with small pieces of wood glued to the glazing.
For the human door into the run, I decided to make a Dutch door in order to allow the kids to give the chickens treats (veggies from the garden, weeds, etc) without opening the full door and letting the chickens out when we don’t want them out. I built the door in place by first attaching the hinges and then building it out. I used a combination of L brackets, screws, nails, and 2X2 bracing strips to create a secure door. If I had to do it again I would make the door narrower. Having a 36” wide door makes the door less rigid and is not necessary.

Door construction pictures.
For the door hardware, I used two bolts on the top and bottom half of the door and one bolt to hold the door halves together. I plan to use a carabiner to add additional security to the bolts closing the door.
Picture of the completed door with hardware.
It is October, and the next step is to finish the outside of the coop. I chose to use low-grade cedar shingles for this. My reason was that the shingles were one of the least expensive sidings I could find. I had to sort through the shingles and throw out about a third due to splits, holes, or because they were misshapen. Also, the final look is rougher than shingles on a house are supposed to look, but – again - it is only a chicken coop. The shingles did take longer than other siding methods, but I ended up really liking the look.
I primed the shingles before putting them up. To do this I created a rig by using a 2X6 and running my circular saw up and down it with the blade set to about a ½” depth. This worked pretty well and allowed the shingles to stand up while they dried.
Shingles drying in rigs.
The next steps were waterproofing. Most of this was overkill since it is just a chicken coop and the plywood is well sealed and painted but I had most of these materials left over from my home renovations and they don’t hurt.

Waterproofing of the coop outside wall.
Shingles were next. I put these on both sides and the front of the coop section.

Shingling the side and nest box of the coop.
Open nest box trim and removable blocks. Note the gap between the front trim and the floor of the next boxes to allow them to be sprayed clean.
Partially completed shingles at sunset.
Shingles on the run side of the coop and the water tank holder with a hinged top.
On the inside and outside, I added more trim and I added hardware cloth over the windows to keep out predators. I also covered the edges of the hardware cloth in trim to prevent chickens from injuring themselves.

Nest box and window trim.
I covered the 2X4s on the outside with 1X4 furring strips. These are much less expensive than 1X4 trim boards and (repeat after me) it is only a chicken coop. For the larger 2X6s, I used ledger boards that are very rough cut wood. They were tough to paint, but a fraction of the cost of 1X6 trim boards; also added to the rustic look.
Outside trim detail.
I added some of the shredded fall leaves (and the pumpkins) to build up some litter. I was surprised how much the leaves compressed over the winter even though they were in a covered run.
The opening for the chicken entrance to the coop was cut out of the plywood and framed by leftover 2X6s. The door itself is made of 22/32” (0.69”) plywood. I made rails to guide the door out of 1X2s, which are ¾” thick. This created a nice pocket for the doors to slide up and down in. Over the 1X2s I added wider 1X3s to keep the door in place and allow it to slide up and down. Note that the bottom of the door is mostly open and only contains blocks to stop the door from falling to the coop floor. This opening allows shavings and other junk to fall through and not collect and block the door from closing. The door also slides below the opening to make it difficult to open from the run side. From the run side, I can’t open the door without using some sort of tool, so I am hoping any predator that makes it into the run also can’t open the chicken door. Outside the coop, the rope is tied down.

Chicken pop door details
I also built a ramp using a 1X8 ledger board. I cut many short pieces of the same type of board and attached them with brads to give the chickens traction walking up and down.

Chicken ramp and attachment
Somehow it got to be December and started snowing. Progress on the coop slowed considerably since I had to wait for nicer days to do anything and painting outside was impossible. It is starting to seem like a really good idea I started this project back in July.
December snow.
I failed to take pictures of the construction, but in the above picture, you can also see a chicken door from the run to the yard. We are not sure how much we will let the chickens free range yet, but it was easier to add this now than later. Our neighbor’s chickens free-range most of the day, much of that time in our yard, but being on a corner lot with no fence also makes us much more exposed to the road.
Not much work happened in January, but there was one warm day (77 degrees!) in February that allowed me to complete shingling and put on the gray paint. The paint is leftover from painting my house and nicely matches the house (eventually I need to paint the shed you see in all the pictures to match the house too). I also added a flowerbed in front of the coop and transplanted a bunch of spring bulbs and Calla Lilies from another bed I was moving.
March was the second snowiest March on record for Philadelphia (records go back to 1872). Almost all our snow came in December and March this season.
Gray paint applied (trim not painted yet). During the fourth and final March snowstorm.
In between snows I was able to run the electrical to the coop. I ‘needed’ electrical for the heated waterer I put in described above. I also ran two lights and an outlet in the coop for the mama’s heating pad while they are chicks, and for a camera and temperature/humidity/wind monitoring equipment later. I ran the wire in conduit almost everywhere except a few inches to connect to the lights. The goal was to keep it secure from curious chickens.

Electrical Installation Details
Spring is almost here and the structure is all done.
While working on the trim and shingling I also added the structure to hold the water tank. I used shelf brackets to support the tank box. I followed the instructions here to create a heated water container and distribution to nipples. The heated waterer uses vertical nipples, a pump to circulate water, and a small heater in a cooler. I modified the design some to run water into both the run and the coop. I ran water into the coop to allow them access to water when they are closed on very cold days. It was challenging to get all the pipes together so I think I would skip the water in the coop if I had to do it again.

Water system details
All the plumbing plus a feeder inspired by one of the many articles like this one.
No mess 5-gallon feeder.
The final step was to paint the trim and other miscellaneous areas and use FlexSeal to coat the inside of the coop so I could use a modified deep litter method in the coop and not worry about rotting the wood. FlexSeal cost $30 for a quart, but it seemed a lot easier than linoleum and easier to put on the walls as well. I thought I would be able to get away with 1 quart, but it took two. I also painted the inside of the nest boxes purple (reusing paint from a door). The idea was to make them dark and cozy.

Flex seal and dark painted nest boxes
I added gravel behind the coop to stop water/dirt from splashing up on the coop. I should have modified the roof a little and had it overhang enough to add a gutter. Stone seems to work well though and is the method recommended by shed manufactures.
The stone behind the coop to stop water/dirt from splashing on the coop.
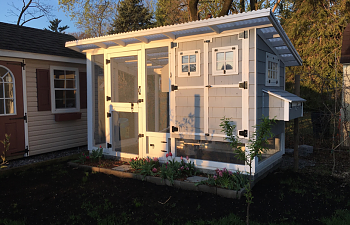
View from the back with the light on, all ready for chicks.
Chickens! I hear this is all about chickens. Finally, after 10 months of coop building, we bought 4 Plymouth Barred Rock hens (hopefully) on April 26th. I got them from a local(ish) supply story, Animals and Gardens Unlimited in New Egypt New Jersey. They had a good selection of good-looking chicks. I decided to move them directly into the coop since temperatures were getting warmer and we had the ‘Mama Heating Pad’, which you can find more than you ever wanted to know about in this thread with over 1100 pages of posts as I write this. I ended up adding a heat lamp too since on the first day the chicks were not leaving the heating pad to eat and drink. It probably wasn’t necessary, but it warmed up the whole coop and got them out and moving around.
Welcome home chicks!
Someone is peaking at the new family members.
Time to play!
In the end, the project was a lot of work, but the chickens seem to be enjoying their new home and I feel good about building it strong.
I always learn something from every project. If I did this one again I would:
- Build the roof with Front back roof rafters
- Make a more narrow human door
- Add a gutter to keep water from splashing
- I will still have to see how winter goes, but the open back makes a very airy coop
- Tuftex roof lets in lots of natural light and makes for a really bright coop
- Cedar shingles provide a nice look and were fairly cheap
- The Dutch door allows easy access to the run without letting chickens out
- The heated waterer and no mess feeder work well