Here is our coop. It is approximately 7x8ft.
This is the view of the coop from the doorway. Their little chicken door is what you see in the back on the wall, and their nest boxes are on the right.

This is the view from the wall in the back.
These are our nest boxes. They are over 100 years old. They were given to us about 10 years ago by someone we knew who was about 60 years old at the time, and he said his grandfather had made them for his chickens It has 3 rows of 5 nest boxes. We only use two of the rows. Each nest box is approximately 11x11 inches on the inside. My chickens absolutely love these nest boxes.
These are the roosts. We use the standard 2x4's for our roosts, and they work great!
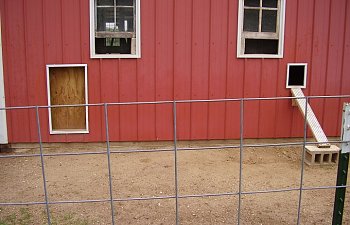
and this is the view from the outside. (on the right is the chicken door and their ramp, and on the left is a goat door that we will be turning into a small chicken door with a ramp like the other one).
This coop is a little on the small side, but it has been working good for my 15 free range chickens. In the winter it gets a little crowded though.
We have 9 new chickens and are in need of a bigger coop, so this is what we have been working on. This used to be a goat pen. The door is made of solid oak for horses and goats. The wiring is made of double layered cow fencing panels that we used to use for our goat yard. The holes on the fencing were about 5x7 inches, which is why we made two layers of the wire.
A better view of the door. (On the left you can see the door that leads to our original coop)
The lighting up here is terrible, so the photo isn't the greatest. But this is the top part. We did the same thing with the cow panels up here.
As you can see from this photo we used zip ties to connect the two layers of cow panels together.
This is the lock on the door. It's made from a large nail bent at the top and two blocks of solid oak. This is what it looks like when the door is unlatched.
and this is what it looks like when it is latched. There is a hole drilled through the block and through part of the wall. So when you slide the nail in place it can't come undone. We used to have horses, and we needed a sturdy door with a latch design that was strong enough that the horses couldn't bust through it. It's a really neat door, which is why we will still be using it for our chicken coop.
This is the top part of the door. The door comes in two parts. A top and a bottom, which gives you easy in and out access. This latch is made with a bent large nail like the other, but this latch is a little different. This is what it looks like when it's latched.
and this is what it looks like when the door is unlatched. The nail slides up and hooks on the screw so you don't lose the nail.
and this is what it looks like when the top door is open.
This is the chicken door that we made. It measures approximately 9x11 inches, and the door is 12x11 inches.
This is what we use for the handle of the door.
To keep the door open I use a bungee cord.
Then I hang the other side of the bungee cord on the wall by a screw.
This is the ramp that we made for the door. It is made by 2x6 board and we stapled gutter strips to it to use as grip for the chickens feet.
We made this ramp match our other one.
We also moved our antique nest boxes into the new coop.
These are the PVC feeders we made We made these because we have been having some problems with feed waste. We used 4" PVC with a 45 degree angle for the bottom. These feeders measure about 2 and half feet tall. We bought all of the supplies from Home Depot for about $18 per feeder. We were still having some problems with waste, so we set the feeders on some bricks and then I cute little half circles of cardboard and duct taped those on the front. (I will try and get some pictures of that another time)
These are the roosts that we made. We made these out of 2x4 boards just like the other roosts.
The chickens seem to really enjoy their new coop. It has more space (which they love) and it has much more ventilation and view.
We also temporarily turned the old coop into a chick grow out pen. I currently have my 2 month old pullets in here until they are old enough to be added to the older flock.
We cut an opening between the two coops and covered it with chicken wire, which we will take off in a few months and it will become one large coop for my 24 chickens.
Thanks for viewing!
~MsChickenMomma
This is the view of the coop from the doorway. Their little chicken door is what you see in the back on the wall, and their nest boxes are on the right.
This is the view from the wall in the back.
These are our nest boxes. They are over 100 years old. They were given to us about 10 years ago by someone we knew who was about 60 years old at the time, and he said his grandfather had made them for his chickens It has 3 rows of 5 nest boxes. We only use two of the rows. Each nest box is approximately 11x11 inches on the inside. My chickens absolutely love these nest boxes.
These are the roosts. We use the standard 2x4's for our roosts, and they work great!
and this is the view from the outside. (on the right is the chicken door and their ramp, and on the left is a goat door that we will be turning into a small chicken door with a ramp like the other one).
This coop is a little on the small side, but it has been working good for my 15 free range chickens. In the winter it gets a little crowded though.
We have 9 new chickens and are in need of a bigger coop, so this is what we have been working on. This used to be a goat pen. The door is made of solid oak for horses and goats. The wiring is made of double layered cow fencing panels that we used to use for our goat yard. The holes on the fencing were about 5x7 inches, which is why we made two layers of the wire.
A better view of the door. (On the left you can see the door that leads to our original coop)
The lighting up here is terrible, so the photo isn't the greatest. But this is the top part. We did the same thing with the cow panels up here.
As you can see from this photo we used zip ties to connect the two layers of cow panels together.
This is the lock on the door. It's made from a large nail bent at the top and two blocks of solid oak. This is what it looks like when the door is unlatched.
and this is what it looks like when it is latched. There is a hole drilled through the block and through part of the wall. So when you slide the nail in place it can't come undone. We used to have horses, and we needed a sturdy door with a latch design that was strong enough that the horses couldn't bust through it. It's a really neat door, which is why we will still be using it for our chicken coop.
This is the top part of the door. The door comes in two parts. A top and a bottom, which gives you easy in and out access. This latch is made with a bent large nail like the other, but this latch is a little different. This is what it looks like when it's latched.
and this is what it looks like when the door is unlatched. The nail slides up and hooks on the screw so you don't lose the nail.
and this is what it looks like when the top door is open.
This is the chicken door that we made. It measures approximately 9x11 inches, and the door is 12x11 inches.
This is what we use for the handle of the door.
To keep the door open I use a bungee cord.
Then I hang the other side of the bungee cord on the wall by a screw.
This is the ramp that we made for the door. It is made by 2x6 board and we stapled gutter strips to it to use as grip for the chickens feet.
We made this ramp match our other one.
We also moved our antique nest boxes into the new coop.
These are the PVC feeders we made We made these because we have been having some problems with feed waste. We used 4" PVC with a 45 degree angle for the bottom. These feeders measure about 2 and half feet tall. We bought all of the supplies from Home Depot for about $18 per feeder. We were still having some problems with waste, so we set the feeders on some bricks and then I cute little half circles of cardboard and duct taped those on the front. (I will try and get some pictures of that another time)
These are the roosts that we made. We made these out of 2x4 boards just like the other roosts.
The chickens seem to really enjoy their new coop. It has more space (which they love) and it has much more ventilation and view.
We also temporarily turned the old coop into a chick grow out pen. I currently have my 2 month old pullets in here until they are old enough to be added to the older flock.
We cut an opening between the two coops and covered it with chicken wire, which we will take off in a few months and it will become one large coop for my 24 chickens.
Thanks for viewing!
~MsChickenMomma