We caught chicken raising fever! We have been posting pictures of our coop and our chickens on Facebook and all of our friends are calling it "A Chicken Mansion".

(Our Chicken Mansion)
Our kids have been asking us for chickens for years and I have always said no. This year, on May Day, I finally gave in and said we could "go look at chickens". On May 2nd, we brought home our very own six pack of the cutest baby chicks! We have 2 of each the Silver Laced Wyandotte, Gold Laced Wyandotte, and Black Sex Link. We didn't even know what that meant. We knew that the lady at the feed store where we bought them told us that they would do good in pairs, were excellent egg layers, and were cold hardy.
(Aren't our babies cute?)
We did a little bit of Googling and found out what our babies would look like once they matured and were pleasantly surprised to see how beautiful they would be.
(Silver Laced Wyandotte)
(Gold Laced Wyandotte)
(Black Sex Link)
When we first brought the chicks home, we used an old dog crate that we had. We lined the bottom with wood shavings, made sure we had a thermometer and a heat lamp and kept the baby chicks inside and warm. We were so paranoid about making sure our babies were safe and sound, that we put the home security camera on them so we could check them remotely while we were at work or even before we went to bed! We watched them weasel their way out of the cage and we knew they would get larger and we needed to find a better home for them.
(Live camera feed of our baby chicks)
We checked out several books at our local library, read www.backyardchickens.com like crazy, scoured Pinterest, and also bought our own book Storey's Guide to Raising Chickens by Gail Damerow ISBN 978-1-60342-469-1 at Tractor Supply. We found out that our chicks would need at least 8-10 sqft per chicken outside and 3-4 sqft per bird inside the coop.
At first we figured that we could just renovate our small shed to have a section for chickens. We put up a plywood wall to partition the "chicken" side of the shed off from where we kept everything else. We cut a hole in the side of the shed and made a little run for them. We had experiences a hawk swooping down and grabbing a song bird right off the feeder in our back yard, so we knew that our baby chicks would need a protective shelter. We used deer fencing and zip tied everything together. We even put a little perch out there for them even though they weren't quite ready to do much more than baby hops around the yard.
(The modified shed and chicken run)
(A baby chickie enjoying the grass for the first time!)
Our babies were growing up and were enjoying being able to run around the lawn. They were eating bugs and caterpillars just as fast as they could! It seemed like each morning when we went to give them fresh food and water, they were double the size!
Our cocker spaniel (Bella) looked on with what could have been a motherly oversight or a curious "wanting to play" with the new babies. She wasn't sure quite what to think of them and actually ripped a hole in the fencing trying to say hi to them. We zip tie patched the hole shut and decided that we needed to make a run that would protect our babies even more.
(Bella "mothering" the chicks)
We knew that socializing the chickens would be a key to making sure that they were good with people and so we made sure to handle and pet our chickies. Although admittedly, the heat lamp light made most of our pictures look a bit horror-film-ish.
(Snuggling our chickies)
We started thinking about plans for a better chicken coop. We checked our town's permitting rules and found out that chickens could be kept on a residential lot (ours is 1/3 of an acre) as long as they were to be used a pets and not for commercial agricultural production. Phew! We hadn't even thought about local ordinances before we got our chickies. We knew we didn't want a rooster because the neighbors wouldn't be too pleased with the noise, but other than that we were clueless about keeping chickens in our town! Definitely something we should have checked before bringing our babies home! We also found out that the coop didn't need to have a permit from the town as long as it was smaller than 10ftx12ft and the coop itself had to site a minimum of 15ft from the back property line, 15 ft from the side property line and 50ft from the front property line. Since we didn't want the coop right in the middle of the lawn, we measured out a spot that was exactly 15ft from the back and side of the lot. Our coop is 6ftx6ft square, so no permit needed!
We went to Lowe's and used the military discount to buy some materials to frame the coop. We didn't want to spend a ton of money, so we looked for opportunities to cut costs wherever we could throughout the project. We would have used the wood from the swing set left behind by the previous home owners, but we knew of a little boy who could use it instead. But man was it tempting to want to break that down and use it!
(The framing is starting!)
We were able to go to a local mill work company and buy some floor model sample windows at a very reasonable price. We figured this would help with ventilation, light, give our chickies windows to look out, and even used the bottom one as a door for them to come out into the yard.
(Windows are installed)
We were right in the middle of calculating what materials we would need to make the roof and walls when we remembered that a friend of ours tears down old sheds and then finds a home for the left over materials. I checked when he was planning on his next job and asked him to just drop off his truck load at the house! It worked out awesome! We could reuse and reclaim lumber that other wise would head to the junk yard or be burned! And we would be able to keep our coop costs low!
(One man's trash is another man's treasure)
At first it looked like just a pile of scrap. But we knew that we could reuse this material to make the most beautiful chicken mansion! We reused almost every part of this pile. We used the former shed floor (a 3/4" piece of plywood) as the roof, left the roof pieces all shingled and put those on top of the old floor. We patched the missing shingle pieces with some shingles from the same friend and matched the shingles as best we could. We used the old shed sides to make walls around our reclaimed windows, and even used the door hinges and hasp to make hinges for our own door which is on the back side so we can get in there to clean the coop. We even left a hole for nesting boxes. We debated the color. I really wanted a purple coop because I loved the fact that people were calling their coops "Egg Plants", but I let the barn red grow on me.
(It's starting to look like a little barn!)
Inside, we made a ladder up to the windows with a perch across so our chickies could look out the window. There is also a perch from a 2x4 about 12" off the ground. The nesting box was also placed 12" off the ground. Soon we will shingle the nesting box section and use hinges to open the top so we can get in there to collect eggs. However, our chickies aren't old enough to lay yet, so we are adding on/completing the project one stage at a time. We will be making 3 partitions in this nesting box space to give our ladies a bit more privacy when laying. We hung the food from a roof beam and the heat lamp too for cold nights. We put down the wood shavings and moved the chickies in. We plan to put inexpensive linoleum flooring down so that the droppings won't ruin the plywood floor and there will be a barrier between any moisture and the wood floor.
Then we started to work on the run part of the coop. We let the chickies wander around the yard and gobble up the inch worms that seemed to infest our town. They loved it and kept together in a flock. I was nervous about letting them free roam, but they stayed in a small area and we were able to corral them back into the coop fairly easily.
We decided to make the run larger than we would need for our 6 chickies just in case we wanted to get more in the future. We had already made the coop larger than we needed and we were really starting to love being chicken owners. We had researched the different breeds and wanted to expand to other fancier plumed chicks as well as those that would lay some other colored eggs.
We continued to use the reclaimed wood from the torn down shed which included several 7ft long 2x3s. We painted them white to make them look nice. We also went back to Lowe's and used that handy 10% off military discount again to get several 16ft 2x4s to make a pergola like top. We went to Tractor Supply and got two 72" high and 50ft long rolls of hex chicken fencing. We had read that the rectangular welded wire would be more robust and last longer, but we felt it was a little bit of overkill and too pricey. We put the "chicken wire" or hex fencing all around the sides of the run and reused the deer fencing we had for the top. The finished run area is 20ftx12ft. We must have gone through a million staples!
(It's starting to look nice)
I wanted a pretty red door to match the coop and tried my best to match the two colors. The coop will get a fresh coat of the new red as soon as we are finished building it. We did splurge on hardware for the door to make it look pretty. You can buy them as a complete kit at Lowe's. The door was very easy to build. We just used more of the recycled wood from the old shed, painted it, and stapled chicken wire to it.
(The pretty red door)
We started putting finishing touches on the coop including finishing the wall of the nesting box area, making a pretty red door, and little plastic picket fence pieces around the bottom board.
(Finishing touches)
We also put some finishing touches in the run for our chickies. We framed out a small section maybe 3ftx5ft, filled it with dirt from some old plant pots, covered it with one layer of hex netting and two layers of deer fencing. Then we threw down some grass seed. We are hoping the chickens will be able to use this to have a fresh grassy snack to munch on, but they won't be able to peck all the way down to the roots.
(Our chicken salad bar)
We also noticed that our neighbors were trimming some trees from around their house. We asked if we could have a few branches and arranged them in one corner to provide some perching spots as well as some shade. We even included a rock from our property so they had a bit more interest in their natural section of the run. We plan to incorporate some more natural tree branches for our chickies to perch on. We may also change the 2x4 perches inside the coop to natural branches because we have read that chickens like to roost on more round perch things. I am not sure they are very happy on the square 2x4s.
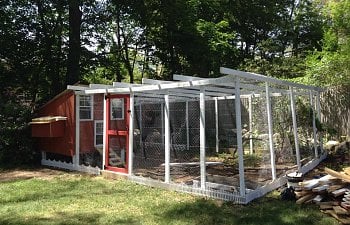
So although we have a few more upgrade and finishing details to do, this is what our final chicken mansion looks like.
(Our chicken mansion)
The final to do list includes:
- Finish the nesting boxes including partitions inside, shingles outside, and a hinged way to open it.
- Maybe a step stool so we can all reach inside to get the eggs.
- Possibly a cabinet below the nesting boxes to store food and other supplies right near the coop.
- A sand bath/box
- A pool of some kind
- A heated waterer
- Possibly a PVC pipe feeding or watering system
- Maybe a spigot near the coop to use for cleaning and watering.
- Better perching inside and out
- A cute name sign (we are still debating names, although we are thinking great female country music legends such as Loretta, Dolly, Minnie, Pearl, Reba, Wynona, etc)
- Potted plants outside, maybe even window boxes
- Possibly 6 more chicks including a Silkie (for their plumage), an Easter Egger (or Ameraucana) for their blue or green eggs, a Welsummer for their chocolate brown eggs, and maybe a few other types.
We hope you enjoyed seeing the process we went through to build our chicken mansion! We learned a lot along the way and are still learning. We hoped that some of what we included in our page was helpful to you and building your coop!
(Our Chicken Mansion)
Our kids have been asking us for chickens for years and I have always said no. This year, on May Day, I finally gave in and said we could "go look at chickens". On May 2nd, we brought home our very own six pack of the cutest baby chicks! We have 2 of each the Silver Laced Wyandotte, Gold Laced Wyandotte, and Black Sex Link. We didn't even know what that meant. We knew that the lady at the feed store where we bought them told us that they would do good in pairs, were excellent egg layers, and were cold hardy.
(Aren't our babies cute?)
We did a little bit of Googling and found out what our babies would look like once they matured and were pleasantly surprised to see how beautiful they would be.
(Silver Laced Wyandotte)
(Gold Laced Wyandotte)
(Black Sex Link)
When we first brought the chicks home, we used an old dog crate that we had. We lined the bottom with wood shavings, made sure we had a thermometer and a heat lamp and kept the baby chicks inside and warm. We were so paranoid about making sure our babies were safe and sound, that we put the home security camera on them so we could check them remotely while we were at work or even before we went to bed! We watched them weasel their way out of the cage and we knew they would get larger and we needed to find a better home for them.
(Live camera feed of our baby chicks)
We checked out several books at our local library, read www.backyardchickens.com like crazy, scoured Pinterest, and also bought our own book Storey's Guide to Raising Chickens by Gail Damerow ISBN 978-1-60342-469-1 at Tractor Supply. We found out that our chicks would need at least 8-10 sqft per chicken outside and 3-4 sqft per bird inside the coop.
At first we figured that we could just renovate our small shed to have a section for chickens. We put up a plywood wall to partition the "chicken" side of the shed off from where we kept everything else. We cut a hole in the side of the shed and made a little run for them. We had experiences a hawk swooping down and grabbing a song bird right off the feeder in our back yard, so we knew that our baby chicks would need a protective shelter. We used deer fencing and zip tied everything together. We even put a little perch out there for them even though they weren't quite ready to do much more than baby hops around the yard.
(The modified shed and chicken run)
(A baby chickie enjoying the grass for the first time!)
Our babies were growing up and were enjoying being able to run around the lawn. They were eating bugs and caterpillars just as fast as they could! It seemed like each morning when we went to give them fresh food and water, they were double the size!
Our cocker spaniel (Bella) looked on with what could have been a motherly oversight or a curious "wanting to play" with the new babies. She wasn't sure quite what to think of them and actually ripped a hole in the fencing trying to say hi to them. We zip tie patched the hole shut and decided that we needed to make a run that would protect our babies even more.
(Bella "mothering" the chicks)
We knew that socializing the chickens would be a key to making sure that they were good with people and so we made sure to handle and pet our chickies. Although admittedly, the heat lamp light made most of our pictures look a bit horror-film-ish.
(Snuggling our chickies)
We started thinking about plans for a better chicken coop. We checked our town's permitting rules and found out that chickens could be kept on a residential lot (ours is 1/3 of an acre) as long as they were to be used a pets and not for commercial agricultural production. Phew! We hadn't even thought about local ordinances before we got our chickies. We knew we didn't want a rooster because the neighbors wouldn't be too pleased with the noise, but other than that we were clueless about keeping chickens in our town! Definitely something we should have checked before bringing our babies home! We also found out that the coop didn't need to have a permit from the town as long as it was smaller than 10ftx12ft and the coop itself had to site a minimum of 15ft from the back property line, 15 ft from the side property line and 50ft from the front property line. Since we didn't want the coop right in the middle of the lawn, we measured out a spot that was exactly 15ft from the back and side of the lot. Our coop is 6ftx6ft square, so no permit needed!
We went to Lowe's and used the military discount to buy some materials to frame the coop. We didn't want to spend a ton of money, so we looked for opportunities to cut costs wherever we could throughout the project. We would have used the wood from the swing set left behind by the previous home owners, but we knew of a little boy who could use it instead. But man was it tempting to want to break that down and use it!
(The framing is starting!)
We were able to go to a local mill work company and buy some floor model sample windows at a very reasonable price. We figured this would help with ventilation, light, give our chickies windows to look out, and even used the bottom one as a door for them to come out into the yard.
(Windows are installed)
We were right in the middle of calculating what materials we would need to make the roof and walls when we remembered that a friend of ours tears down old sheds and then finds a home for the left over materials. I checked when he was planning on his next job and asked him to just drop off his truck load at the house! It worked out awesome! We could reuse and reclaim lumber that other wise would head to the junk yard or be burned! And we would be able to keep our coop costs low!
(One man's trash is another man's treasure)
At first it looked like just a pile of scrap. But we knew that we could reuse this material to make the most beautiful chicken mansion! We reused almost every part of this pile. We used the former shed floor (a 3/4" piece of plywood) as the roof, left the roof pieces all shingled and put those on top of the old floor. We patched the missing shingle pieces with some shingles from the same friend and matched the shingles as best we could. We used the old shed sides to make walls around our reclaimed windows, and even used the door hinges and hasp to make hinges for our own door which is on the back side so we can get in there to clean the coop. We even left a hole for nesting boxes. We debated the color. I really wanted a purple coop because I loved the fact that people were calling their coops "Egg Plants", but I let the barn red grow on me.
(It's starting to look like a little barn!)
Inside, we made a ladder up to the windows with a perch across so our chickies could look out the window. There is also a perch from a 2x4 about 12" off the ground. The nesting box was also placed 12" off the ground. Soon we will shingle the nesting box section and use hinges to open the top so we can get in there to collect eggs. However, our chickies aren't old enough to lay yet, so we are adding on/completing the project one stage at a time. We will be making 3 partitions in this nesting box space to give our ladies a bit more privacy when laying. We hung the food from a roof beam and the heat lamp too for cold nights. We put down the wood shavings and moved the chickies in. We plan to put inexpensive linoleum flooring down so that the droppings won't ruin the plywood floor and there will be a barrier between any moisture and the wood floor.
Then we started to work on the run part of the coop. We let the chickies wander around the yard and gobble up the inch worms that seemed to infest our town. They loved it and kept together in a flock. I was nervous about letting them free roam, but they stayed in a small area and we were able to corral them back into the coop fairly easily.
We decided to make the run larger than we would need for our 6 chickies just in case we wanted to get more in the future. We had already made the coop larger than we needed and we were really starting to love being chicken owners. We had researched the different breeds and wanted to expand to other fancier plumed chicks as well as those that would lay some other colored eggs.
We continued to use the reclaimed wood from the torn down shed which included several 7ft long 2x3s. We painted them white to make them look nice. We also went back to Lowe's and used that handy 10% off military discount again to get several 16ft 2x4s to make a pergola like top. We went to Tractor Supply and got two 72" high and 50ft long rolls of hex chicken fencing. We had read that the rectangular welded wire would be more robust and last longer, but we felt it was a little bit of overkill and too pricey. We put the "chicken wire" or hex fencing all around the sides of the run and reused the deer fencing we had for the top. The finished run area is 20ftx12ft. We must have gone through a million staples!
(It's starting to look nice)
I wanted a pretty red door to match the coop and tried my best to match the two colors. The coop will get a fresh coat of the new red as soon as we are finished building it. We did splurge on hardware for the door to make it look pretty. You can buy them as a complete kit at Lowe's. The door was very easy to build. We just used more of the recycled wood from the old shed, painted it, and stapled chicken wire to it.
(The pretty red door)
We started putting finishing touches on the coop including finishing the wall of the nesting box area, making a pretty red door, and little plastic picket fence pieces around the bottom board.
(Finishing touches)
We also put some finishing touches in the run for our chickies. We framed out a small section maybe 3ftx5ft, filled it with dirt from some old plant pots, covered it with one layer of hex netting and two layers of deer fencing. Then we threw down some grass seed. We are hoping the chickens will be able to use this to have a fresh grassy snack to munch on, but they won't be able to peck all the way down to the roots.
(Our chicken salad bar)
We also noticed that our neighbors were trimming some trees from around their house. We asked if we could have a few branches and arranged them in one corner to provide some perching spots as well as some shade. We even included a rock from our property so they had a bit more interest in their natural section of the run. We plan to incorporate some more natural tree branches for our chickies to perch on. We may also change the 2x4 perches inside the coop to natural branches because we have read that chickens like to roost on more round perch things. I am not sure they are very happy on the square 2x4s.
So although we have a few more upgrade and finishing details to do, this is what our final chicken mansion looks like.
(Our chicken mansion)
The final to do list includes:
- Finish the nesting boxes including partitions inside, shingles outside, and a hinged way to open it.
- Maybe a step stool so we can all reach inside to get the eggs.
- Possibly a cabinet below the nesting boxes to store food and other supplies right near the coop.
- A sand bath/box
- A pool of some kind
- A heated waterer
- Possibly a PVC pipe feeding or watering system
- Maybe a spigot near the coop to use for cleaning and watering.
- Better perching inside and out
- A cute name sign (we are still debating names, although we are thinking great female country music legends such as Loretta, Dolly, Minnie, Pearl, Reba, Wynona, etc)
- Potted plants outside, maybe even window boxes
- Possibly 6 more chicks including a Silkie (for their plumage), an Easter Egger (or Ameraucana) for their blue or green eggs, a Welsummer for their chocolate brown eggs, and maybe a few other types.
We hope you enjoyed seeing the process we went through to build our chicken mansion! We learned a lot along the way and are still learning. We hoped that some of what we included in our page was helpful to you and building your coop!