And so it began with a brief, yet completely random conversation in the car ... "We should get a couple chickens" said my husband, who was blissfully unaware I had been conversing with a co-worker and contemplating chickens for a couple months now. "Really? Are you serious?" I asked and shared that I had been sort-of wanting chickens. "Yea, my mom always had them when I was a kid, they are pretty interesting" he said. I expressed my concerns about winter chicken care and was assured he would go out on the coldest of cold days to tend to the girls and would also make sure we had power and water out in the yard.
Moments later we turned in to our local Sam's Club and purchased their biggest coop kit, our "starter coop" with grand plans to build a large coop, SLOWLY, a little at a time, over the entire upcoming summer. We went home and I ordered 7 chicks from http://www.mypetchicken.com I intended to order 6 but accidentally clicked the Plymouth Barred Rock twice. (I have an issue with odd numbers, more on that later...)
Over the next few days we made several trips to TSC for bedding, a feeder, a waterer, chick feed, storage containers, heat lamp, every chicken keeping book they carried and finally a trip to U-Haul for the biggest box they had available. We were set for the chicks to arrive, or so we thought.

I started reading and combing the net for everything chicken and soon realized the "coop" was in no way shape or form big enough, nor adequate protection from the wildlife in our area (plus I ordered 5 more chicks, we should really have blue and green eggs after all...and then there is the odd number issue - 12 is much better than 7).
(The initial plan was I would keep the smaller coop for fancy crazy feathered bantam chickens but learned they do not handle the cold as well as I had hoped, so I scrapped that idea.)
Sticking to cold hardy breeds, I promptly returned the unopened "little" coop and recruited my son and his friends to frame in the permanent coop, which was largely inspired by Coop Delisle's Plans @ https://www.backyardchickens.com/a/coopdelisles-chicken-coop Thank you Coop Delisle!
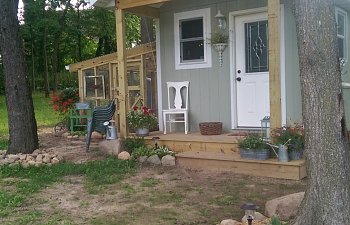
My husband started by clearing the brush out behind our shed and building the raised floor so the boys could focus on the building. The coop is 10'x10' with 8' walls, the porch is 4' wide and the run is 8'x10' with access under the coop (an additional 10'x10' of outdoor space)
Hardware cloth was used on all sides of the coop and run to prevent predators from digging in. We buried the cloth about 24" deep on the coop side and 4x4's are stacked and buried around the sides of the run due to the ground being unlevel. The 4x4's helped prevent water from entering the run when it rains.
There are 6 external nest boxes on the coop for easy access of eggs. Currently the boxes are covered from the inside to discourage the girls from sleeping in them.
We built a dividing wall inside the coop so the chicks have 6' and 3.5' is utilized as the entry way and storage area. The wall can easily be removed if chicken math becomes an issue in the future. The walls are finished with luan and painted with exterior paint for easy clean up and we put linoleum on the floor.
There are vents in all the eaves, ceiling, both gable ends and windows on all sides for ventilation. We purchased windows for the east, west and south sides second hand from Habitat Restore and built an adjustable window/vent on the north side. I found the exterior coop door on a local Facebook Garage Sale site (leaded glass!), found the chicken wire interior door at a local vintage resale shop and I scored the chandelier at a thrift shop almost 2 years ago for $5. It will be nice, stylish, supplemental lighting on a timer in the winter months.
The run is covered with polycarbonate sheeting to help keep things dry and secured with hardware cloth. We added gutters to the run and building to divert water from entering the run area.
My husband initially secured the hardware cloth with screws and washers, after going through several boxes he decided to rip down 2x4's on the table saw and just use screws. I think it looks much more finished this way and keeps the cat out nicely. The gutter has been damaged by a tree limb that fell during a recent storm but shows the adjustable vent and pulley.
We purchased an automatic door from http://www.automaticchickencoopdoor.com/ which will be nice once the electric is hooked up. Installation was very easy and we simply trimmed around the inside of the door rather than covering the access panel should the line need to be replaced.
We installed a droppings board under the roosts, lined it with linoleum and added a ladder for the chickens to climb up. Two weeks after moving in 6 of the girls used the roost or ladder and 6 continued to pile up on the floor behind the waterer which resulted in filthy walls and water every morning. I placed the slackers on the roost at dark a few nights and several returned to the floor.
Just when I started deciding maybe the roost was too high and thought about tearing everything out, 4 of the girls found the highest point in the coop. This was not ok in my book so I added wire above the door and moved the waterer to the middle of the coop away from the walls. All 12 are now roosting where I want them to, every night.
Making good on his promise, as he always does, my dear husband had the yard torn up this week for the electric and water. Lots of seed and a couple bags of straw should repair the mess in short order.
This has been a lot of work over the past two months with most of the work done at night and on the weekends but I am very pleased with the outcome and the chickens seem to be very happy in their new home.
Hopefully they pay us back in eggs soon, and I am so lucky to have this guy!
Moments later we turned in to our local Sam's Club and purchased their biggest coop kit, our "starter coop" with grand plans to build a large coop, SLOWLY, a little at a time, over the entire upcoming summer. We went home and I ordered 7 chicks from http://www.mypetchicken.com I intended to order 6 but accidentally clicked the Plymouth Barred Rock twice. (I have an issue with odd numbers, more on that later...)
Over the next few days we made several trips to TSC for bedding, a feeder, a waterer, chick feed, storage containers, heat lamp, every chicken keeping book they carried and finally a trip to U-Haul for the biggest box they had available. We were set for the chicks to arrive, or so we thought.
I started reading and combing the net for everything chicken and soon realized the "coop" was in no way shape or form big enough, nor adequate protection from the wildlife in our area (plus I ordered 5 more chicks, we should really have blue and green eggs after all...and then there is the odd number issue - 12 is much better than 7).
(The initial plan was I would keep the smaller coop for fancy crazy feathered bantam chickens but learned they do not handle the cold as well as I had hoped, so I scrapped that idea.)
Sticking to cold hardy breeds, I promptly returned the unopened "little" coop and recruited my son and his friends to frame in the permanent coop, which was largely inspired by Coop Delisle's Plans @ https://www.backyardchickens.com/a/coopdelisles-chicken-coop Thank you Coop Delisle!
My husband started by clearing the brush out behind our shed and building the raised floor so the boys could focus on the building. The coop is 10'x10' with 8' walls, the porch is 4' wide and the run is 8'x10' with access under the coop (an additional 10'x10' of outdoor space)
Hardware cloth was used on all sides of the coop and run to prevent predators from digging in. We buried the cloth about 24" deep on the coop side and 4x4's are stacked and buried around the sides of the run due to the ground being unlevel. The 4x4's helped prevent water from entering the run when it rains.
There are 6 external nest boxes on the coop for easy access of eggs. Currently the boxes are covered from the inside to discourage the girls from sleeping in them.
We built a dividing wall inside the coop so the chicks have 6' and 3.5' is utilized as the entry way and storage area. The wall can easily be removed if chicken math becomes an issue in the future. The walls are finished with luan and painted with exterior paint for easy clean up and we put linoleum on the floor.
There are vents in all the eaves, ceiling, both gable ends and windows on all sides for ventilation. We purchased windows for the east, west and south sides second hand from Habitat Restore and built an adjustable window/vent on the north side. I found the exterior coop door on a local Facebook Garage Sale site (leaded glass!), found the chicken wire interior door at a local vintage resale shop and I scored the chandelier at a thrift shop almost 2 years ago for $5. It will be nice, stylish, supplemental lighting on a timer in the winter months.
The run is covered with polycarbonate sheeting to help keep things dry and secured with hardware cloth. We added gutters to the run and building to divert water from entering the run area.
My husband initially secured the hardware cloth with screws and washers, after going through several boxes he decided to rip down 2x4's on the table saw and just use screws. I think it looks much more finished this way and keeps the cat out nicely. The gutter has been damaged by a tree limb that fell during a recent storm but shows the adjustable vent and pulley.
We purchased an automatic door from http://www.automaticchickencoopdoor.com/ which will be nice once the electric is hooked up. Installation was very easy and we simply trimmed around the inside of the door rather than covering the access panel should the line need to be replaced.
We installed a droppings board under the roosts, lined it with linoleum and added a ladder for the chickens to climb up. Two weeks after moving in 6 of the girls used the roost or ladder and 6 continued to pile up on the floor behind the waterer which resulted in filthy walls and water every morning. I placed the slackers on the roost at dark a few nights and several returned to the floor.
Just when I started deciding maybe the roost was too high and thought about tearing everything out, 4 of the girls found the highest point in the coop. This was not ok in my book so I added wire above the door and moved the waterer to the middle of the coop away from the walls. All 12 are now roosting where I want them to, every night.
Making good on his promise, as he always does, my dear husband had the yard torn up this week for the electric and water. Lots of seed and a couple bags of straw should repair the mess in short order.
This has been a lot of work over the past two months with most of the work done at night and on the weekends but I am very pleased with the outcome and the chickens seem to be very happy in their new home.
Hopefully they pay us back in eggs soon, and I am so lucky to have this guy!