I decided I wanted to have backyard chickens in the summer of 2013. I had been thinking about it and then saw photos of a friends chicken who was sitting on a large nest of eggs! I knew that the timing was perfect!
We started building in the middle of July...super hot and lots of mosquitoes.
The area to the left of the crype myrtles was where I wanted the coop, the tree had died that was there and I wanted to use the lower part of it in the run area (we later removed it because they never used it)
The coop is 8x5, which seems large but has really came in handy! The run is 13x10, which includes the space under the coop.

Here was a little "drawing" I did on paint of what I was thinking.
We used reclaimed wood from a coworker of my husbands. The coop is set on 8 cinder-blocks that supports the weight of a adult with no problem. We ended up moving that top piece of wood down to remove that large gap.
This is when we started the nest box area.
We did linoleum floor, which has held up good almost 2 years later.
I got the one side of the coop painted (still the only side painted until this summer hopefully) and then we started on the run.
The back side
We used hardware cloth for the whole thing. The door is on the side next to the coop, you can see its spot in the above photo. We dug down and added a metal skirt all around the run as needed.
We added a side clean out door, large enough for me to get into and doors on the windows. (matching windows on each side) ventilation provided under the eves.
While this was happening, our chicks where growing in the house, we got them at about 4 weeks old! at 6 weeks 3 of them where crowing.....oops!
We installed one roosting bar, and it has worked, I thought about adding another, but not sure where to put it compared to this one.
On the first night in the coop, the girls choose this spot to hang out,
and the boys choose this spot. (there where later re-homed)
This photo was just taken this week. I love my coop, if I could change any I would flip it around for more sunlight (the run is to the west, should of been on the east) and then move the door that is on the side of the run (just on the other side of the end of the coop) and put it on the front that you can see here. We have also since removed the tree stump and I want to add more roosts and plants around the exterior.
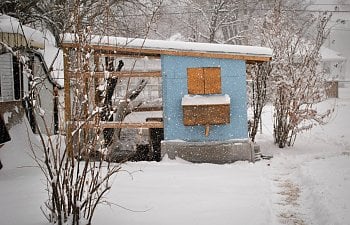
2 summers later and I just got this painted this week and installed a lift on the nest box (I normally just always step inside a bit)
The front of the nest box will have a chicken silhouette on it
This photo shows the ramp they use to get in/out, just taken this week with our new babies. (the bars where just added to help assist them in) the food and water hooks on nails under the coop
Thank you for taking the time to look at our City Coop!
We started building in the middle of July...super hot and lots of mosquitoes.
The area to the left of the crype myrtles was where I wanted the coop, the tree had died that was there and I wanted to use the lower part of it in the run area (we later removed it because they never used it)
The coop is 8x5, which seems large but has really came in handy! The run is 13x10, which includes the space under the coop.
Here was a little "drawing" I did on paint of what I was thinking.
We used reclaimed wood from a coworker of my husbands. The coop is set on 8 cinder-blocks that supports the weight of a adult with no problem. We ended up moving that top piece of wood down to remove that large gap.
This is when we started the nest box area.
We did linoleum floor, which has held up good almost 2 years later.
I got the one side of the coop painted (still the only side painted until this summer hopefully) and then we started on the run.
The back side
We used hardware cloth for the whole thing. The door is on the side next to the coop, you can see its spot in the above photo. We dug down and added a metal skirt all around the run as needed.
We added a side clean out door, large enough for me to get into and doors on the windows. (matching windows on each side) ventilation provided under the eves.
While this was happening, our chicks where growing in the house, we got them at about 4 weeks old! at 6 weeks 3 of them where crowing.....oops!
We installed one roosting bar, and it has worked, I thought about adding another, but not sure where to put it compared to this one.
On the first night in the coop, the girls choose this spot to hang out,
and the boys choose this spot. (there where later re-homed)
This photo was just taken this week. I love my coop, if I could change any I would flip it around for more sunlight (the run is to the west, should of been on the east) and then move the door that is on the side of the run (just on the other side of the end of the coop) and put it on the front that you can see here. We have also since removed the tree stump and I want to add more roosts and plants around the exterior.
2 summers later and I just got this painted this week and installed a lift on the nest box (I normally just always step inside a bit)
The front of the nest box will have a chicken silhouette on it
This photo shows the ramp they use to get in/out, just taken this week with our new babies. (the bars where just added to help assist them in) the food and water hooks on nails under the coop
Thank you for taking the time to look at our City Coop!