Whew, it’s been a hot and busy summer! We’ve had a few days the ole thermometer has registered 113 to 121 degrees in the sun. Let me tell ya, that’s hot (and not in the good way). We should be having a rain shower a day right now and we’re not which really puts us at risk for not only the high temperatures now but an increased threat of fire and restricted water use in the winter months. Southwest Florida where I live is tropical and without the rain we’re not very tropical at all.
With all of this heat you would think that we would just stay inside and soak up the air conditioning but nooooo….. not us. We’ve had a very productive summer and it’s not soon to slow down. Since June we have had a major drive to build the chicks – who are now fully feathered pullets (young ladies not mature enough yet to produce eggs) – a full time home outside. It’s been quite an undertaking and other than a few cosmetic tweaks, the major project is complete. Here’s what we’ve done:

The original sin – a boy with his new girlfriends. This was June 6, 2015 and now his life has really changed. Altogether he has six new girls (not including his best friend in the background) and this 17 year old guy couldn’t be happier. Officially he has two Isa Brown chicks, two white girls, one black sweetheart who immediately earned the name Ebony, and a dark brown jitterbug. He wanted to name dark brown girl Road Runner but later he chose Beep Beep and that’s the name that stuck. The two white girls are named Betty White (like the actress) and Meg White (from the former band The White Stripes). The two Isa brown chicks are now Big Momma and Little Momma (and yes, you CAN tell them apart!). They each have their own personalities and he loves and dotes on them constantly even by taking them into the shower with him. Gotta give it to the kid – he’s dedicated…. so far…
Here’s the original “coop and run” inspiration. For a couple of hundred dollars at Rural King, our new favorite farm store in Bonita Springs, you can buy this gem of a run/coop. Here are the few issues we have with this model: First, it’s too small for six chickens. Second, it’s very cheaply made. Third – for a few bucks more we could build a rockin’ coop and run that’s larger, sturdier, tall enough where we can walk around inside, and will stand the test of time and weather. As they say – build it and they will come.
It all starts with a good foundation. Using 12″ x 12″ reclaimed pavers for the perimeter of the run and 18″ x 18″ reclaimed pavers as an intermediate step between the sidewalk and the coop we were able to raise the chicken run off of the ground and create a solid barrier for burrowing predators. We also built this 6′ x 12′ run on a western wall of the house. Since we are still in an urban area and we have plans for the open lawn area behind the house, this area seemed logical to us. We will integrate the run and coop into our “Grand Master Plan” for the backyard re-design and it will be a part of the landscaping completely but I’m getting ahead of myself… we still need to build this thing, right??
Just like building a home or similar-type structure we built each wall substructure first. We bought most of the materials at our local Lowe’s and surprisingly we found pressure treated lumber to be the most economical choice. The basic structure used 2″ x 4″ x 8′ boards and the bottom boards are all 2″ x 6″ x 12′ s. The east side of the run is the main entry side which is also the side between the house and the rest of the run so this was structured at 8′ tall to allow my son – who is over 6′ tall – to walk inside with no issue. The west wall is only 7′ tall so the flat roof with Ondura corrugated roofing material will slant away from the house. The side walls were built to match the angles. Oh, everything was pre-painted with a mixture of paint we had laying around. The mixture of white, beige, and dark brown made this mocha-like color which we weren’t in love with at the time but the price was certainly right: free!
The chicken run went up fairly fast and easily. The bottom half of the run is lined with hardware cloth aka rabbit wire fencing and the top half is chicken wire. The black sheets you see hanging on the walls are lengths of weed block which will block out the western sun that is absolutely brutal in this part of the yard. We custom-built the door which swings outward for convenience. The roof rafters inside the run have a few eyebolts installed which allow us to hang the self-watering can and the self-feeder to minimize mess. The run as shown is just the run and the coop has not been built nor attached at the time of this photo. The pullets spent the days in this run and at night we brought them back into the house until we were able to build the coop.
Two weeks later we used Hardie Board to construct the coop walls. Shown here is the north wall of the coop and the larger opening where his hands are is where the egg laying box will be attached. The opening above that is where a permanent window (another freebie) will go. The entire coop is raised about 32″ off the ground on legs of pressure treated lumber. The actual coop will measure 4′ x 4′ with a pitched roof that resembles the roof of the run. The roof rafters were clipped on the corners for aesthetics.
The coop features two extra large swinging doors – one on the west side and one on the east side – for ease of cleaning and maintenance inside the coop. This is one of the swinging doors and that’s a “window” in the center that’s been screened with more hardware cloth and framed on both sides. Later we’ll attach a window covering for those cold nights and times with severe weather (hurricanes and tropical storms). The photo shows all the materials in their natural coloring and eventually everything will be painted to match the chicken run. We had plenty of matching paint since we mixed together three partially used gallons of paint to create that ‘mocha’ color.
Here’s the coop attached to the run with the roof roughly attached. The same pavers were placed around the perimeter of the coop so the legs of the coop were up off the ground and so it mirrored the run layout. Just like the run, the walls of the coop were erected and attached in place just like you would frame a house. Floor “joists” were then installed to support the plywood flooring which we then covered in super cheap peel-n-stick 12″ x 12″ tiles to make cleaning a breeze.
On the south end of the coop we planned a doorway with a “drawbridge” type closure. When the coop was officially in place we cut through the north wall of the run for access. After that we attached the two separate units to each other for both stability and safety.
Before the large swinging doors were installed we added lots of hardware cloth to the area between the walls and the roof so our girls would have lots of ventilation even after they were locked in at night. The idea here was to create circulation between the screened windows on the swinging doors and the upper area between the top of the walls and the roof which should help keep our chickens healthier because of the fresh air. We’ll see how it all works out when the cold weather comes in January – I say cold but rarely do we have temperatures near freezing.
What a long day but the fruits of our labor makes it worth it all. We still have many small tweaks to make on the coop from what is shown here including roof supports, painting, adding the nest boxes inside the egg laying box, and so on. Inside the coop we did add two perches and the girls can see out of the eastern, northern, and western windows plus there’s a ton of good ventilation going on. We’re trying to devise a pulley system to raise and lower the drawbridge doorway between the coop and the run and we’ll add those photos after we’re successful with the design.
Here's the skinny on time and materials: all in all the basic run took three of us one long weekend to build and the coop took four of us a full weekend, too. Minor adjustments and tweaks aside both structures are built and ready for 'the girls'. Now for the cost.... for the items I purchased to make both the run and the coop I spent right around $700. Many items I already had like all of the pavers, all of the chicken wire, paint, staples, weed cloth, and the five-pane window so there's no price added for those things. Not too shabby!
Here are more photos of the finished product. Will we ever finish tweaking it? I think not! So far we’ve had no predator issues and our girls seem quite content in their new surroundings. Check it out:
“Drawbridge” down
“Drawbridge” up and locked
South side
Interior view
Access door
East side
North side
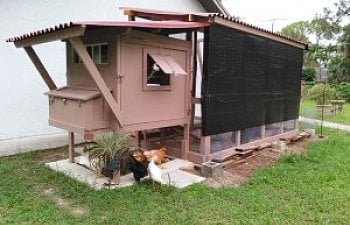
Full view of our "Coop Deville" where wicked chickens lay devilled eggs
My cheesy sketch of the east & north coop walls
Another cheesy sketch of the south wall of coop
Egg-laying box sketch
My “chicken scratch” (pun intended!) ideas
What’s up? A chicken’s butt when they’re eating! hahaha
So there you have it - our Coop Deville.
"Ebony"
With all of this heat you would think that we would just stay inside and soak up the air conditioning but nooooo….. not us. We’ve had a very productive summer and it’s not soon to slow down. Since June we have had a major drive to build the chicks – who are now fully feathered pullets (young ladies not mature enough yet to produce eggs) – a full time home outside. It’s been quite an undertaking and other than a few cosmetic tweaks, the major project is complete. Here’s what we’ve done:

The original sin – a boy with his new girlfriends. This was June 6, 2015 and now his life has really changed. Altogether he has six new girls (not including his best friend in the background) and this 17 year old guy couldn’t be happier. Officially he has two Isa Brown chicks, two white girls, one black sweetheart who immediately earned the name Ebony, and a dark brown jitterbug. He wanted to name dark brown girl Road Runner but later he chose Beep Beep and that’s the name that stuck. The two white girls are named Betty White (like the actress) and Meg White (from the former band The White Stripes). The two Isa brown chicks are now Big Momma and Little Momma (and yes, you CAN tell them apart!). They each have their own personalities and he loves and dotes on them constantly even by taking them into the shower with him. Gotta give it to the kid – he’s dedicated…. so far…

Here’s the original “coop and run” inspiration. For a couple of hundred dollars at Rural King, our new favorite farm store in Bonita Springs, you can buy this gem of a run/coop. Here are the few issues we have with this model: First, it’s too small for six chickens. Second, it’s very cheaply made. Third – for a few bucks more we could build a rockin’ coop and run that’s larger, sturdier, tall enough where we can walk around inside, and will stand the test of time and weather. As they say – build it and they will come.

It all starts with a good foundation. Using 12″ x 12″ reclaimed pavers for the perimeter of the run and 18″ x 18″ reclaimed pavers as an intermediate step between the sidewalk and the coop we were able to raise the chicken run off of the ground and create a solid barrier for burrowing predators. We also built this 6′ x 12′ run on a western wall of the house. Since we are still in an urban area and we have plans for the open lawn area behind the house, this area seemed logical to us. We will integrate the run and coop into our “Grand Master Plan” for the backyard re-design and it will be a part of the landscaping completely but I’m getting ahead of myself… we still need to build this thing, right??

Just like building a home or similar-type structure we built each wall substructure first. We bought most of the materials at our local Lowe’s and surprisingly we found pressure treated lumber to be the most economical choice. The basic structure used 2″ x 4″ x 8′ boards and the bottom boards are all 2″ x 6″ x 12′ s. The east side of the run is the main entry side which is also the side between the house and the rest of the run so this was structured at 8′ tall to allow my son – who is over 6′ tall – to walk inside with no issue. The west wall is only 7′ tall so the flat roof with Ondura corrugated roofing material will slant away from the house. The side walls were built to match the angles. Oh, everything was pre-painted with a mixture of paint we had laying around. The mixture of white, beige, and dark brown made this mocha-like color which we weren’t in love with at the time but the price was certainly right: free!

The chicken run went up fairly fast and easily. The bottom half of the run is lined with hardware cloth aka rabbit wire fencing and the top half is chicken wire. The black sheets you see hanging on the walls are lengths of weed block which will block out the western sun that is absolutely brutal in this part of the yard. We custom-built the door which swings outward for convenience. The roof rafters inside the run have a few eyebolts installed which allow us to hang the self-watering can and the self-feeder to minimize mess. The run as shown is just the run and the coop has not been built nor attached at the time of this photo. The pullets spent the days in this run and at night we brought them back into the house until we were able to build the coop.

Two weeks later we used Hardie Board to construct the coop walls. Shown here is the north wall of the coop and the larger opening where his hands are is where the egg laying box will be attached. The opening above that is where a permanent window (another freebie) will go. The entire coop is raised about 32″ off the ground on legs of pressure treated lumber. The actual coop will measure 4′ x 4′ with a pitched roof that resembles the roof of the run. The roof rafters were clipped on the corners for aesthetics.

The coop features two extra large swinging doors – one on the west side and one on the east side – for ease of cleaning and maintenance inside the coop. This is one of the swinging doors and that’s a “window” in the center that’s been screened with more hardware cloth and framed on both sides. Later we’ll attach a window covering for those cold nights and times with severe weather (hurricanes and tropical storms). The photo shows all the materials in their natural coloring and eventually everything will be painted to match the chicken run. We had plenty of matching paint since we mixed together three partially used gallons of paint to create that ‘mocha’ color.

Here’s the coop attached to the run with the roof roughly attached. The same pavers were placed around the perimeter of the coop so the legs of the coop were up off the ground and so it mirrored the run layout. Just like the run, the walls of the coop were erected and attached in place just like you would frame a house. Floor “joists” were then installed to support the plywood flooring which we then covered in super cheap peel-n-stick 12″ x 12″ tiles to make cleaning a breeze.

On the south end of the coop we planned a doorway with a “drawbridge” type closure. When the coop was officially in place we cut through the north wall of the run for access. After that we attached the two separate units to each other for both stability and safety.

Before the large swinging doors were installed we added lots of hardware cloth to the area between the walls and the roof so our girls would have lots of ventilation even after they were locked in at night. The idea here was to create circulation between the screened windows on the swinging doors and the upper area between the top of the walls and the roof which should help keep our chickens healthier because of the fresh air. We’ll see how it all works out when the cold weather comes in January – I say cold but rarely do we have temperatures near freezing.

What a long day but the fruits of our labor makes it worth it all. We still have many small tweaks to make on the coop from what is shown here including roof supports, painting, adding the nest boxes inside the egg laying box, and so on. Inside the coop we did add two perches and the girls can see out of the eastern, northern, and western windows plus there’s a ton of good ventilation going on. We’re trying to devise a pulley system to raise and lower the drawbridge doorway between the coop and the run and we’ll add those photos after we’re successful with the design.
Here's the skinny on time and materials: all in all the basic run took three of us one long weekend to build and the coop took four of us a full weekend, too. Minor adjustments and tweaks aside both structures are built and ready for 'the girls'. Now for the cost.... for the items I purchased to make both the run and the coop I spent right around $700. Many items I already had like all of the pavers, all of the chicken wire, paint, staples, weed cloth, and the five-pane window so there's no price added for those things. Not too shabby!
Here are more photos of the finished product. Will we ever finish tweaking it? I think not! So far we’ve had no predator issues and our girls seem quite content in their new surroundings. Check it out:

“Drawbridge” down

“Drawbridge” up and locked

South side

Interior view

Access door

East side

North side

Full view of our "Coop Deville" where wicked chickens lay devilled eggs

My cheesy sketch of the east & north coop walls

Another cheesy sketch of the south wall of coop

Egg-laying box sketch

My “chicken scratch” (pun intended!) ideas

What’s up? A chicken’s butt when they’re eating! hahaha
So there you have it - our Coop Deville.
"Ebony"