I am completely new to chickens and after discovering BYC and looking through literally hundreds of coops, I pulled together a design that I hope will work well for my ladies. I started out with 5 day old pullets (Mildred, Mabel, Ethel, Lupé, and Harriet) about 5 weeks ago, and I’m obsessed.

My dad helped me with almost the entire build since he’s got every tool under the sun. However we have no carpentry experience so we had to adjust a lot on the fly. I took a lot of inspiration from coops on BYC but had to make some adjustments to our area and predator levels. We started out but digging out some holes for concrete blocks since I wanted the coop to sit off of the ground by a few feet.
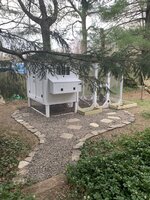
The dimensions for the coop are 4’x6’ and the run is 6’x12’ including the under the coop area. The height drops from 7’ to 6.5’ from front to back. I used pressure treated for the 4x4s and the entire run and regular 2x4s for the coop interior part.
We started with the framing of the coop using the 2x4s and a framing nailer to hold everything in place.
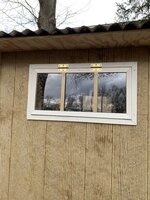
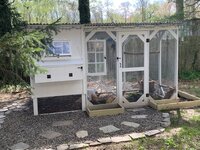
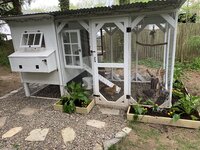
Next we attached the “wood” siding(it was a little bit cheaper than T1-11 and just needed a coat of paint) and cut out the slots for the door, windows, and nesting box. I went with 36”x18” for the nesting box and they are 12” deep. The window above them is 15”x24” and the opposite wall window is12”x24”. My big windows were cut to fit some old 1920s windows that I needed to re-glaze and paint. I made the back double doors as big as I could so that I could clean it out easier.
I needed to buy some plexiglass and re-glaze those old windows, so next we focused on the nesting box. We attached the sides to the frame and then build the inside from around that. As of right now we just used the siding for the roof but I’d like to cover it with a metal roof to match the run roof.
With the glaze still drying, I started on the run build. We built the walls on the driveway and the stood them up and attached them directly to the 4x4s on the coop. It was a little shaky so we added cross braces on the roof and corner braces to each panel. We built the frames with 32” centers for each section to fit with the 36” hardware cloth I purchased.
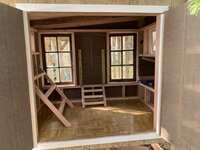
While I finished with the corner braces, my dad built a small roosting ladder (I know I might need to change this in the future and maybe raise them up) and a small ladder to get out of the coop.

The next big part to tackle was the roof. I used galvanized roofing panels (26”x96”) for the entire coop and run roof. I did a foot overhang on all sides to try to prevent rain from getting in my windows.
I grabbed some peel and stick vinyl floor from a local ReStore for about $7 so I installed that in the coop and the nesting box for easier cleanup.
I got the door put up and then started to add trim and hinges to everything.
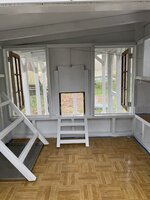
Next I moved on to painting the entire coop and run. I went with an exterior white paint, needed to do about 2 coats on most of the coop.
After that I started on the hardware cloth installation. I covered the entire run and raised part, then did the predator skirt, and covered the windows last. I used 1” galvanized narrow staples roughly every 3 squares and doubled up with screws and washers along the entire bottom. I ended up digging as best as I could around the coop with an average depth of 1-1.5 feet deep. I used a 1.5’ wide piece of hardware cloth. I have too many roots!
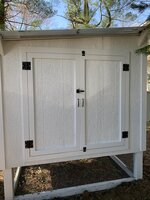
I also added some extra bolt locks to the big door for added predator proofing and all the gate locks have carabiners.
I decided to paint the inside of the coop too to make it a little brighter. I got the windows installed and covered with hardware cloth and added some wood chips and logs around the coop to give them some entertainment.
After reading so many articles I knew I wanted an automatic waterer and pvc bucket feeder so I went with a mini gravity waterer that’ll have a 3 gallon bucket on this stump attached to this watering system. The feeder is the same 3 gallon bucket with 2 3” 90° pvc angles in it.
With all of the construction finished, we moved on to landscaping. We had a ton(literally) of stones left over from a fire pit project so we built a larger stone border and filled it in so that it wouldn’t get muddy in the higher traffic areas like the front and side of the coop and along the back where the rain falls down.
We also added so planter boxes around the sides, but I need to find some shade happy plants to put there since that side doesn’t get much sun!
I decided to throw together a little compost bin with some left over pallets over there as well so that I have a place to dump shavings and don’t have to go too far after cleaning the poop tray I set up each day.
After a month and a half of long work, the chicks are finally ready to move into their new home!
I added some solar string lights to the top of the coop just to make it look cute, not for laying.
I also wanted a place right next to the coop that I could store their food, shavings, and treats in so I added a little shed to the back with my leftover supplies from the rest of the coop.
After I painted it I finally got around to putting more metal roofing on both the shed and nest box area, it looks great, but is super sharp so I need to find a way to cover the edges
My last finishing touch for the coop was to put in some plants around it! I tried to get perennials so I wouldn't have to replant every year. I went with hosta, marigolds(not perennial), mondo grass, and some mosses.
I knew this day would come, and it came while still building the first coop. I find myself building an open air additional run for the ladies. I just want them to have more space and some sun in the afternoons since the coop is mostly shady! It’s about 7.5’x7.5’ and 3’ tall. I am going to make it open from the front and top so I can fully walk in it half way.
I ended up making the top door only go about 1/3 of the way because it was just too heavy! I also added more reinforcements on the corners of the whole structure and the doors because I didn’t square anything so it was a little wonky.
I slowly got around to painting the whole structure, and after having to replace a stapler, got 2x4” wore around the whole thing. I went with bigger wire because the coop will be closed off to the addition at night so I wasn’t really as worried about predators. I also have been waiting a few extra hours to open this part and closing it early in the evening to avoid them being out at dusk and dawn.
The next big step was building the doors and the little bridge that gets them over my garden and into the addition! I built the entire thing out of old fence pickets that I had cut up a few months ago. The tunnel is about 13” wide and 13” tall. They can fit almost side by side through it.
I made the door out of an extra piece of siding that I had and added a gate lock and an eye hook to close it from the inside of the coop at night.
I covered the tunnel with the same 2x4” wire and just stapled it right to the bridge.
There isn’t much grass in it but after 2 days it’s almost already all gone.
I have since added edging around the egg door roof and shed roof to stop from cutting myself on the sharp metal, and I’ve added some roosts and a chick-nic table to the run addition!
My dad helped me with almost the entire build since he’s got every tool under the sun. However we have no carpentry experience so we had to adjust a lot on the fly. I took a lot of inspiration from coops on BYC but had to make some adjustments to our area and predator levels. We started out but digging out some holes for concrete blocks since I wanted the coop to sit off of the ground by a few feet.
The dimensions for the coop are 4’x6’ and the run is 6’x12’ including the under the coop area. The height drops from 7’ to 6.5’ from front to back. I used pressure treated for the 4x4s and the entire run and regular 2x4s for the coop interior part.
We started with the framing of the coop using the 2x4s and a framing nailer to hold everything in place.
I needed to buy some plexiglass and re-glaze those old windows, so next we focused on the nesting box. We attached the sides to the frame and then build the inside from around that. As of right now we just used the siding for the roof but I’d like to cover it with a metal roof to match the run roof.
With the glaze still drying, I started on the run build. We built the walls on the driveway and the stood them up and attached them directly to the 4x4s on the coop. It was a little shaky so we added cross braces on the roof and corner braces to each panel. We built the frames with 32” centers for each section to fit with the 36” hardware cloth I purchased.
While I finished with the corner braces, my dad built a small roosting ladder (I know I might need to change this in the future and maybe raise them up) and a small ladder to get out of the coop.
The next big part to tackle was the roof. I used galvanized roofing panels (26”x96”) for the entire coop and run roof. I did a foot overhang on all sides to try to prevent rain from getting in my windows.
I grabbed some peel and stick vinyl floor from a local ReStore for about $7 so I installed that in the coop and the nesting box for easier cleanup.
I got the door put up and then started to add trim and hinges to everything.
Next I moved on to painting the entire coop and run. I went with an exterior white paint, needed to do about 2 coats on most of the coop.
After that I started on the hardware cloth installation. I covered the entire run and raised part, then did the predator skirt, and covered the windows last. I used 1” galvanized narrow staples roughly every 3 squares and doubled up with screws and washers along the entire bottom. I ended up digging as best as I could around the coop with an average depth of 1-1.5 feet deep. I used a 1.5’ wide piece of hardware cloth. I have too many roots!
I also added some extra bolt locks to the big door for added predator proofing and all the gate locks have carabiners.
I decided to paint the inside of the coop too to make it a little brighter. I got the windows installed and covered with hardware cloth and added some wood chips and logs around the coop to give them some entertainment.
With all of the construction finished, we moved on to landscaping. We had a ton(literally) of stones left over from a fire pit project so we built a larger stone border and filled it in so that it wouldn’t get muddy in the higher traffic areas like the front and side of the coop and along the back where the rain falls down.
We also added so planter boxes around the sides, but I need to find some shade happy plants to put there since that side doesn’t get much sun!
I decided to throw together a little compost bin with some left over pallets over there as well so that I have a place to dump shavings and don’t have to go too far after cleaning the poop tray I set up each day.
After a month and a half of long work, the chicks are finally ready to move into their new home!
I added some solar string lights to the top of the coop just to make it look cute, not for laying.
I also wanted a place right next to the coop that I could store their food, shavings, and treats in so I added a little shed to the back with my leftover supplies from the rest of the coop.
After I painted it I finally got around to putting more metal roofing on both the shed and nest box area, it looks great, but is super sharp so I need to find a way to cover the edges
My last finishing touch for the coop was to put in some plants around it! I tried to get perennials so I wouldn't have to replant every year. I went with hosta, marigolds(not perennial), mondo grass, and some mosses.
I knew this day would come, and it came while still building the first coop. I find myself building an open air additional run for the ladies. I just want them to have more space and some sun in the afternoons since the coop is mostly shady! It’s about 7.5’x7.5’ and 3’ tall. I am going to make it open from the front and top so I can fully walk in it half way.
I ended up making the top door only go about 1/3 of the way because it was just too heavy! I also added more reinforcements on the corners of the whole structure and the doors because I didn’t square anything so it was a little wonky.
I slowly got around to painting the whole structure, and after having to replace a stapler, got 2x4” wore around the whole thing. I went with bigger wire because the coop will be closed off to the addition at night so I wasn’t really as worried about predators. I also have been waiting a few extra hours to open this part and closing it early in the evening to avoid them being out at dusk and dawn.
The next big step was building the doors and the little bridge that gets them over my garden and into the addition! I built the entire thing out of old fence pickets that I had cut up a few months ago. The tunnel is about 13” wide and 13” tall. They can fit almost side by side through it.
I made the door out of an extra piece of siding that I had and added a gate lock and an eye hook to close it from the inside of the coop at night.
I covered the tunnel with the same 2x4” wire and just stapled it right to the bridge.
There isn’t much grass in it but after 2 days it’s almost already all gone.
I have since added edging around the egg door roof and shed roof to stop from cutting myself on the sharp metal, and I’ve added some roosts and a chick-nic table to the run addition!