This summer we built a chicken coop for our new flock of six chooks. The family has dubbed the coop "Palais des Poulets." We got the chicks toward the end of May, a few days post hatch. We are located in southwestern Vermont.
Step one was to scour the property for lumber and other materials that I could use for the coop. I also looked at the small chicken coops on this website for design inspiration. Most of the lumber was found on site, as were the cinder blocks for foundation, the chicken wire, and some of the 1/2" hardware cloth.

Here I am stapling the chicken wire to the bottom of the frame. I did the dirty work of leveling the cinder blocks and hauling the turf that I used for fill. I had a good pile of turf from having cut it out for my vegetable garden a month earlier. Of course, ideally all the framing would have been stained prior to building, but that did not happen. I had a carpenter friend helping for a few select weeks, and the chickens were growing fast. Stain is barn red to match the corn crib and barn on premises.
We decided on a metal roof. We had to buy that new.
Three nesting boxes placed high enough to allow deep litter through the Vermont winter.
Hen house walls from leftover barn siding, and alder cabinetry that we could not use in our previous house, and that we lugged across the country in our move back to Vermont. I was determined to use it on the coop.
Interior of the hen house. Floor of the house from shelving removed from our new business office before renovations.
Chook door.
An old pile of topsoil on premises provided more fill for the floor and berm around the coop. Found a square of locally quarried marble to place in front of the door.
The doors are up. Time to put the chicks in. This was the end of June. We did loose two chicks to a Jack Russel Terrier in the first week. She got in when the water was being changed. We got replacement chicks of the same age from our original source. Have not lost any more since.
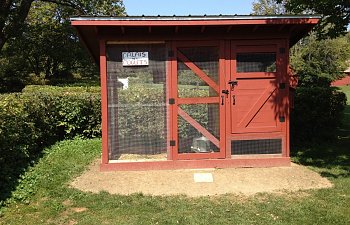
Here is the coop fully stained, and with it's name hung - painted by an 11 year old niece. End of August.
There are always improvements or modifications to be made. I added a shelf (using more of the alder) to keep the chicks from pooping in their food and water. Also to cover the screw holes in the metal braces that hold the waterer and food dispenser. One of the chicks got a toe stuck in a screw hole and ended up upside down in the food can. She limped around for a bit, but fully recovered by the end of the day. Anyway, as you can see, they like their new shelf. I put an old piece of carpet over it, but would like to find some Astroturf to put on it someday soon.
Here are some photos showing the chook ramp. Also, as it happens, one of the chicks turns out to be a handsome cockerel. That's him closest to the ramp. He crows nicely at sunrise and has not proven to be a problem, so I guess we will keep him.
I expect the hens to start laying next month. I'll post a few photos showing what I've done with the nesting boxes to discourage hanging out in them unless one wants some privacy to lay and egg.
Step one was to scour the property for lumber and other materials that I could use for the coop. I also looked at the small chicken coops on this website for design inspiration. Most of the lumber was found on site, as were the cinder blocks for foundation, the chicken wire, and some of the 1/2" hardware cloth.
Here I am stapling the chicken wire to the bottom of the frame. I did the dirty work of leveling the cinder blocks and hauling the turf that I used for fill. I had a good pile of turf from having cut it out for my vegetable garden a month earlier. Of course, ideally all the framing would have been stained prior to building, but that did not happen. I had a carpenter friend helping for a few select weeks, and the chickens were growing fast. Stain is barn red to match the corn crib and barn on premises.
We decided on a metal roof. We had to buy that new.
Three nesting boxes placed high enough to allow deep litter through the Vermont winter.
Hen house walls from leftover barn siding, and alder cabinetry that we could not use in our previous house, and that we lugged across the country in our move back to Vermont. I was determined to use it on the coop.
Interior of the hen house. Floor of the house from shelving removed from our new business office before renovations.
Chook door.
An old pile of topsoil on premises provided more fill for the floor and berm around the coop. Found a square of locally quarried marble to place in front of the door.
The doors are up. Time to put the chicks in. This was the end of June. We did loose two chicks to a Jack Russel Terrier in the first week. She got in when the water was being changed. We got replacement chicks of the same age from our original source. Have not lost any more since.
Here is the coop fully stained, and with it's name hung - painted by an 11 year old niece. End of August.
There are always improvements or modifications to be made. I added a shelf (using more of the alder) to keep the chicks from pooping in their food and water. Also to cover the screw holes in the metal braces that hold the waterer and food dispenser. One of the chicks got a toe stuck in a screw hole and ended up upside down in the food can. She limped around for a bit, but fully recovered by the end of the day. Anyway, as you can see, they like their new shelf. I put an old piece of carpet over it, but would like to find some Astroturf to put on it someday soon.
Here are some photos showing the chook ramp. Also, as it happens, one of the chicks turns out to be a handsome cockerel. That's him closest to the ramp. He crows nicely at sunrise and has not proven to be a problem, so I guess we will keep him.
I expect the hens to start laying next month. I'll post a few photos showing what I've done with the nesting boxes to discourage hanging out in them unless one wants some privacy to lay and egg.