I am one to think outside the box and since I live in a limited fixed income I am always looking for cheap but sturdy ideas. That's why my first coop, when I had 1 rescue chicken was made of an old solid wood cabinet. It was 2ft × 3ft and it worked great for her. This year I enlarged my flock to 4 hens....so I knew I needed to enlarge the coop, especially when they started squabbling over the small roost bar and the nesting box in the old cabinet coop.
So I started researching cheap yet sturdy coop builds.....I kept wondering if a person could build a coop outta pallets. The answer is why yes, yes you can. So I drove down by my local co-op discard pile and wow did I score....3 huge stacks of pallets to pick from.....and pick I did! I thought I made a huge score, not only did I get several solid pallets, I also found 2 pallets that had completely solid floors, and a laminated piece of plywood.

I was tickled pink.....but how to go about the build. I have to say thank you to many on here for prior postings, you lead me in the right direction and some showed me what not to do.
I might add that I am disabled so had to take my sweet time and build a coop that could be disassembled and moved if need be. Oh and did I mention I own NO power tools other than a cheap cordless drill I bought at a thrift store for $8. All I had was a claw hammer, a hack saw, and that cordless drill to tear those pallets apart and build my coop with. Can ya say Manual Labor!!!! I sure can. After whacking my knee once with the hammer, I got in a groove of hack sawing those pallet slats off the supports.....soon I had quite the pile.
Let the building commence......
I bought 2 boxes of screws for $8.99 a box....that's $17.98+ tax that I now have into my coop build.
I took the big pallet with the solid floor to use as the base.....I had 2 pallet supports the same length and I used them for the front of my side walls. I then had 6 supports the same length and I used them for my base boards and uprights of the side walls. I used 2 pallet slats for my top plate on each side wall. And now I had 2 frames for the side walls, and I screwed them into place on the base.
I then used pallet slats that were the same length to screw to the framing to create each side wall. I laid them all out to get the tightest fit I could before screwing them in place. Now I have 2 walls build. One with an opening for an exterior nesting box to be mounted.
Next I used a pallet support to make a base plate and mid wall support for the back wall. I then took pallet slats that reached all the was across the back and screwed them in place. I again used a pallet slats to make a top plate for this wall.
(Gus approves of the build)
From here I ran longer pallet slats to frame space around the top for my hardware cloth ventilation.
It is looking good at this point, and I had 1 more smaller solid pallet to create a door. And I knew from the articles here and my experience with the old cabinet coop I wanted the whole front to open up some how. So I got to sawing with my hacksaw again and shorted some pallet supports and screwed my slats to them. I had to use a few shorter slats to have enough but I just mounted them towards the bottom where I knew I would be cutting out a spot for the chicken access door(I borrowed a skillsaw for this).
At this point another trip to get 4 hinges was needed. And since this door was so heavy I figured I needed some hefty hinges....so each hinge can hold 50 pounds....so 4 hinges at 50 pounds = 200 pounds they could hold. And I needed a latch. So that was another $34 into my coop build. Let's just say mounting hinges properly is a royal pain in the hind end!!!!
Are ya keeping up though, that is a total of $51.98 for my coop at this point.
Now the coop is built, but I need to seal any possible drafts.....and I know not to do this on the inside for my chickens safety.....so I use paintable caulking that has silicone in it and caulk every single seam I could find on the outside. The next day I primed with old house paint, then painted the final slat blue exterior paint I had left from my old cabinet coop build.
Now that it is all built and ready to move I need to figure out legs as I want it up off the ground like the old coop. Hummm not sure where I will find a 4×4 post. I also need to find a board for a roost. While talking to my Mom about the problem she sends me to her back shed for a roost board from Dad's old scrap pile, and what do I see but a huge 3×4 rough cut cedar beam....JACKPOT.....it is for legs and it is cedar which is hard for insects to eat. Now I have my roost board AND an 8'5" beam for legs, which I need 5 of.....one at each corner and one right in the middle....(again thanks to comments on articles here I knew I needed center support for this coop). I did have to go get 4×4 leg brackets to mount the legs to the base....that was $48. I also made my roost bar removable.
Ok so let's total things up here....... $17.98 + 34.00 + 48.00 = $99.98
Yesterday I disassembled my new coop into 3 walls and the drop down door.
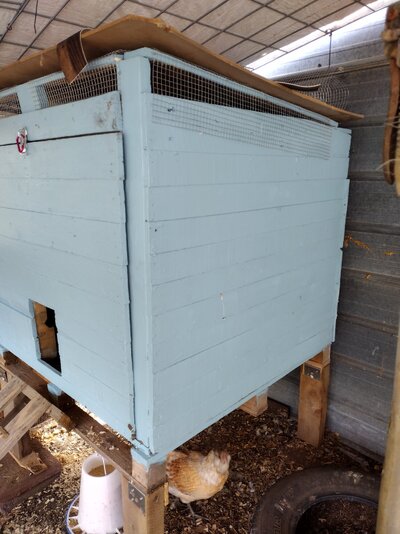
Today I moved the old coop out temporarily covered the whole in the fence where the nesting box goes through. Moved in the new base, and started reassembling the new coop. Once the coop was reassembled with the hardware cloth in place, the roosting bar in place, lined the floor with old linoleum, and the roof on....I then took the nesting box from the old coop (which I had built from my Grandpa's old wooden ammo box from WWII) and mounted in the hole I had left in the one wall of the new build. And yes only 1 nesting box.....I have only 4 hens.
I used the ramp from the old coop and now I just have to find an old cabinet door to be able to close the chicken door....though I have them in a secure run and never close the door I want a door just in case.
Now my ladies have a 4ft × 4ft coop that cost less than $100 to build. It may have taken a few weeks to build but I am proud of myself, because this disabled lady with no building skills or power tools did it all!!!
The old hen has staked her claim already, while the next oldest keeps going in and out, the 2 youngest have yet to enter the coop. I also have space for one more roosting bar if needed. As of 9pm all hens are in the new coop bedded down!!!!
I have named the new coop....CoopMagedon
(Side note: I know the roof isn't screwed down yet in the pictures, I had leaned it against a wall and it kinda warped, I am hoping it will straighten out in a few days)
Thanks @BigBlueHen53 for telling me how to insert pictures.
Update:. I did add a tempory lower perch for the Easter Eggers, they just weren't figuring out how to get to the top roost.
So I started researching cheap yet sturdy coop builds.....I kept wondering if a person could build a coop outta pallets. The answer is why yes, yes you can. So I drove down by my local co-op discard pile and wow did I score....3 huge stacks of pallets to pick from.....and pick I did! I thought I made a huge score, not only did I get several solid pallets, I also found 2 pallets that had completely solid floors, and a laminated piece of plywood.
I was tickled pink.....but how to go about the build. I have to say thank you to many on here for prior postings, you lead me in the right direction and some showed me what not to do.
I might add that I am disabled so had to take my sweet time and build a coop that could be disassembled and moved if need be. Oh and did I mention I own NO power tools other than a cheap cordless drill I bought at a thrift store for $8. All I had was a claw hammer, a hack saw, and that cordless drill to tear those pallets apart and build my coop with. Can ya say Manual Labor!!!! I sure can. After whacking my knee once with the hammer, I got in a groove of hack sawing those pallet slats off the supports.....soon I had quite the pile.
Let the building commence......
I bought 2 boxes of screws for $8.99 a box....that's $17.98+ tax that I now have into my coop build.
I took the big pallet with the solid floor to use as the base.....I had 2 pallet supports the same length and I used them for the front of my side walls. I then had 6 supports the same length and I used them for my base boards and uprights of the side walls. I used 2 pallet slats for my top plate on each side wall. And now I had 2 frames for the side walls, and I screwed them into place on the base.
I then used pallet slats that were the same length to screw to the framing to create each side wall. I laid them all out to get the tightest fit I could before screwing them in place. Now I have 2 walls build. One with an opening for an exterior nesting box to be mounted.
Next I used a pallet support to make a base plate and mid wall support for the back wall. I then took pallet slats that reached all the was across the back and screwed them in place. I again used a pallet slats to make a top plate for this wall.
(Gus approves of the build)
From here I ran longer pallet slats to frame space around the top for my hardware cloth ventilation.
It is looking good at this point, and I had 1 more smaller solid pallet to create a door. And I knew from the articles here and my experience with the old cabinet coop I wanted the whole front to open up some how. So I got to sawing with my hacksaw again and shorted some pallet supports and screwed my slats to them. I had to use a few shorter slats to have enough but I just mounted them towards the bottom where I knew I would be cutting out a spot for the chicken access door(I borrowed a skillsaw for this).
At this point another trip to get 4 hinges was needed. And since this door was so heavy I figured I needed some hefty hinges....so each hinge can hold 50 pounds....so 4 hinges at 50 pounds = 200 pounds they could hold. And I needed a latch. So that was another $34 into my coop build. Let's just say mounting hinges properly is a royal pain in the hind end!!!!
Are ya keeping up though, that is a total of $51.98 for my coop at this point.
Now the coop is built, but I need to seal any possible drafts.....and I know not to do this on the inside for my chickens safety.....so I use paintable caulking that has silicone in it and caulk every single seam I could find on the outside. The next day I primed with old house paint, then painted the final slat blue exterior paint I had left from my old cabinet coop build.
Now that it is all built and ready to move I need to figure out legs as I want it up off the ground like the old coop. Hummm not sure where I will find a 4×4 post. I also need to find a board for a roost. While talking to my Mom about the problem she sends me to her back shed for a roost board from Dad's old scrap pile, and what do I see but a huge 3×4 rough cut cedar beam....JACKPOT.....it is for legs and it is cedar which is hard for insects to eat. Now I have my roost board AND an 8'5" beam for legs, which I need 5 of.....one at each corner and one right in the middle....(again thanks to comments on articles here I knew I needed center support for this coop). I did have to go get 4×4 leg brackets to mount the legs to the base....that was $48. I also made my roost bar removable.
Ok so let's total things up here....... $17.98 + 34.00 + 48.00 = $99.98
Yesterday I disassembled my new coop into 3 walls and the drop down door.
Today I moved the old coop out temporarily covered the whole in the fence where the nesting box goes through. Moved in the new base, and started reassembling the new coop. Once the coop was reassembled with the hardware cloth in place, the roosting bar in place, lined the floor with old linoleum, and the roof on....I then took the nesting box from the old coop (which I had built from my Grandpa's old wooden ammo box from WWII) and mounted in the hole I had left in the one wall of the new build. And yes only 1 nesting box.....I have only 4 hens.
I used the ramp from the old coop and now I just have to find an old cabinet door to be able to close the chicken door....though I have them in a secure run and never close the door I want a door just in case.
Now my ladies have a 4ft × 4ft coop that cost less than $100 to build. It may have taken a few weeks to build but I am proud of myself, because this disabled lady with no building skills or power tools did it all!!!
The old hen has staked her claim already, while the next oldest keeps going in and out, the 2 youngest have yet to enter the coop. I also have space for one more roosting bar if needed. As of 9pm all hens are in the new coop bedded down!!!!
I have named the new coop....CoopMagedon
(Side note: I know the roof isn't screwed down yet in the pictures, I had leaned it against a wall and it kinda warped, I am hoping it will straighten out in a few days)
Thanks @BigBlueHen53 for telling me how to insert pictures.
Update:. I did add a tempory lower perch for the Easter Eggers, they just weren't figuring out how to get to the top roost.