I'll start out by saying that this post is one of the main reasons I joined BYC, as I'm not much of a blogger / social-media kind of guy. But I wanted to share my chicken coop experience and design since I couldn't really find much when I looked into it, but figured there are plenty of others with the same questions I had.
Originally, my plan was to just build a coop and run out of 2x4's and plywood - like you do. But I had some concerns with keeping it clean. I was looking at a 4ft x 6ft design so my 6 birds could have 4 sq ft each inside - which seems to be the rule of thumb. The problem is that I'd have had to make it tall enough to walk inside or I'd never be able to get it clean. Then I started thinking about rot, mold, repeated paint jobs, and all the other things inherent with using wood.
So my choice was to make my coop out of plastic. It will never rot, never need painted, can be cleaned out completely with a garden hose, and as long as it's well-ventilated mold / mildew shouldn't be an issue.
I looked all over the internet and, as good as the idea seemed, I couldn't find anything about making a coop out of plastic. There were a lot of people asking about how to convert a plastic shed (Rubbermaid, Suncast, etc.) into a coop, but not many answers. I did find a handful of pre-made ones on Amazon made by Formex, but they seemed REALLY small. Their largest offering claimed to hold 4 - 6 full-size birds or 6 - 12 bantams, but it was only 42" x 64" including the nesting boxes. I'm sure you could fit 6 birds in there - if you stuffed them in like sardines. I'm in the Mid-Atlantic, so while the birds will spend the summer outdoors, most of the winter will be spent "cooped up" for lack of a better term. Since I happen to be an Engineer, I figured I could put my engineering skills to good use and work out how to convert a plastic shed on my own.
So this is the shed I picked out. It's a Suncast Glidetop shed that measures about 58" x 80" (around $400 at Home Depot).

Overall, the basic size and shape of the shed is perfect for what I wanted to do. It has double doors at the end, and the front half of the roof slides back so I can walk right in. My biggest disappointment is that it didn't have any windows, and I wanted the girls to be able to get some natural sunlight. Aside from also wanting to be able to peek in and see how they're doing. I checked the internet again and kept finding a bunch of nay-saying about how it was impossible to install windows in this kind of shed.
Not to be discouraged, I did a little looking online and at Home Depot. Amazon and Ebay both had a wide selection of flush-mount "shed windows" that can be screwed into pretty much any flat surface (typically around $20 / each). Since the walls of the shed are hollow (which is nice for insulating) I needed to create a frame for the windows. Since I really didn't want to use any wood, which would defeat the whole purpose of making a plastic coop, I found that Home Depot and Lowes both stock PVC trim in various sizes - which is essentially plastic wood planks.
I ended up making both window frames using 3/4" x 1-1/2X pieces which fit nearly perfectly with the thickness of the shed. Considering the bottom of the frame, I had a strip laid horizontally with a vertically-oriented strip on either side to basically "sandwich" the side of the shed. The hole for the window actually cut out fairly easily with a utility knife since it's only plastic. I did have to glue in a few bracing pieces in the hollow between the inside and outside of the shed to kind of reinforce it a bit, but this could have been avoided if I'd have cut the window out a little more in line with the grooves molded into the walls. The window looked like the picture below before I inserted it, and I then screwed on the inside frame which was identical to the outside.
The window inside the wall panel looked like this
For nesting boxes, I went online and bought two "Little Giant" plastic nesting boxes, which just screw right into the wall. The screw holes are slotted to make it easy to take them off for cleaning. I have them set a few inches off the ground just inside the double doors so I can easily reach in and grab my eggs. I also thought about cutting / framing a hatch in the wall behind them, but I want to wait and see how this works out first.
For roosts, I'm just using 2x4's (with the edges rounded off) since they're cheap and easy to get. I put joist hangers on the walls so that they can be pulled out for cleaning or replacement. I have one about 18" off the ground, and the other set 12" behind that and around 6" higher. The lower one is in line with the windows, and the girls like to sit up there and look out.
For ventilation, I used off-the-shelf dryer vents. I got a pair of plastic wall vents, inserted a short piece of metal duct, and capped it on the inside with a round, flat vent. For added ventilation on hot summer days, I can also just slide the top of the coop open a tad.
For the door to the run, I cut an 8" x 12" hole in the far end, opposite the double doors, and framed it the same way as the windows with the PVC board. I ended up just making the run out of wood as it was a LOT cheaper and easier to work with than the PVC. I also needed it to be solid enough to stand up to the Mid-Atlantic winters we've been getting. The run is a whole other story deserving of its own post.
Here's the door inserted in the wall panel. The two metal rails go with the door I bought.
Since I'm not really much of an "early riser", particularly on the weekends, I opted to go with an automatic door leading out to the run. I shopped around a bit, and found quite a bit of very useful information on BYC about the different brands. I ended up getting the AXT VSB door off of Amazon. It works on a light sensor - and from what I could see no one really had anything bad to say about it. Some of the other doors, while they did get good reviews, a lot of people said that they were unreliable and didn't always open or close. While this one was REALLY expensive by my standards (especially for two rails, a sheet metal door, and a control box), it was worth it to know that the girls are getting let in and out on time.
The automatic door did require a bit of adjustment, but so far works great! For about the first week we had at least one of them getting stuck outside when it closed at night. On one evening it was all six! It adjusts pretty easily though, and after setting it to close a little bit later we haven't had any further problems.
For food and water, I made them a feeder out of PVC pipe and a temporary waterer using an old juice jug with a watering nipple threaded into the lid. Like the run, these are both deserving of their own posts, as they both presented some unique problems. The feeder shown in the pictures below DID NOT work (kept clogging), so I've pulled it out and switched to something that does.
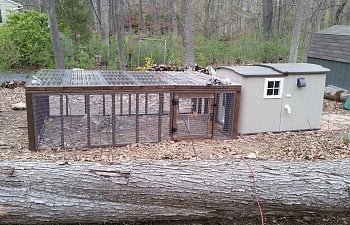
So...here is my finished coop!
Here are the girls checking out their new home
So far this coop is working out wonderfully. It stays very dry in the rain, despite all of the holes I cut in it, and the birds seem more than happy.
Feel free to comment if anyone has any questions or suggestions.
Originally, my plan was to just build a coop and run out of 2x4's and plywood - like you do. But I had some concerns with keeping it clean. I was looking at a 4ft x 6ft design so my 6 birds could have 4 sq ft each inside - which seems to be the rule of thumb. The problem is that I'd have had to make it tall enough to walk inside or I'd never be able to get it clean. Then I started thinking about rot, mold, repeated paint jobs, and all the other things inherent with using wood.
So my choice was to make my coop out of plastic. It will never rot, never need painted, can be cleaned out completely with a garden hose, and as long as it's well-ventilated mold / mildew shouldn't be an issue.
I looked all over the internet and, as good as the idea seemed, I couldn't find anything about making a coop out of plastic. There were a lot of people asking about how to convert a plastic shed (Rubbermaid, Suncast, etc.) into a coop, but not many answers. I did find a handful of pre-made ones on Amazon made by Formex, but they seemed REALLY small. Their largest offering claimed to hold 4 - 6 full-size birds or 6 - 12 bantams, but it was only 42" x 64" including the nesting boxes. I'm sure you could fit 6 birds in there - if you stuffed them in like sardines. I'm in the Mid-Atlantic, so while the birds will spend the summer outdoors, most of the winter will be spent "cooped up" for lack of a better term. Since I happen to be an Engineer, I figured I could put my engineering skills to good use and work out how to convert a plastic shed on my own.
So this is the shed I picked out. It's a Suncast Glidetop shed that measures about 58" x 80" (around $400 at Home Depot).
Overall, the basic size and shape of the shed is perfect for what I wanted to do. It has double doors at the end, and the front half of the roof slides back so I can walk right in. My biggest disappointment is that it didn't have any windows, and I wanted the girls to be able to get some natural sunlight. Aside from also wanting to be able to peek in and see how they're doing. I checked the internet again and kept finding a bunch of nay-saying about how it was impossible to install windows in this kind of shed.
Not to be discouraged, I did a little looking online and at Home Depot. Amazon and Ebay both had a wide selection of flush-mount "shed windows" that can be screwed into pretty much any flat surface (typically around $20 / each). Since the walls of the shed are hollow (which is nice for insulating) I needed to create a frame for the windows. Since I really didn't want to use any wood, which would defeat the whole purpose of making a plastic coop, I found that Home Depot and Lowes both stock PVC trim in various sizes - which is essentially plastic wood planks.
I ended up making both window frames using 3/4" x 1-1/2X pieces which fit nearly perfectly with the thickness of the shed. Considering the bottom of the frame, I had a strip laid horizontally with a vertically-oriented strip on either side to basically "sandwich" the side of the shed. The hole for the window actually cut out fairly easily with a utility knife since it's only plastic. I did have to glue in a few bracing pieces in the hollow between the inside and outside of the shed to kind of reinforce it a bit, but this could have been avoided if I'd have cut the window out a little more in line with the grooves molded into the walls. The window looked like the picture below before I inserted it, and I then screwed on the inside frame which was identical to the outside.
The window inside the wall panel looked like this
For nesting boxes, I went online and bought two "Little Giant" plastic nesting boxes, which just screw right into the wall. The screw holes are slotted to make it easy to take them off for cleaning. I have them set a few inches off the ground just inside the double doors so I can easily reach in and grab my eggs. I also thought about cutting / framing a hatch in the wall behind them, but I want to wait and see how this works out first.
For roosts, I'm just using 2x4's (with the edges rounded off) since they're cheap and easy to get. I put joist hangers on the walls so that they can be pulled out for cleaning or replacement. I have one about 18" off the ground, and the other set 12" behind that and around 6" higher. The lower one is in line with the windows, and the girls like to sit up there and look out.
For ventilation, I used off-the-shelf dryer vents. I got a pair of plastic wall vents, inserted a short piece of metal duct, and capped it on the inside with a round, flat vent. For added ventilation on hot summer days, I can also just slide the top of the coop open a tad.
For the door to the run, I cut an 8" x 12" hole in the far end, opposite the double doors, and framed it the same way as the windows with the PVC board. I ended up just making the run out of wood as it was a LOT cheaper and easier to work with than the PVC. I also needed it to be solid enough to stand up to the Mid-Atlantic winters we've been getting. The run is a whole other story deserving of its own post.
Here's the door inserted in the wall panel. The two metal rails go with the door I bought.
Since I'm not really much of an "early riser", particularly on the weekends, I opted to go with an automatic door leading out to the run. I shopped around a bit, and found quite a bit of very useful information on BYC about the different brands. I ended up getting the AXT VSB door off of Amazon. It works on a light sensor - and from what I could see no one really had anything bad to say about it. Some of the other doors, while they did get good reviews, a lot of people said that they were unreliable and didn't always open or close. While this one was REALLY expensive by my standards (especially for two rails, a sheet metal door, and a control box), it was worth it to know that the girls are getting let in and out on time.
The automatic door did require a bit of adjustment, but so far works great! For about the first week we had at least one of them getting stuck outside when it closed at night. On one evening it was all six! It adjusts pretty easily though, and after setting it to close a little bit later we haven't had any further problems.
For food and water, I made them a feeder out of PVC pipe and a temporary waterer using an old juice jug with a watering nipple threaded into the lid. Like the run, these are both deserving of their own posts, as they both presented some unique problems. The feeder shown in the pictures below DID NOT work (kept clogging), so I've pulled it out and switched to something that does.
So...here is my finished coop!
Here are the girls checking out their new home
So far this coop is working out wonderfully. It stays very dry in the rain, despite all of the holes I cut in it, and the birds seem more than happy.
Feel free to comment if anyone has any questions or suggestions.