A Playhouse Coop for Kathryn

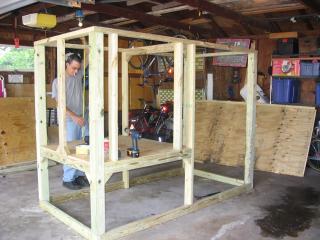
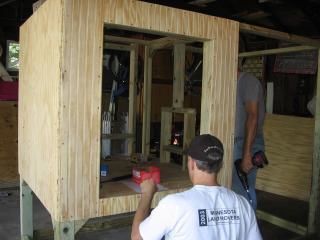
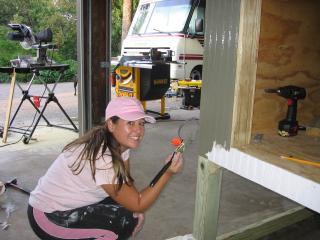
Kathryn is a friend of mine and our children attend grade school together. In May 2009, she adopted three of the chicks from the annual Kindergarten egg hatching experiment, much to the delight of her children. All summer they grew and grew, free-ranging in her beautiful, woodsy yard and going to roost nightly in a rabbit hutch situated in her garage. Fast forward to mid-September -- the chooks were almost laying age and the temperatures were quickly beginning to cool off. Kathryn realized that a rabbit hutch would not provide the necessary space, heat and a comfortable environment for her chickens over our long MN winter where we often get cold snaps with daily highs still below 0F. My generous husband offered up his newly acquired carpentry skills (perfected over the summer of '08 on our coop!) and a couple of weekends to get the job done. I researched the BYC for design ideas, drew up the plans and created a budget. With the exceptional help of our friend, Eric, the two guys built this beautiful coop. 
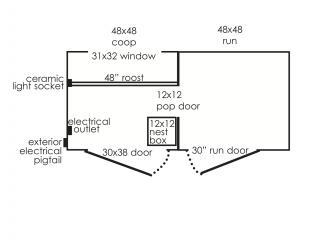
The Plans:
The Details:
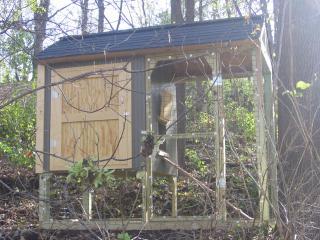
Style: Playhouse design for 3 standard hens
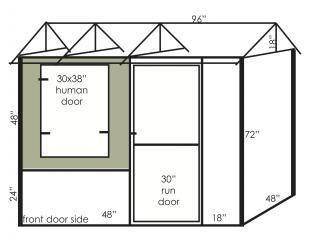
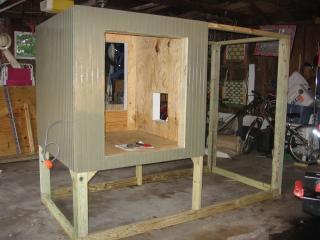
Size: 4x8 run with a 4x4 coop, entire structure is 7.5 ft. tall
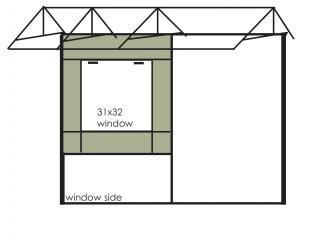
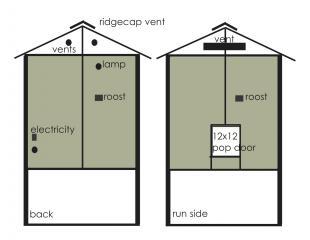
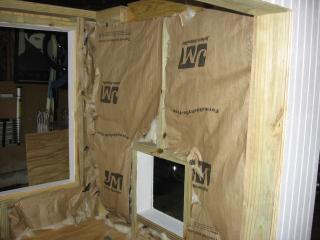
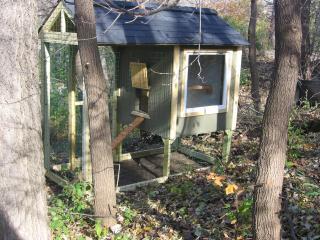
Materials: 2x4 framing with screws throughout. Siding/Doors are plywood beadboard, trimmed in pine 1x4. R17 fiberglass insulation behind plywood interior walls. 31x32 vintage glass/wood window, hinged at the top and locked at the bottom (and facing South). All wood is green treated. Paint is exterior semigloss enamel over Kilz oil-based primer. All trim and the doors are left natural and coated with linseed oil. Roof has 3 trusses at 24 inches (for snow load) over the coop and 2 trusses at 48 inches over the run, full insulation, ridgecap ventilation and asphalt shingles.
Electric/Heat: Hardwired ceramic socket heat bulb fixture and one exterior grade electrical outlet with a "pigtail" electrical plug for use with an extension cord.
Ventilation: 18x6 inch metal vent located in the run-side gable, two 4 inch round vents located in the backside gable and 8 ft. of ridgecap ventilation in the roof.
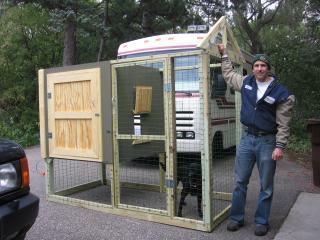
Run: Galvanized and coated 1x2 inch welded wire, attached with fender washers and screws. Corner posts are 4x4 and all other lumber is 2x4. Door is 30 x72 inches. To be added: Hardware wire 2 ft. up from ground level and 1 ft. below.
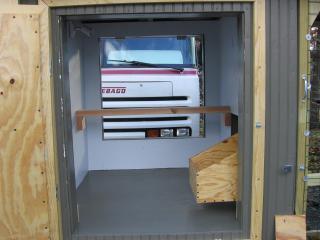
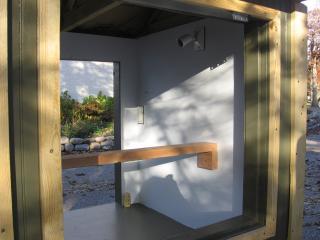
Interior: Includes a 4 ft cedar 2x4 roost and one 12x12 open top nesting box. To be added in Spring: Hardware wire in the window.

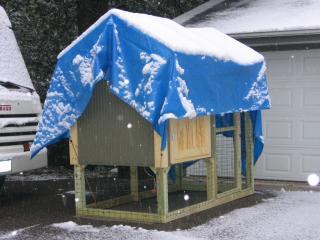
Even the onset of early snow in mid-October didn't deter them.
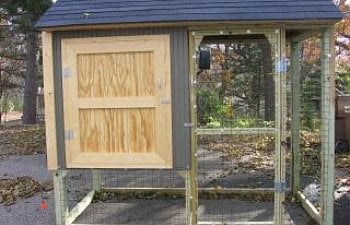
Here is the finished coop, without the window (it was installed after delivery to avoid breakage), ladder and the ledge in front of the door to hold the shavings in…
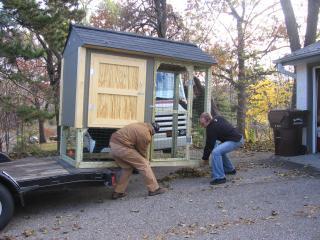
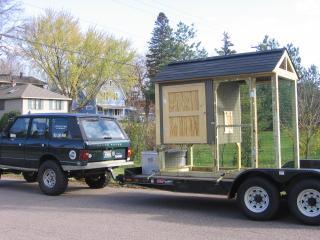
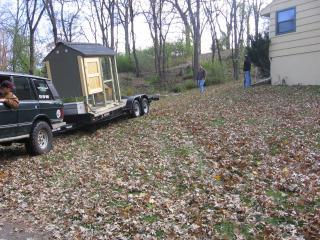
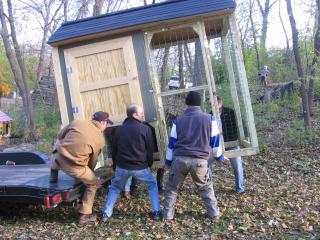
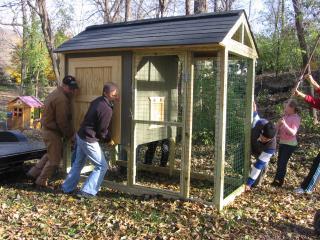
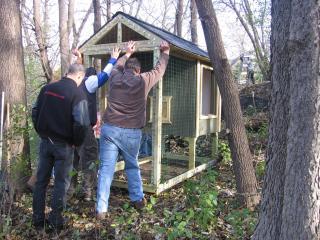
On November 1, with the help of a car hauling trailer and the strong backs of some good friends, the coop was loaded up, delivered and positioned into it's resting spot, high amongst the trees in Kathryn's back yard. Yes, the hill really was that STEEP and the coop really was that H.E.A.V.Y.
I received a lovely email from her that evening saying that the chickens put themselves to bed that night on their new roost and everyone was comfortable and very pleased. They could see the chickens inside their coop from the kitchen window. To me, the look on her kids faces says it all.

What would we have done differently:
* In an effort to make the run door easier to use, we ripped the 2x4 in half. After all was said and done, I felt like it was a little too flimsy and flexed a bit more than I prefer. I'd probably change the door back to 2x4 framing and beef up the latches.
* Budget didn't allow for hardware wire, so it will be added at a later date. The chickens are free-rangers at this point, so the main purpose of the coop is to provide warmth and safety at night and during cold weather.
* Because the coop was built off-site, it will be up to the new owners to bury wire around the perimeter. I feel like this is easier to do early in the construction process, but it just wasn't possible.
* I put a fair amount of thought into the pitch of the roof, but am still a little frustrated with it -- while I wanted it steep to shed snow, I also wanted a little more overhang than I got. We found that too much overhang impeded the operation of the doors. But the shallow overhang allows rain to run down the siding. Sigh. Maybe I could talk her into little gutters made of PVC to direct water????
* The large window is not wired yet for safety. This will be left wire-less through the winter for maximum sunshine -- it won't be opened until Spring anyways. I have a feeling that the chooks are going to make the window ledge their favorite place to sunbathe, which might make a mess of the wall beneath the window. Oh well, it's painted...
* The ladder from the pop door is a little steep. We'll wait to see if the chickens have difficulty navigating the steps and add more rungs if need be.
* I think the nest box might need a little ledge on the front - it's pretty narrow and might be uncomfortable for them to hop up upon.
* The pop door, while it's under the roof of the run, still faces West which is the direction of much of our weather. The coop is sheltered somewhat by the house, which is only 30 ft away. They might need to put a barrier in the pop door if it makes it too drafty inside.
Favorite Things:
* I am in love with the human door on the coop and the green color on the beadboard with the natural pine trim. The colors are just so pretty and the coop looks perfect nestled back in the trees. Someone described it to me as a big bird house.... well, yeah, sort of!
* We originally wanted to put on a corregated metal roof, both for aesthetics and for weight. But it had to be special ordered, so that was strike #1. Then, it was going to be expensive. Strike #2. Then I got to thinking that it *might* give us some fits with the snow/cold and condensation, blah blah blah. So, strike #3 and you're out. Which worked out just fine since I like the black roof. It's very smart looking.
* Painting the interior was one of the best moves EVER with my coop. Not only does it look pretty, but it reflects light and makes clean up soooo easy. I hope that Kathryn comes to appreciate the ease of maintenance that this simple detail will give her.
* That HUGE window is the BOMB. It lets in soooo much light and also gives the family a chance to peek in on the chickens from the comfort of inside their own home.