First, I should explain that I live in a historic house and must have anything on our property approved by a historical commission in a very painful and lengthy process. After two years of process, we finally got to build a new garage this year. I ordered 6 peeps for my February birthday with the intention of putting them under the stairs in the garage (no approval needed!) and hiding the run behind the garage (out of view from the street). Hence, "potter poulets".
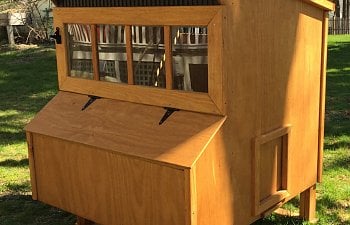
This is one plan from the construction. My husband insisted that I did not need any more projects, so we compromised and bought this coop. I made a few changes (watering system, moved the pop hole, changed the roosts, added vinyl on the floor) before adding the growing chickens to it.
RUN
The run: I decided to build 6' panels to use as a modular solution. I salvaged some boards and the door from a peacock pen a friend was tearing down (cleaned, built, and painted it all). I used PVC boards for the bottom because of contact with the ground, added 1/2" hardware cloth to the whole thing and screwed it together in the last corner that was left of my yard. A couple weeks ago, I pulled them apart and attached them, as intended, to the back of the finally finished garage. My husband dug the trench, and I stapled an additional foot of hardware cloth to the walls which extends underground. Now I'm working on adding a metal roof...
Or course, this is the part of the story where things get interesting. The builder insisted mid- summer that he needed to put a wall under the stairs, which of course ruined everything. They look at me and say, "Why don't you just build something under the stairs for them?" Now why didn't I think of that. hahaha So, after a weekend of convincing my husband that I could sell the (not cheap) coop we compromised on and that if I got them to frame if for me, it wouldn't be much work, I won!
FRAMING
I don't have many sketches, because it's an awkward space and most of the decisions I made on the fly with the builder. But I will say that (like everyone else) I learned a lot from having chickens in the first coop. Here are some pictures of the space with the changes I talked them into and a diagram to delineate the chicken space for some clarity.
Essentially, it is an L shaped stairway, and the chickens live under the landing and part of the higher portion of the stairs. I have access through a door at the tall end where there is space for me to stand and a I can reach a broom under the lower portion. I had the electrician add an outlet inside at the highest point above my door to power an automatic pop hole door. The parallelograms are windows and the rectangle below is nesting boxes. Across from the windows, at the back, is the pop hole. And that's where my work began.
The builders and I lined the inside with OSB, and my husband sealed the concrete floor so that the garage isn't affected by the chickens. It is not insulated, but I would assume the R value is higher than it would be if it were a stand-alone coop outside. We'll see how winter goes.
SYSTEMS & NESTING BOXES
I learned a lot from building a system for the other coop and separate water and food systems for "naughty chicken's" time-out pen. (which clearly, is a whole nother sorted tale) These pass through a 3" space in the framing and can be filled from outside the coop! I have used the chicken nipples before, which are great, but if you have too much water or too much pressure from vertical water, they start to drip, and I really didn't want water dripping and destroying the OSB. So, I went with the cups. They seem to be working fine, although my hopes are somewhat low for the water not freezing this winter; we'll see. The food: this type of feeder gives me less mess. The pipes below the food junction are filled with concrete, just to put them at the right height, and the whole thing is 45 degree angles so the food doesn't get stuck when I pour it in. When I began this portion, I didn't know I only had 3" of space to go through, so my waterer holds maybe 8 days of water (too much) and the food only lasts for a day and a half. So, I may tweak that later.
The nesting boxes are plywood with stained exterior. I built up the floor of the portion that extrudes through the wall to meet the sill and covered it in wood-printed vinyl for easier cleaning. They are slightly tighter than typical nesting boxes, but the ladies seem to be happy. They also stay much cleaner than the old coop nesting boxes. The floor being built up higher and the board at the edge makes it impossible for them to kick wood shavings in there, so my eggs are cleaner than ever!
ACCESS DOOR & WINDOWS
I rented a mitre saw to build the door and the windows. The door is plywood with trim on the exterior and blocking on the interior, modeled after the door on the old coop, but larger, and I added a rubber weather strip to the bottom (sandwiched it into the door construction).
The windows were the bane of my chicken coop building existence! I still have not figured out how to cut a 26 degree angle at those top corners, but at some point, I'll figure out some sort of patch. I tacked hardware cloth on the inside so that no one sits up there and nailed a piece of trim to cover the sharp edges. At some point I plan to build two plexi panels and hinge them to the people-side so that I can control the temperature, but I'm going to see how it goes open first.
ROOST
The roosts are removable and hang just inside the door against the tallest wall. I used picture framing bits to hang the whole thing. It puts the majority of the poop just inside the door, and they don't seem to track through it at all!!!!!
The hens seem to be happy so far, and I'm glad to be mostly finished! Hopefully this post isn't too long. It took me many, many nap times to complete, and although I still have the run roof to complete, I can't wait to move on to something else.