Here is the initial framing of the coop. The legs are just 4X4 pressure treated wood. I just bought one 8" piece and cut it into 4 equal legs. So they are approximately 24" each. I placed cheap pavers on the ground under the legs that were all leveled. This should keep moisture away from the wood. All of the framing was done with 2x3's to save a little on cost and to add a little to the interior space.The overall size of the coop is 4'x6' plus the nesting boxes. It is raised about 2' off the ground and is about 7' tall at the peak. The biggest drawback is that it is very heavy for its size. However, I don't plan on moving it so it is alright.

My faithful companion Afton likes what he sees so far. Luckily, he is very friendly to the chickens.
Another view of the initial framing.
This picture shows the location of the coop and run. The run will be mostly comprised of my side yard. This way I won't have to build as much chicken fencing. I will only have to separate the side yard from the rest of my backyard.
This show the roof framing going up as well as the first of the inside panels before being trimmed. I basically built this like a house with panels in the inside and outside. I am hoping this will give better insulation, wind protection as well as strength and rigidity.
All of the interior panels are attached.
The roof panels are added. This coop will have two large doors for access and cleaning, one small door for the chicken entrance, three windows that can be closed if desired and 3 nesting boxes which can be accessed from the outside for easy egg collection.
Outside panels going on. I used exterior paneling with faux wood grain so that when I paint it, it will look like a classic barn.
Exterior panels applied and cut out. I used a router with a tracing bit to cut out all the doors and windows. This way, I could just attach the panels and the cutouts would be exactly the same as the openings.
Starting to apply wood trim. This helps give it a barn look but it also covers the joints where the panels come together at the corners. I also used asphalt shingles to cover roof. One tricky part was that since I only used 7/16" osb for the roof panels, I had to use the shortest roofing nails I could find. None of them actually came all the way through to the inside but you can definately see bulges from the inside.
Here it is right before adding the nesting boxes.
Here are the nesting boxes added to the end.
The doors have been hinged and latches added. You can see the window insert is in place. The idea is that I will just slide these into the windows and leave them there at times. But I think I will eventually add a hinged cover to make it easier to open and close at will.
View on the inside with the heat lamp going. Initially, I put the chickens in there with the original cage I use when I got them. They liked to use the small cage to sleep in for a few days. Then I removed it.
Painting made it look so much better. I added metal flashing to the roof edge to add better protection from water. But I painted over it so that it would match the rest of the white trim.
I designed the hinge so that water could run in but would be directed out by a channel underneath the hinge that was lined with another piece of metal roof flashing. This has worked great.
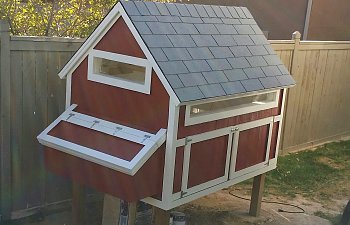
This shows the coop with the access doors open. I didn't place any lip or edge inside so that it would be easy to sweep out the coop when cleaning. Also note that the windows have the covers in them here. But these are easily removed for better ventilation.
Chicken access door open and window cover removed.
Finished coop with all window covers removed.
View inside coop looking at the nesting boxes. I am keeping food in one box temporarily. I have two roosts at different heights. I can add a third if needed. I will just wait and see. I painted the inside of the coop just to give better moisture protection to the wood. But I think it looks much cleaner and brighter as well.
I placed a hole in the side so that I could have my heat lamp installed in the coop. I just have to plug it in and it is good to go.
I finally added the chicken ramp. I made it about 50" long. You can see the cord coming out to plug in the heat lamp when needed.
My faithful companion Afton likes what he sees so far. Luckily, he is very friendly to the chickens.
Another view of the initial framing.
This picture shows the location of the coop and run. The run will be mostly comprised of my side yard. This way I won't have to build as much chicken fencing. I will only have to separate the side yard from the rest of my backyard.
This show the roof framing going up as well as the first of the inside panels before being trimmed. I basically built this like a house with panels in the inside and outside. I am hoping this will give better insulation, wind protection as well as strength and rigidity.
All of the interior panels are attached.
The roof panels are added. This coop will have two large doors for access and cleaning, one small door for the chicken entrance, three windows that can be closed if desired and 3 nesting boxes which can be accessed from the outside for easy egg collection.
Outside panels going on. I used exterior paneling with faux wood grain so that when I paint it, it will look like a classic barn.
Exterior panels applied and cut out. I used a router with a tracing bit to cut out all the doors and windows. This way, I could just attach the panels and the cutouts would be exactly the same as the openings.
Starting to apply wood trim. This helps give it a barn look but it also covers the joints where the panels come together at the corners. I also used asphalt shingles to cover roof. One tricky part was that since I only used 7/16" osb for the roof panels, I had to use the shortest roofing nails I could find. None of them actually came all the way through to the inside but you can definately see bulges from the inside.
Here it is right before adding the nesting boxes.
Here are the nesting boxes added to the end.
The doors have been hinged and latches added. You can see the window insert is in place. The idea is that I will just slide these into the windows and leave them there at times. But I think I will eventually add a hinged cover to make it easier to open and close at will.
View on the inside with the heat lamp going. Initially, I put the chickens in there with the original cage I use when I got them. They liked to use the small cage to sleep in for a few days. Then I removed it.
Painting made it look so much better. I added metal flashing to the roof edge to add better protection from water. But I painted over it so that it would match the rest of the white trim.
I designed the hinge so that water could run in but would be directed out by a channel underneath the hinge that was lined with another piece of metal roof flashing. This has worked great.
This shows the coop with the access doors open. I didn't place any lip or edge inside so that it would be easy to sweep out the coop when cleaning. Also note that the windows have the covers in them here. But these are easily removed for better ventilation.
Chicken access door open and window cover removed.
Finished coop with all window covers removed.
View inside coop looking at the nesting boxes. I am keeping food in one box temporarily. I have two roosts at different heights. I can add a third if needed. I will just wait and see. I painted the inside of the coop just to give better moisture protection to the wood. But I think it looks much cleaner and brighter as well.
I placed a hole in the side so that I could have my heat lamp installed in the coop. I just have to plug it in and it is good to go.
I finally added the chicken ramp. I made it about 50" long. You can see the cord coming out to plug in the heat lamp when needed.