My Homemade Incubator
I've enjoyed reading about all the homemade incubators many of you have made. So being the mechanical type I am... I thought... "hey, I could build that!". So I decided instead of getting day old chicks to begin my family's adventure into raising a small backyard flock... I would start at the egg! (Cause we all know the egg came before the chicken!) Yes. I would build my own incubator and hatch my own chicks!
So I thought I would share my take on the homemade incubator.
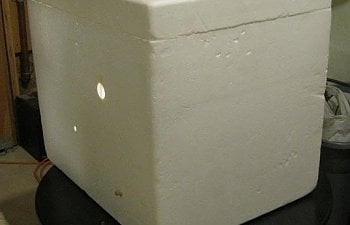
First you got to start with a good box. I wanted a heavy duty styrofoam box... not the 1/4" thick flimsy ones at Walmart (although they can work too). I wanted to recycle so I was looking for used coolers at the thrift shop. I figured I'd end up with an old plastic kind which I would have made work... but I wanted styrofoam since it would be so much easier to cut, put holes in and screw into. I got very lucky. The thrift store had a large, very heavy duty, 1.5" thick styrofoam cooler for $6. It was perfect! Very similar to the "Omaha Steak" boxes people also find.
-- ramble about insulation -----------------------------------------------
I like styrofoam for its great insulating value. It will hold heat inside very well. A thick foam box can be heated with a small light bulb because it's so well insulated that it doesn't lose much heat that's inside it. A glass box of the size volume would take a much larger bulb or multiple light bulbs to heat it because glass is a very poor insulator and would lose a lot of heat from inside the box. Glass has an R-value of 0.14 per inch (when have you ever seen inch thick glass?) Wood is a little better than glass. Wood has an R-value of 1 per inch. Styrofoam (molded expanded polystyrene, or MEPS... Styrofoam is a trademarked name from Dow) has an R-value of 3.5 per inch. That is probably why many of the commercial small incubators are made out of Styrofoam.
** update after first hatch ** I can see why people like the plastic namebrand incubators for their ease of cleaning. After my first hatch I can see my incubator is in need of a good cleaning from all the chick fuzz and such from hatching. But it still worked great!
-- end ramble -----------------------------------------------
Like others, I used a pane of glass out of an old picture frame for my observation window... $1 from thrift store. I cut the hole in the lid 1/2" smaller than the glass pane. Then I cut a recessed lip in the lid to sit the glass pane flush. Then finished it off with some classy duct tape!

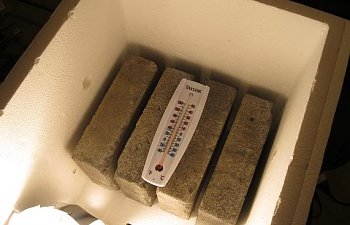
It took some experimenting and planning to figuring out how to package all the needed items in there: light, fan, t-stat, receptacle, water tray, area for eggs/chicks, etc. Once I had a plan, I was able to see how much space was left over for some heat sinks... thermal mass. I sized up a bunch of jars with water, but then remembered I had some paver stones. I tried them out and they fit... so I filled it up. These pavers are directly under the wire shelf where the eggs/chicks reside.
Here is a good link talking about thermal mass: http://cmfarm.us/thermalmass.html

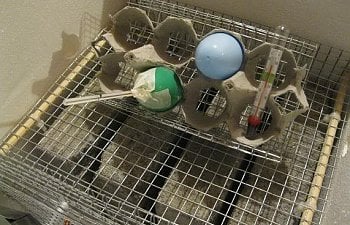
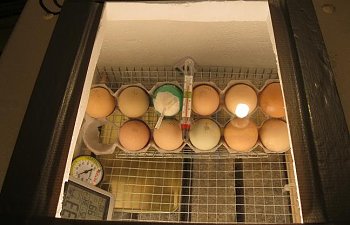
Here's a picture of the wire shelf in place. It fits nicely over top the pavers. The wood dows on either side just give the center some sag support. I made an angled wire wedge egg carton holder to tilt the eggs. Now when I need to "turn the eggs", I can just spin the egg carton 180 and put it back on the holder. In my egg carton, which is all cut up for better air flow, you can see here one plain plastic egg and one plastic egg that I taped shut with a hole in the top and filled with liquid dish soap with a glass bulb thermometer sticking out. That's my homemade Egg-o-meter! The thermometer originally had the temp marking on the plastic house (seen above pic) so I used a Sharpie and marked the 100 degree point on the glass part so I could remove it from it's plastic and just use the glass part. All I care about is that this thermometer reaches and stays on the black dot! (not very scientific... I know)

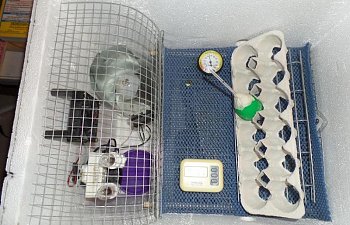
Next was the light, fan, thermostat(t-stat) and wiring. Since I needed an always-on power source for the old cell phone charger (transformer) to power my old computer CPU fan, I figured that I could easily use a regular outlet receptacle for power and then tap off of that to wire the t-stat and light. So I put in a regular outlet wired to an old cut cord from some old appliance for power. Into the outlet I plugged a small 4watt night light so I could see in the box even when the main light was off. I also plugged in the cell phone charger. The output from this charger's transformer was only 5volts DC... and even though most computer fans run off of 12volts... I knew it would work fine... even if not at full blast. (And it does). The charger cord had a red and black wire in it. Hooked those to the red and black wires on the fan (not using the yellow speed sensor wire) and we were in business. I originally had the fan positioned down low in the box facing the lamp, but I found it didn't circulate well down there when I would take temp readings around the wire shelf where the eggs lay. So I repositioned the fan... up higher in the box, facing the wire shelf and centered. This created much more uniform temps at all corners of the wire tray. Much better!
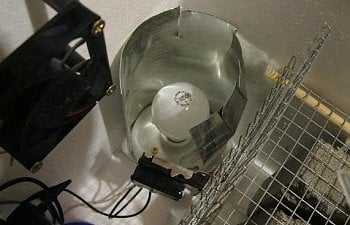
From the wiring screws on the side of the outlet I connected the power (black) and common (white) wires I would need for the main light. I ran the common directly to the ceramic light bulb base (silver screw) I bought at Home Depot (< $2). I ran the power/hot wire to one terminal on the t-stat (doesn't matter which one). Then ran a separate wire from the *other* t-stat terminal to the power screw on the ceramic bulb base (gold screw). That's all there was to wiring.

To shield the eggs/chicks from the intense radiant energy coming off the light bulb, I made a sort of chimney shield to surround the bub. But I made sure my t-stat was in direct line-of-sight of the bulb. You can see I have the backside of the hot water heater lower thermostat (~$8 at Home Depot) facing directly at the light bulb... only about 2.5" away. Set the screw adjustment on the t-stat to come on at the desired low temperature... and position the t-stat the needed distance way from the bulb (start at 3-4 inches... then work closer) to get the shortest "light on" amount of time before the t-stat turns the light off... so that while the light is on you get enough heat pumped into the box to get to the desired high temp. If adjusted correctly, you can get a 1 degree +/- temp swing.
--- more t-stat setting details ---------------------------------------------
Here is a great link with video about using a water heater thermostat: http://cmfarm.us/WHTincubator.html
The water heater t-stat's distance away from the light bulb is dependent on a number of factors. There is no perfect distance for everybody.
The bulb wattage (how much heat it gives off) matters. The size of the incubator (how much space to heat) matters. How well the incubator holds heat (styrofoam vs glass) matters.
Use the temp adjustment screw on the t-stat to set the TURN ON temperature you want... based on temps from a thermometer near the eggs (ignore the temp numbers on the t-stat it's self). Use the distance between the light bulb and t-stat (backside of t-stat in direct line of sight to bulb... don't cover bulb shining on t-stat) to set the amount of time the light stays ON... ie the cycle time. The time the light bulb is on is the only time your putting heat into your box. You only need enough heat to reach your desired upper temp. Shorten the ON cycle by moving the t-stat ever so slightly closer to the bulb until the ON cycle puts in enough heat to get you to your upper temp. Be sure to let the whole cycle run OFF then back ON... between each adjustment.
In my very well insulated box (1.5" styrofoam)... using a 60W bulb (plus a small 4W night light which is always on)... I have my t-stat 2.5" (a little less than 3 fingers) away from the bulb. This gives me a ~3 minute ON cycle (5min off) for my bulb which raised the temps enough to go from turn-on-temp of 99 to 100 degrees. Keep in mind that after the bulb goes out... temps will continue to rise a tad before dropping. Earlier in my attempts to dial-in my box... I had the t-stat 3" way and that gave me a 5min ON cycle... but that put in too much heat... hit 101.5 temps... so I shortened the ON time by moving the t-stat closer to the bulb... till I found the "sweet spot"
--- end more details ---------------------------------------------

For humidity, I've filled the 4" round water tray (plastic lid). After this equalized, my incubator is holding 35% RH and 100 degrees. Sound good to me for incubating days 1-18. I'll be using the "dry" hatch methods. For days 19-21, I am using a tin lid of about 30 sq inches. With this full my box holds an RH% of 55%... good for hatching.
****** updated: 2/5/2011 at 4pm **************
Picked up my eggs from a nice lady who lives near me today. A day earlier than planned. So I let them warm up to room temperature while I prepped the incubator... then off to bator they went!

My eggs were all laid in the past 3 days. She marked the eggs and told me I got:
2 Ameruacana
2 Buff Orp mix
1 Barred Rock mix
1 Light Brahma mix
1 Blue Wyandotte mix
2 unknown browns (of questionable fertility)
All the "mix" are because she knows who laid them but not which rooster is the daddy! haha.
Exciting times lay ahead!
****** updated: 2/26/2011 **************
We have success! Today (day 21), we had 5 fuzzy, fun little chicks hatch! They seem healthy and energetic!
From the original 10 eggs, 4 turned out to be infertile during day 10/12 candling and were removed. They had no growth in them.
6 eggs went into lockdown (day 19-21), and 5 pipped early on day 21. Those 5 went on to hatch... 3 in the mid morning and 2 later in the evening. The 6th egg never pipped and didn't make it. I gave it an extra couple days and then "pulled the plug". After cracking open the egg, I saw a developed chick but for some reason it never pipped through to the air sac. Too bad...
================================================================================================
ROUND TWO! Update... Feb 2014
Well... time again for some more chicks! Decided to give my homemade incubator another round...

I got a dozen mixed, mutt, hatching eggs. I was told the flock had an Ameraucana and BO roosters over 10 different hens. The eggs were a variety of colors from white, to brown, to blue, to green. Of the 12 eggs, all but 1 were fertile as determined by day 7 candling.
The incubator worked well. The t-stat keep the temps in the 99.1* - 99.9* range consistently throughout the process. I did notice that during lockdown when I upped the humidity to 60-65% RH... that the temps seems to creep up about a degree. But that could have been due to repositioning the thermometer as I had to make floor space to lay out the eggs.
Hatching Day went very well. Had the first pip the night prior... and awoke to one chick out, up and ready to go. He came from the smallest egg in the bunch so he must have cooked quicker! The rest started popping that morning/afternoon. All-in-all, 9 cute little fuzzies hatched out of the 11 eggs that went into lockdown. Later investigating showed one egg only partially developed and one egg pipped on the wrong end of the egg and didn't make it.

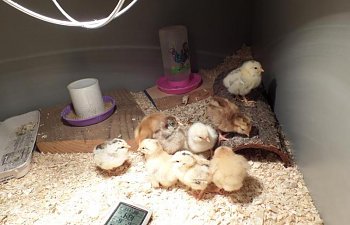
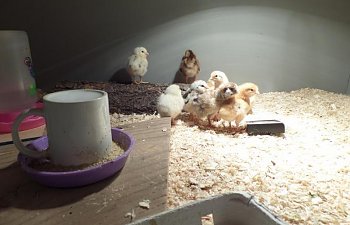
The 9 chicks are doing well... loving the fermented chick mash I feed them and seem full of life. There are obvious signs of Ameraucana (Easter Egger) markings on them as well as Buff coloring too! Should make a lovely bunch. Now only if I could tell the boys from the girls at this point! Hoping to get at least 4-5 hens out of this group.


Happy Hatching!
I've enjoyed reading about all the homemade incubators many of you have made. So being the mechanical type I am... I thought... "hey, I could build that!". So I decided instead of getting day old chicks to begin my family's adventure into raising a small backyard flock... I would start at the egg! (Cause we all know the egg came before the chicken!) Yes. I would build my own incubator and hatch my own chicks!
So I thought I would share my take on the homemade incubator.
First you got to start with a good box. I wanted a heavy duty styrofoam box... not the 1/4" thick flimsy ones at Walmart (although they can work too). I wanted to recycle so I was looking for used coolers at the thrift shop. I figured I'd end up with an old plastic kind which I would have made work... but I wanted styrofoam since it would be so much easier to cut, put holes in and screw into. I got very lucky. The thrift store had a large, very heavy duty, 1.5" thick styrofoam cooler for $6. It was perfect! Very similar to the "Omaha Steak" boxes people also find.
-- ramble about insulation -----------------------------------------------
I like styrofoam for its great insulating value. It will hold heat inside very well. A thick foam box can be heated with a small light bulb because it's so well insulated that it doesn't lose much heat that's inside it. A glass box of the size volume would take a much larger bulb or multiple light bulbs to heat it because glass is a very poor insulator and would lose a lot of heat from inside the box. Glass has an R-value of 0.14 per inch (when have you ever seen inch thick glass?) Wood is a little better than glass. Wood has an R-value of 1 per inch. Styrofoam (molded expanded polystyrene, or MEPS... Styrofoam is a trademarked name from Dow) has an R-value of 3.5 per inch. That is probably why many of the commercial small incubators are made out of Styrofoam.
** update after first hatch ** I can see why people like the plastic namebrand incubators for their ease of cleaning. After my first hatch I can see my incubator is in need of a good cleaning from all the chick fuzz and such from hatching. But it still worked great!
-- end ramble -----------------------------------------------
Like others, I used a pane of glass out of an old picture frame for my observation window... $1 from thrift store. I cut the hole in the lid 1/2" smaller than the glass pane. Then I cut a recessed lip in the lid to sit the glass pane flush. Then finished it off with some classy duct tape!
It took some experimenting and planning to figuring out how to package all the needed items in there: light, fan, t-stat, receptacle, water tray, area for eggs/chicks, etc. Once I had a plan, I was able to see how much space was left over for some heat sinks... thermal mass. I sized up a bunch of jars with water, but then remembered I had some paver stones. I tried them out and they fit... so I filled it up. These pavers are directly under the wire shelf where the eggs/chicks reside.
Here is a good link talking about thermal mass: http://cmfarm.us/thermalmass.html
Here's a picture of the wire shelf in place. It fits nicely over top the pavers. The wood dows on either side just give the center some sag support. I made an angled wire wedge egg carton holder to tilt the eggs. Now when I need to "turn the eggs", I can just spin the egg carton 180 and put it back on the holder. In my egg carton, which is all cut up for better air flow, you can see here one plain plastic egg and one plastic egg that I taped shut with a hole in the top and filled with liquid dish soap with a glass bulb thermometer sticking out. That's my homemade Egg-o-meter! The thermometer originally had the temp marking on the plastic house (seen above pic) so I used a Sharpie and marked the 100 degree point on the glass part so I could remove it from it's plastic and just use the glass part. All I care about is that this thermometer reaches and stays on the black dot! (not very scientific... I know)
Next was the light, fan, thermostat(t-stat) and wiring. Since I needed an always-on power source for the old cell phone charger (transformer) to power my old computer CPU fan, I figured that I could easily use a regular outlet receptacle for power and then tap off of that to wire the t-stat and light. So I put in a regular outlet wired to an old cut cord from some old appliance for power. Into the outlet I plugged a small 4watt night light so I could see in the box even when the main light was off. I also plugged in the cell phone charger. The output from this charger's transformer was only 5volts DC... and even though most computer fans run off of 12volts... I knew it would work fine... even if not at full blast. (And it does). The charger cord had a red and black wire in it. Hooked those to the red and black wires on the fan (not using the yellow speed sensor wire) and we were in business. I originally had the fan positioned down low in the box facing the lamp, but I found it didn't circulate well down there when I would take temp readings around the wire shelf where the eggs lay. So I repositioned the fan... up higher in the box, facing the wire shelf and centered. This created much more uniform temps at all corners of the wire tray. Much better!
From the wiring screws on the side of the outlet I connected the power (black) and common (white) wires I would need for the main light. I ran the common directly to the ceramic light bulb base (silver screw) I bought at Home Depot (< $2). I ran the power/hot wire to one terminal on the t-stat (doesn't matter which one). Then ran a separate wire from the *other* t-stat terminal to the power screw on the ceramic bulb base (gold screw). That's all there was to wiring.
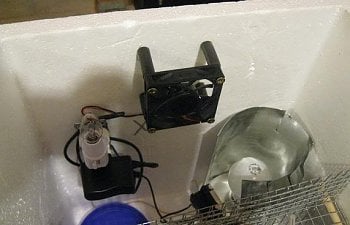
To shield the eggs/chicks from the intense radiant energy coming off the light bulb, I made a sort of chimney shield to surround the bub. But I made sure my t-stat was in direct line-of-sight of the bulb. You can see I have the backside of the hot water heater lower thermostat (~$8 at Home Depot) facing directly at the light bulb... only about 2.5" away. Set the screw adjustment on the t-stat to come on at the desired low temperature... and position the t-stat the needed distance way from the bulb (start at 3-4 inches... then work closer) to get the shortest "light on" amount of time before the t-stat turns the light off... so that while the light is on you get enough heat pumped into the box to get to the desired high temp. If adjusted correctly, you can get a 1 degree +/- temp swing.
--- more t-stat setting details ---------------------------------------------
Here is a great link with video about using a water heater thermostat: http://cmfarm.us/WHTincubator.html
The water heater t-stat's distance away from the light bulb is dependent on a number of factors. There is no perfect distance for everybody.
The bulb wattage (how much heat it gives off) matters. The size of the incubator (how much space to heat) matters. How well the incubator holds heat (styrofoam vs glass) matters.
Use the temp adjustment screw on the t-stat to set the TURN ON temperature you want... based on temps from a thermometer near the eggs (ignore the temp numbers on the t-stat it's self). Use the distance between the light bulb and t-stat (backside of t-stat in direct line of sight to bulb... don't cover bulb shining on t-stat) to set the amount of time the light stays ON... ie the cycle time. The time the light bulb is on is the only time your putting heat into your box. You only need enough heat to reach your desired upper temp. Shorten the ON cycle by moving the t-stat ever so slightly closer to the bulb until the ON cycle puts in enough heat to get you to your upper temp. Be sure to let the whole cycle run OFF then back ON... between each adjustment.
In my very well insulated box (1.5" styrofoam)... using a 60W bulb (plus a small 4W night light which is always on)... I have my t-stat 2.5" (a little less than 3 fingers) away from the bulb. This gives me a ~3 minute ON cycle (5min off) for my bulb which raised the temps enough to go from turn-on-temp of 99 to 100 degrees. Keep in mind that after the bulb goes out... temps will continue to rise a tad before dropping. Earlier in my attempts to dial-in my box... I had the t-stat 3" way and that gave me a 5min ON cycle... but that put in too much heat... hit 101.5 temps... so I shortened the ON time by moving the t-stat closer to the bulb... till I found the "sweet spot"
--- end more details ---------------------------------------------
For humidity, I've filled the 4" round water tray (plastic lid). After this equalized, my incubator is holding 35% RH and 100 degrees. Sound good to me for incubating days 1-18. I'll be using the "dry" hatch methods. For days 19-21, I am using a tin lid of about 30 sq inches. With this full my box holds an RH% of 55%... good for hatching.
****** updated: 2/5/2011 at 4pm **************
Picked up my eggs from a nice lady who lives near me today. A day earlier than planned. So I let them warm up to room temperature while I prepped the incubator... then off to bator they went!
My eggs were all laid in the past 3 days. She marked the eggs and told me I got:
2 Ameruacana
2 Buff Orp mix
1 Barred Rock mix
1 Light Brahma mix
1 Blue Wyandotte mix
2 unknown browns (of questionable fertility)
All the "mix" are because she knows who laid them but not which rooster is the daddy! haha.
Exciting times lay ahead!
****** updated: 2/26/2011 **************
We have success! Today (day 21), we had 5 fuzzy, fun little chicks hatch! They seem healthy and energetic!
From the original 10 eggs, 4 turned out to be infertile during day 10/12 candling and were removed. They had no growth in them.
6 eggs went into lockdown (day 19-21), and 5 pipped early on day 21. Those 5 went on to hatch... 3 in the mid morning and 2 later in the evening. The 6th egg never pipped and didn't make it. I gave it an extra couple days and then "pulled the plug". After cracking open the egg, I saw a developed chick but for some reason it never pipped through to the air sac. Too bad...
================================================================================================
ROUND TWO! Update... Feb 2014
Well... time again for some more chicks! Decided to give my homemade incubator another round...
I got a dozen mixed, mutt, hatching eggs. I was told the flock had an Ameraucana and BO roosters over 10 different hens. The eggs were a variety of colors from white, to brown, to blue, to green. Of the 12 eggs, all but 1 were fertile as determined by day 7 candling.
The incubator worked well. The t-stat keep the temps in the 99.1* - 99.9* range consistently throughout the process. I did notice that during lockdown when I upped the humidity to 60-65% RH... that the temps seems to creep up about a degree. But that could have been due to repositioning the thermometer as I had to make floor space to lay out the eggs.
Hatching Day went very well. Had the first pip the night prior... and awoke to one chick out, up and ready to go. He came from the smallest egg in the bunch so he must have cooked quicker! The rest started popping that morning/afternoon. All-in-all, 9 cute little fuzzies hatched out of the 11 eggs that went into lockdown. Later investigating showed one egg only partially developed and one egg pipped on the wrong end of the egg and didn't make it.
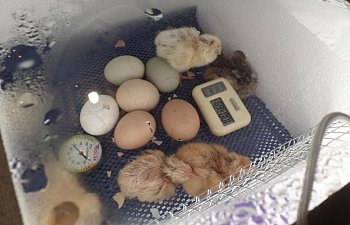
The 9 chicks are doing well... loving the fermented chick mash I feed them and seem full of life. There are obvious signs of Ameraucana (Easter Egger) markings on them as well as Buff coloring too! Should make a lovely bunch. Now only if I could tell the boys from the girls at this point! Hoping to get at least 4-5 hens out of this group.
Happy Hatching!
