[FONT=arial black,avant garde]Self Feeder Plans[/FONT]
After posting my coop pictures I had a lot of inquiries about my self feeder that I built from scratch. I've seen feeders that you can buy also but this is fairly simple to build if you're handy with a saw. I also like it because mine holds a lot of feed and I don't have to worry about my chickens going hungry if I can't get to them for a few days. My design is for a double coop and the feeder sits in the separation wall so it serves both coops but it would be easy to only build half of it for a single coop. I'm not a great artist or draftsman but I drew it out as best I could below with comments and dimensions.

[FONT=arial,helvetica,sans-serif]Ok, it may be a little difficult to read but it doesn't have to be exactly to scale. In fact you can modify it for your own purposes. As long as you can get the angles close it will work. The important part is the angle and depth of the center wedge on the inside. Mine is 12" high and angled so there is a 1" space between it and the outer wall. I wouldn't go anymore than that or the feed may overflow nor would I go less than 1/2" or it may clog. Having an inclining slant on the outer wall toward the wedge that insures the feed will flow toward it and then down the wedge to the trough. It's also important to nail or screw a strip of wood in the center of the trough to keep the chickens from scratching the feed out. Just give them enough room to get their heads in. [/FONT]
[FONT=arial,helvetica,sans-serif]Beginning framing and side walls. Notice the 2 X 4s are on angles at the bottom and the wedge drawn out on the inside of the wall. Also I hadn't yet cut the angle at the top for the hinged feed doors (it was an afterthought), so I would make sure in cut that before building.[/FONT]
I framed out the wedge with 2X 4s cut on a miter saw. After that I cut 1/2 plywood and nailed it to the wedge frame. The drawn line is 1/2" above the frame for a reason, it allows the 1/2" plywood that will be screwed to the frame. After screwing the plywood to the frame there will only be a 1" space between it and the corner at the top of the trough.
I covered the plywood wedge with rubber blankets. This is where you can use your imagination as I got these from work. Originally I intended to use sheets of flat tin but you don't have to use anything at all as long as the plywood surface is smooth enough to allow the feed to flow. I wouldn't recommend OSB because it's hard to smooth out.
[FONT=arial,helvetica,sans-serif]I wish I had taken more pictures during construction but I had no idea I'd be posting it online at the time. I used 2 X 3s to frame up the sides so I could have something to screw into for the front walls. Notice the wood strip in the center of the trough. Make sure you make the hinged lid wider than the actual feeder so you have something to grab when you lift it or you can just put a handle on it. The angle for the lid is important because you don't want your chickens to fly up there and poop in the feed trough so make it steep enough so that they can't do that.[/FONT]
Here's a quick sketch for a single feeder. It's simply what I did cut in half. You don't have to follow these plans exactly to make it work. The important things are the interior angle to divert the feed to the trough, the exterior wall angle to divert the feed to the interior angle and the space between the outer wall angle and the interior angle that allows the feed to flow to the trough. If you have any questions please send me a message and I'll do my best to help you out. I didn't even draw this out on paper when I built it and didn't even know if it would work or not. But it works great and it's one of the features of my new coop that I love the most.
After posting my coop pictures I had a lot of inquiries about my self feeder that I built from scratch. I've seen feeders that you can buy also but this is fairly simple to build if you're handy with a saw. I also like it because mine holds a lot of feed and I don't have to worry about my chickens going hungry if I can't get to them for a few days. My design is for a double coop and the feeder sits in the separation wall so it serves both coops but it would be easy to only build half of it for a single coop. I'm not a great artist or draftsman but I drew it out as best I could below with comments and dimensions.

[FONT=arial,helvetica,sans-serif]Ok, it may be a little difficult to read but it doesn't have to be exactly to scale. In fact you can modify it for your own purposes. As long as you can get the angles close it will work. The important part is the angle and depth of the center wedge on the inside. Mine is 12" high and angled so there is a 1" space between it and the outer wall. I wouldn't go anymore than that or the feed may overflow nor would I go less than 1/2" or it may clog. Having an inclining slant on the outer wall toward the wedge that insures the feed will flow toward it and then down the wedge to the trough. It's also important to nail or screw a strip of wood in the center of the trough to keep the chickens from scratching the feed out. Just give them enough room to get their heads in. [/FONT]
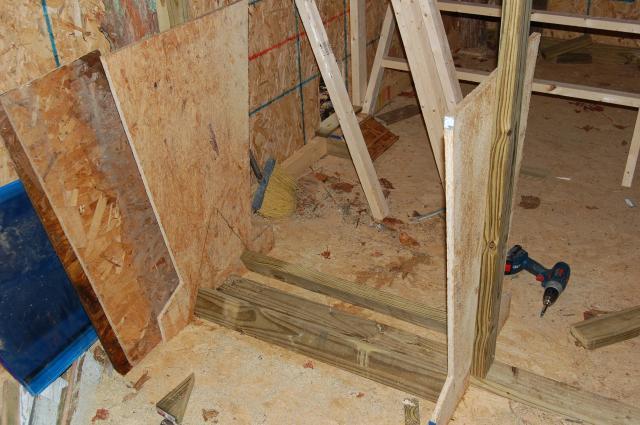
[FONT=arial,helvetica,sans-serif]Beginning framing and side walls. Notice the 2 X 4s are on angles at the bottom and the wedge drawn out on the inside of the wall. Also I hadn't yet cut the angle at the top for the hinged feed doors (it was an afterthought), so I would make sure in cut that before building.[/FONT]
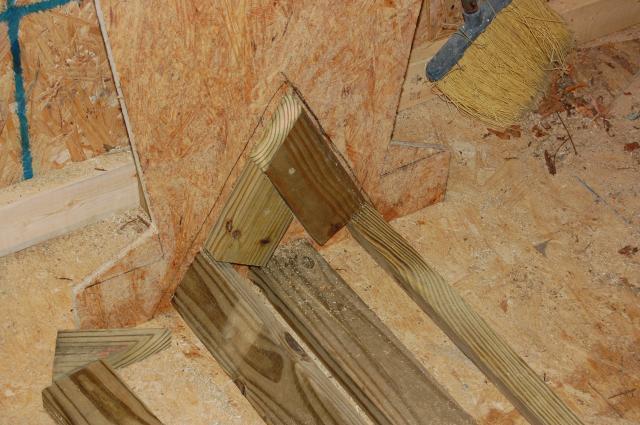
I framed out the wedge with 2X 4s cut on a miter saw. After that I cut 1/2 plywood and nailed it to the wedge frame. The drawn line is 1/2" above the frame for a reason, it allows the 1/2" plywood that will be screwed to the frame. After screwing the plywood to the frame there will only be a 1" space between it and the corner at the top of the trough.
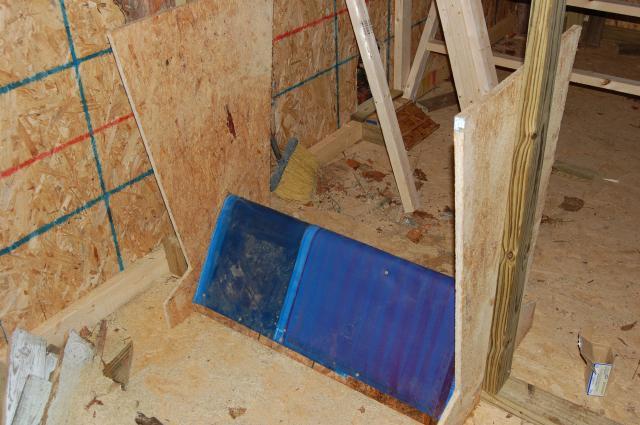
I covered the plywood wedge with rubber blankets. This is where you can use your imagination as I got these from work. Originally I intended to use sheets of flat tin but you don't have to use anything at all as long as the plywood surface is smooth enough to allow the feed to flow. I wouldn't recommend OSB because it's hard to smooth out.
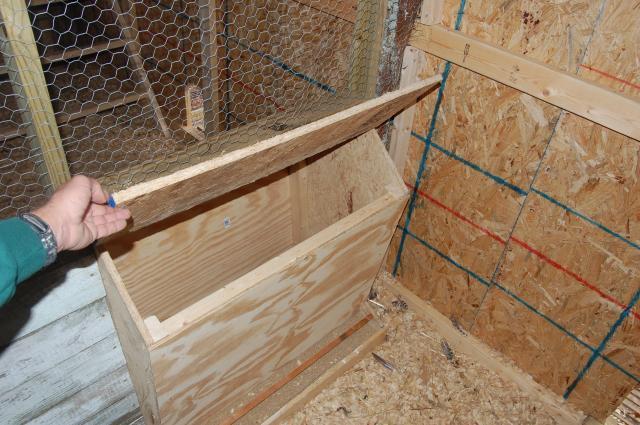
[FONT=arial,helvetica,sans-serif]I wish I had taken more pictures during construction but I had no idea I'd be posting it online at the time. I used 2 X 3s to frame up the sides so I could have something to screw into for the front walls. Notice the wood strip in the center of the trough. Make sure you make the hinged lid wider than the actual feeder so you have something to grab when you lift it or you can just put a handle on it. The angle for the lid is important because you don't want your chickens to fly up there and poop in the feed trough so make it steep enough so that they can't do that.[/FONT]
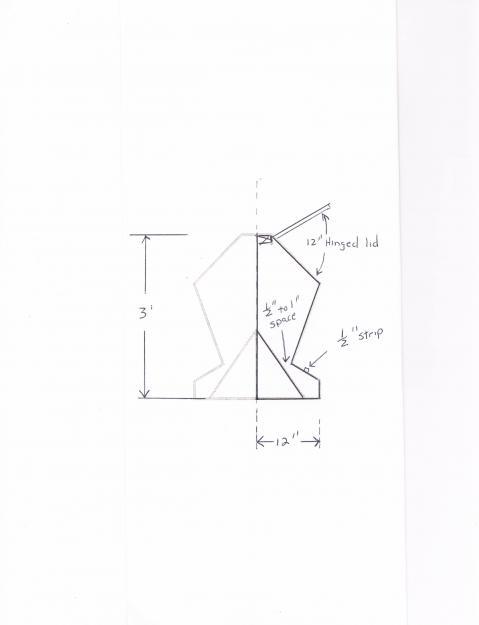
Here's a quick sketch for a single feeder. It's simply what I did cut in half. You don't have to follow these plans exactly to make it work. The important things are the interior angle to divert the feed to the trough, the exterior wall angle to divert the feed to the interior angle and the space between the outer wall angle and the interior angle that allows the feed to flow to the trough. If you have any questions please send me a message and I'll do my best to help you out. I didn't even draw this out on paper when I built it and didn't even know if it would work or not. But it works great and it's one of the features of my new coop that I love the most.