This is "Shady Pines". As of today, it is 99% complete. It will be done this weekend if it kills me.
The plan is to have 2 Buff Orpingtons named "Blanche" and "Dorothy"

Here's the beginning of the story (feel free to skip this paragraph if you don't care for a narrative from an inexperienced builder). I decided to get a few chickens... yay! I needed a coop. I began looking around online and was disappointed with the quality/price of the coops that I could buy. I thought, surely I could make my own that would be better quality than the cheap crappy ones, and less expensive than the really nice ones... Well, I was right about making one that was better quality, but that's not hard. The money thing was not so accurate. I now owe Lowe's my firstborn. Luckily, I found BYC just in time. I relied on Trictle's Coop on the small coops page for a general guide and how-to since I've never built anything myself before, but I ended up making quite a few adjustments along the way to fit the needs of my space.
I found some decent tools on sale at Sears to get me started since the only saw I had was a hand saw

I started with some concrete cap blocks that I had left over from my last project, which was a raised-bed vegetable garden.
These concrete caps are solid concrete, and 4 inches thick, so I figured they would make a good base. I decided I didn't want to put any posts into the ground just in case I ever had to move this thing.
I got my 4x4 posts, but instead of cutting them off at the floor level, I decided I wanted to carry them all the way up as part of the wall. I'm glad I did this, as I think it made a lot of things much easier.
Here's the posts with 2x6 floor joists and a plywood floor:
I then framed out the walls with 2x4s:
As you can see, I used pallet wood in some places, but for framing around windows and things, I went with newer pieces since they were more likely to be straight. Only 3 walls are up here because the front wall is on hinges and swings out for easy access. I set it in place in many of the next pictures, so it's hard to tell.
I put up the roof one afternoon. That was a tough day. Notch cuts are not fun, but with enough metal braces, I made it work:
I should have left myself more room for overhang, but about this time in the process is when I developed the mantra "It's just a chicken coop".
With the framing done, it was time to do the floor and the begin the walls. Thanks to a few great suggestions on BYC, I did a nice little linoleum floor over the plywood.
I ordered some perfectly sized little vents and a window from www.shed-windows.com and they were just what I needed. The vents are 8x8, which fit very well at the top, and the window is about 2 feet wide, and 16 inches tall. The window came with a built in screen, and the best part is, it cranks out, so I can adjust air flow.
I don't have pictures for quite a few steps in here. Once the plywood was up, I painted the base black (tuxedo tie), and then I used #30 tar paper to wrap the whole thing, and I used SmartSide osb siding from Lowe's over that. When the siding was up, I painted it red (radiant red) and began to add trim which I had pre-painted gray (vintage gray). I put on the plywood for the roof, tar papered it and added really nice shingles to that. I over did it a bit on the ridge caps (there's at least 3 layers of shingles over the ridge, but better safe than sorry, right?).
(That picture reminds me, I need to clean those gutters!)
One whole Saturday was devoted to the nesting box. That was a hateful thing. I knew I wanted it to be exterior for more space inside, but I'm not sure it's worth the amazing amount of extra work that went into it (mostly because that was the one part that I hadn't drawn up plans for). Once I shingled the little roof for the nesting box, I realized that if water dripped down the side of the coop, it could get between the wall and the shingles. I'm sure there's a better way to do that than my method, but I remedied that by adding a "sign" above the box with lots of caulking to make sure rain couldn't drip between.
In this picture you can also see the front wall is on hinges, with a little handle.
I was finally ready to add some chicken wire around the bottom of the coop. Under the nesting box, I added another hinged door so that I could have easy access to their food and water. Most mornings I shouldn't have to take more than a few steps out of the back door to get to food, water and eggs.
Jack, our lab, approves.
As you can see, the chicken wire extends out from the bottom at least a foot from all sides to prevent the dogs (mainly our wonderful German Shepherd, Mandy), or any other critters from digging underneath the coop. I also doubled the chicken wire for extra dog protection. Did I mention that Mandy can be a very stubborn dog?
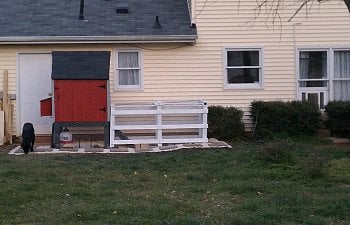
I started to frame out the run using 4x4 posts, 3 feet tall, and 1x4's for the other boards, all of which I pre-painted white (paparazzi white). I used the middle section of an old pallet for the chicken ladder. Berlioz the cat approves as well. Do you see Mandy peeking around the back corner?
I used leftover concrete caps to just sit inside the run area along the edges for a last line of defense.
For the run, I did the basic framing first, then I put up the double layer of chicken wire, then I added horizontal boards on the outside of the chicken wire to help hold things all together better.
I covered half of the top with chicken wire, and the other half of the top lifts up for an access hatch. Unfortunately, that means climbing over the 3 foot fence (oops!). I should have hinged a section of the wall as well.
Apollo, the cat it lounging against the neighbor's fence in the background.
With the run complete, I was nearly done. I needed to add a roost inside, which was fairly simple. I made it free-standing, so I can remove it for cleaning. I use un-treated 2x4s for the actual roosting boards, and I sawed off all of the edges.
Pine shavings inside, and in the nesting box finished off that part of the build.
Now to finish doggy-proofing the outside. I got some great big metal spikes from Lowe's, they are 18 inches long, and very thick and heavy. I hammered them into the ground around the outside edges to prevent anything from getting under. Over the layers of chicken wire that extended out over the ground, I added landscaping fabric, leveling sand and 16 inch square concrete patio pavers (very heavy). I added pea gravel in between to hide all of the mess, and the end result is a nice little walkway around the coop:
In the above picture, you can see that all of the spikes haven't been completely hammered down yet.
Got to clean up all of my construction mess over there to the side!