This site has been a massive help this year in learning how to care for our new flock, so I'm super happy to be able to maybe give a little something back by contributing my design. Most of it is pretty common, but it's got a few differences that have been working really well and I think could be useful to others.
My main requirements for the coop were:
Cost effective: We will probably only be at our house another 4 years or so, so I wasn't going to spend a fortune for something we were going to leave behind. So it either had to be super cheap or an asset for the house when we left. Since there's no such thing as 'super cheap' once it starts nickel and diming you, so I went for 'property asset'.
Versatile: We plan on free-ranging the flock when the time comes, but on mornings when I'm running late for work or know I'll be out late, I'd like them to be able to have a run. Eventually, I'd like to add an automatic door opener to make it even simpler.
Easy to clean: I'm lazy. I've got lots of other projects. So if it's a matter of working on the Jeep or scrubbing a hutch, I'm going to make sure I can get it finished quickly and get to the fun stuff. So having a full-sized door on the coop and person-sized door on the run was a definite.
Size: Our current flock is 13 (I got a little overzealous in purchasing the flock before finishing my research), but about half of those will end in the freezer. It'll be a little crowded while they're still growing (read: lots of cleaning and changing of the hay), but I'm planning on an eventual flock of 8 or so with a few more ending up in the freezer through the year to make room for more chicks if we get a broody hen.
Secure from predators at night: Obviously with free ranging a flock, there will always be inherent dangers to them during the day, even with good chicken dogs guarding them. The run is only using poultry wire, not welded wire because it's really only meant for daytime use and it's in a chain-link fenced area in a barbed wire fenced yard. The hen-house, however, needs to be secure against predators at night. We have raccoons in the area, but they've never dared show their faces around the yard where the coon-hounds hang around, plus a solar-powered motion-activated light. Still, better safe than sorry, so the hen-house needs to be raccoon proof.
Maintenance "free": Again, lazy, lots of projects. I'd rather build it once and have it done. I didn't want to have to deal with rot or sagging hinges or shoring up wobbling frames later. As a good buddy says "Overkill is Underated". So the structure is built with screws-not nails, hardiboard-not plywood, and all galvanized hardware.
All-in all, materials cost me about $350, but probably would have been closer to $400 if you bought all materials new.
Here is my best estimates of cost breakdown:
Roof wood - $40
Roof shingles - $20
Lumber - $150
Paint - $30
Hardiplank - $40
Wire - $30
Hardware - $10
Total - $320
Solar Motion Light - $30
Feeder/Waterer - $30
Coop hinges - Free
Additional lumber - Free
Additional Hardiplank - Free
Tar Paper - Free
Tar Paper Nails - Free
I did make sketches originally and the frame followed those pretty exactly, but once the frame was built, I sort of adapted each component and cut them to size as I went along.
Here are the original plans for the frame:
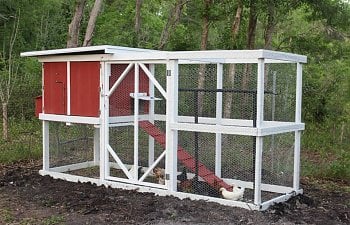
Basically, it's a 12' x 4' frame. The length is broken up into (3) 4' sections and the height is broken up into (2) 3' sections (minus the door gap). The top left 4'x4' section gets boarded in to create the hen-house (and you could probably add a hen-house to the upper right side if you wanted additional room). The framing is entirely 2x4s, and the door is built using 2x2s.
For the bottom boards, I used pressure treated wood, but the other 2x4s are just regular pine. Make sure to use a quick-square while assembling to make sure all your corners are square and the frame is straight.
Next up was cutting the hardiboard for the hen-house. BEWARE: Not only is this a giant pain in the butt, because concrete infused wood needs special tools to cut it, but breathing the silicate dust is extremely toxic/carcinogenic. So DO NOT cut without a proper respirator (and eye and ear protection as long as you're at it, because...why not?). I tried originally with a circular saw, which destroyed the blade and worked terribly. There are special blades you can use, but there's a ton of dust. Other specialty tools include electronic shears or a utlility blade to score-and-snap. That is what I used, and aside from a sore wrist, it worked pretty darn well, if not as neat as the shears would have done.
So: pain in the butt to work with hardi-board, but the fact that it will never rot, even when covered in slick chicken poo in a humid bayou makes it worth the effort.
It was during this stage that I had to plan dimensions for the door, window, and nest boxes. When making these cuts, for an exact fit DO NOT rely on theoretical cuts. Use actual measurements from multiple points. For instance, a panel might need to be 42.5" on the left side, but 42.75" on the other. Measure 3 times, cut once. For interior cuts, score-and-snap doesn't work, so I ended up using an angle grinder, a dust mask, and holding my breath to make the cuts.
Once everything was cut out, it was time to paint. We decided to go with barn paint because it was half the price of other paints, self-priming, and meant for the not-as-clean painting conditions were were going to be working with. It only came in red, black, and white, so red and white it was. (Besides, I love the barn inspiration)
For the nesting box, I used 2x2s to frame it, then attached the panels to it to box it in and give it rigidity.
Once the structure was assembled, I called in the inspector (Winchester, 10 months):
Once I passed inspection, I had to install the chicken wire (a 3' tall roll) on the upper circumference and the 4' chicken wire across the top of the run/hen house. This allows me to install the roof with a gap for air circulation without worrying about predators using it to gain access. Very straightforward, just stretch it taught and staple in place. You could install the lower section of wire at this point as well, but I waited because I have plenty of time to work at night when the baby is asleep, but I have very limited daytime windows, so I started on the roof and trim next.
The roof is framed to overhang about 6" on each side, although I tweaked the measurements a bit for visual sake. I think it ended up being 59" by like 63" or something. I framed it with 2x2s with a 2x4 facer to give it enough angle for water to run off. Once it was framed (using a quick square again to make sure everything is straight and true), I covered it with plywood. I hesitated to use plywood because I was afraid of rot, but since it'll be covered with tar paper I shouldn't have anything to worry about. I painted the underside, which was probably not necessary, but you can't put in this much time and investment and not let details matter, even when they don't.
Putting on a fully shingled roof was definitely overkill for this project, and you'd probably be just fine with galvanized or plastic sheet, but I had never done roofing and really wanted to learn, so this was a great opportunity to do so.
While you can probably google better instructions than mine, but as a quick sum-up:
First cut the tar paper to the width of the roof with an overlap of a quarter inch or so (when putting on multiple sheets, make sure to overlap in a way that water flowing over won't get underneath. This means overlap by a few inches and lower sheets should be underneath the upper sheets. Then nail it down with tar paper nails (the ones with the plastic washers). Some do this with staples, which is cheaper and faster, but I wanted to learn this the right way. (Having a buddy give me them for free helps too, ha ha)
Once the tar paper is down, you need to line the edges with drip-edge, which will prevent water from soaking into the plywood beneath and give it a nice finished look.
A good helper during all of this is essential! Luckily, I have our sweet foster, coincidentally named Coop! (well, Cooper)
AHEM! I said a *good* helper.....
Once the tar paper and drip edge is down, you'll need to install the shingles, one row at a time from the bottom up, each row alternating so as not to leave any gaps. You'll need to using roofing nails and about 3 nails per sheet (3 shingles per). Again, Youtube can teach you better than this article. The only really specific bit to this particular case is that for the top row, you will need to cut a shingle in half length-wise for presentation's sake. Also, you should really overlap the edges by a half inch or so, but I did not, mostly because I had *exactly* the right amount of shingles in the one pack that I bought if I didn't overlap, so that's what I did.
I do not recommend trying to lift up and install the roof by yourself. It was not a fun experience. Thing probably weighs over 100lbs with nails sticking out all underneath and had to be lifted 6 feet in the air. Dinged it up a bit in the process and myself as well, but got it done and a quick touchup with paint and no one's the wiser.
For the window, I used a piece of an old dog crate that I cut to size and some window screening and sandwiched them behind some trim pieces.
Inside the coop, I installed a couple of roosts made from a thin tree that I had to cut down from another portion of the yard and hung a couple feeders from the roof. The food will normally be outside and I'll probably install a cooler PVC gravity feed option, but for the moment, they're working well.
My main gal(guy?) Falcoln helps me test the new setup
To finish up with the screening, I dug about 6" down and 6" out, stapled a 4' roll of screen to the bottom 3' of the run and left the bottom foot in the trench (you have to snip relief cuts in the corners).
The idea behind this is so that predators attempting to dig underneath will be deterred. Apparently, they're don't ever really try to dig deeper than a foot or any further than 6 inches away from the edge.
To make it even more dig-proof, I had a bunch of stone lying around from a previous project, so I lined the bottom of the trench on top of the wire with it. This also helps with the there's-never-as-much-dirt-as-you-started-with principle when filling in.
To round out the final details, I made and painted a ramp out of plywood and plywood strips and attatched it to the frame with a 2x4 section to rest on.
The door was just a section of plywood attached to a strip of edging with a couple of galvanized hinges.
I'm particularly proud of the opening mechanism. It's designed so that I can open/close and latch/unlatch the door without having to step into the run (useful when running out the door in work clothes) and just locking and unlocking automatically. A bit overengineered for manual use, but will work perfectly once I add an automatic photo-sensitive mechanism. I built it using a clevis pin, a conduit hanger, compression spring, a couple of washers and a bushing from an old Jeep project with a little TIG welding. (You really shouldn't weld on galvanized like this, but it is possible) The spring tension is enough to push out the spring, but weak enough that the weight of the door keeps it compressed until it's fully closed.
The string runs up to an eye hook on the roof, then through the frame and another eye hook, then down to either a top or bottom hook depending on whether it's open or closed.
The latch for the primary door is a regular gate latch, which means I needed a string going through the frame so it could be opened from the inside.
Lastly, the main double barn doors are closed by a facer piece attached to one side that holds the other side closed. There is a brace inside of the frame on the top that acts as a stopper to keep the door from opening inwards.
To keep it from opening when it's not supposed to (aka...raccoons), I used a piece of rod I bent that goes through a couple brackets I made from more conduit brackets and Jeep bushings. The rod extends down into the frame into another bushing that I drilled and caulked into place. There are two rod hangers made from conduit brackets. One for when it's raised up, and one for when it's closed and locked.
So that's the coop! The chickens seem pretty happy with it. The only thing I would change if I had to do it all over again would be to put in more windows and light for the coop. If you had a clear plastic roof or didn't use dark windowing screening like I did, it wouldn't be a problem, but it's super dark in the coop, even when it's bright outside. So another window, on the right barn door or maybe in the front of the coop would go a long way to remedying that.
And just a final note, because who doesn't love extra chicken pictures, here are the two (probably cockerels) above when they were chicks! I'll hoping Falcon will turn out to be a hen, because they're both awesome and it would be a bummer to have to send either one to 'freezer camp'.
Falcon - Probably a Black Cochin
Chanticleer (Formerly known as Georgia) - Probably a barred CochinPost-Week-Of-Thunderstorm Thoughts:
My original intention was to use the t-pole in the run to hang food/waterers off of. This did not work at all. Despite my best efforts to make covers and roofs for them, the food was just constantly getting soaked and everything was just crazy muddy. To fix this, I installed hooks underneath the coop and hung the food and water under there. It's working perfectly, so that is where they will stay.
The coop itself had some major moisture issues during the storm as well. Granted, it was a bad enough storm that most of the area lost power for 3 days and it was raining pretty much sideways, but I'd still prefer to keep the coop dry under all conditions. So I ended up running a beat of caulk all around the bottom of the coop where the hardi-board met the frame, even behind the double doors. We ended up having another big storm afterward and everything stayed pretty dry, so I think that should be good for the long run.
Oh, and while they've met through fences and while being held, we introduced Cooper to the chickens (I'm not worried about my own dogs, but the foster was a wildcard) and he did fantastically. He'll be a darn good chicken dog!