Here are a few pictures from the coop build. I hope you enjoy please feel free to ask any questions and comment.
I had a good level spot of ground we had at one time had an above ground pool so it already had a base level of sand as well.

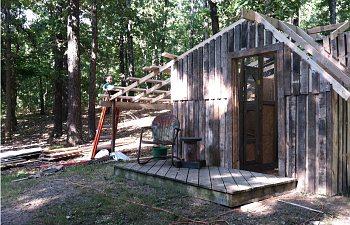
Our son He has this coop building down!
I stood the pallets a little different than most. Using a scissor car jack I popped off enough boards to
cover all the gaps give it a real barn siding look.
You can see here the gaps in the pallets. I used new lumber for the roof build
and sourced used barn tin from crags list
Wife decided we needed a window for cross ventilation. No problem!! second hand junk store!!!
Its getting a lot closer to finished here. It has to be pretty secure.
Those woods behind it hold all the worst kind of chicken thieves!
Picked up an old door from another remodel project.
So here we have it ... The Polish Pallet Coop... This was how the wife came home and
found it on her birthday.
A few more steps and this will be done!
We added a small pen as sort of an infirmary or mama pen.
The outside is run is done as well. Its been a good coop through the winter here work on
it has slowed down a bit but all the Polish are safe and warm and we are starting to get eggs.
Here is the finished small run its holding an injured roo. The youngun
got to big for his britches and had a go at Franklin our big Red
These are the three separate runs for Trio's of different colors.
The southside vents there are covered in feedsacks for the winter. The vents open directly into the runs and
allow for a nice breeze during the heat. The coop is built in the shade so over all it stays relatively cool.
All the main woodwork here the 5/4 cca deck boards ripped in half they give you a nice meaty 2.5 in wide board to work with. I had some left over from another project all total there are less than 12 1x6x8 deck boards in this picture affordable and it was super easy to work with. (keep the rounded edge to the outside of the project)
The nest boxes easy access from outside the pens. Polish Roo's don't seem to see that well
and these young birds we have just hit first and ask questions later. I also left a small gap at the bottom of the nest box that allows me to scrape any debris into a cart from this side (don't make that as big as an egg)
This is my cheap lazy feeder. These girls need a bigger area of feed made from a material
that won't mess up their hairdo. This setup has worked well and they waste very little food. Just a cheap little scoop.
I have a blacksmith buddy that has made me some door latches and its on my list to get done...
(there is no reason to remind me every six months)
We also found hanging a curtain between aggressive Roo's has brought a little peace to the coop.
Hey its winter who's coop isn't in need of a spring cleaning
Don't judge me")
Winter time I stuff every gap I can in the summer here we need as much ventilation as possible.
So I can't get a real good picture of what I did between the walls. I will try to explain
I Used 30pd tar paper (roofing felt) this stuff is tough tough tough. Folded and stapled to the inside of the pallets keeps out the air and has lasted now over a season without any damage from chickens or mice. Its also on my list to cover these gaps the way the front is done... I have a long list
Each door of the three runs is built exactly like this.
I am pretty sure she has eyes in there somewhere
Here is Hulahoop and Hop Scotch... pretty birds her poof is just remarkable really! And he has earned his Devil horns he is a not very kind rooster.....
There you have it ... The Polish Pallet Palace thanks for the interest and if you have any questions about building or design feel free to send me a message.
I had a good level spot of ground we had at one time had an above ground pool so it already had a base level of sand as well.
Our son He has this coop building down!
I stood the pallets a little different than most. Using a scissor car jack I popped off enough boards to
cover all the gaps give it a real barn siding look.
You can see here the gaps in the pallets. I used new lumber for the roof build
and sourced used barn tin from crags list
Wife decided we needed a window for cross ventilation. No problem!! second hand junk store!!!
Its getting a lot closer to finished here. It has to be pretty secure.
Those woods behind it hold all the worst kind of chicken thieves!
Picked up an old door from another remodel project.
So here we have it ... The Polish Pallet Coop... This was how the wife came home and
found it on her birthday.
A few more steps and this will be done!
We added a small pen as sort of an infirmary or mama pen.
The outside is run is done as well. Its been a good coop through the winter here work on
it has slowed down a bit but all the Polish are safe and warm and we are starting to get eggs.
Here is the finished small run its holding an injured roo. The youngun
got to big for his britches and had a go at Franklin our big Red
These are the three separate runs for Trio's of different colors.
The southside vents there are covered in feedsacks for the winter. The vents open directly into the runs and
allow for a nice breeze during the heat. The coop is built in the shade so over all it stays relatively cool.
All the main woodwork here the 5/4 cca deck boards ripped in half they give you a nice meaty 2.5 in wide board to work with. I had some left over from another project all total there are less than 12 1x6x8 deck boards in this picture affordable and it was super easy to work with. (keep the rounded edge to the outside of the project)
The nest boxes easy access from outside the pens. Polish Roo's don't seem to see that well
and these young birds we have just hit first and ask questions later. I also left a small gap at the bottom of the nest box that allows me to scrape any debris into a cart from this side (don't make that as big as an egg)
This is my cheap lazy feeder. These girls need a bigger area of feed made from a material
that won't mess up their hairdo. This setup has worked well and they waste very little food. Just a cheap little scoop.
I have a blacksmith buddy that has made me some door latches and its on my list to get done...
(there is no reason to remind me every six months)
We also found hanging a curtain between aggressive Roo's has brought a little peace to the coop.
Hey its winter who's coop isn't in need of a spring cleaning
Don't judge me
Winter time I stuff every gap I can in the summer here we need as much ventilation as possible.
So I can't get a real good picture of what I did between the walls. I will try to explain
I Used 30pd tar paper (roofing felt) this stuff is tough tough tough. Folded and stapled to the inside of the pallets keeps out the air and has lasted now over a season without any damage from chickens or mice. Its also on my list to cover these gaps the way the front is done... I have a long list
Each door of the three runs is built exactly like this.
I am pretty sure she has eyes in there somewhere
Here is Hulahoop and Hop Scotch... pretty birds her poof is just remarkable really! And he has earned his Devil horns he is a not very kind rooster.....
There you have it ... The Polish Pallet Palace thanks for the interest and if you have any questions about building or design feel free to send me a message.