Hello, this is the story of how we built Sweet Pea's Rustic Roost for our little flock of 7 hens. Sweet Pea is one of our Barred Rock Chickens. She was the sweetest of the chicks and used to sit on my shoulder. She seems to be partly blind which has made her very sweet and a bit funny. She tends to run straight at you, fast, and then runs into your legs. She is finally happy when she is roosting on your feet. We named the roost for her.
To learn more about our chickens go to my chickens' page at: https://www.backyardchickens.com/a/chickens-at-sweet-peas-rustic-roost
My husband and I moved from Southern California to Billings Montana in Dec 2014 for work. Growing up in busy California we never had the opportunity to raise chickens, but the prospect really excited me. Because I am an engineer, I researched the heck out of everything before I jump in and one of the first places I started was BYC. I found so much great information on this site and thought I would share our plans and what we ended up with for our first coop/run. Maybe it will help you like so many others helped me.
Location:
We have 20 acres in a pine tree area in Billings called Emerald Hills. There is no flat land at all on our property but we have plenty of space and my husband is pretty good with heavy equipment. I decided that I wanted to build a combined chicken/garden area with the coop and greenhouse in close proximity and the garden surrounding both. It needed to be close to the house for easy access too, so we chose a spot behind our garage and my husband began excavating. We ended up with 2 levels due to the extent of the slope.

Coop Plans
Size:
Since I wanted a garden with the chickens I designed a combination shed/coop/run. The shed is 14ft long by 8 ft wide with 8 ft high walls and includes the Coop. The coop inside the shed is 6 ft x 8 ft with an internal wall frame and hardware cloth to separate the coop from the shed. The run is 12 ft long by 8 ft wide attached on the rear wall so that the entire structure is 26 ft long and 8 ft wide with 8 ft high walls. This gives the chickens 48 sq ft of interior space, plus 5 nest boxes and 96 sq ft of enclosed and covered outdoor space. My plans were to have about 6 chickens (I currently have 7) and this size gave me a bit of room to grow if I really like having chickens. (Which I do)
Predator Proofing:
I read so many heartbreaking stories about people losing their chickens to predators that I really spent a lot of effort on making the enclosure safe. The shed/coop has a concrete floor with a drain on the coop side for easy clean-up. The drain hole is plugged normally. The Run floor is dirt, but it has a concrete block wall surrounding it. Remember that slope we had. We made it work to our advantage here. The run is built into the slope about 3 ft high. This means that predators would have to dig 4 ft down to get under the footing on 2 of the sides. A third side is attached to the coop and the remaining side has a 1 ft footing with hardware cloth 2 ft out. The run is fully framed and 1/2" hardware cloth is used to cover it. Trim boards are used to cover hardware cloth seams so that edges can not be pulled at by raccoons.
Construction Pics:
flooring and sidewalls for shed/coop/run. We also painted the floor with garage floor epoxy paint for easy clean-up.
beginning of run framing
framing of the shed/coop
The design included 4 windows, 2 on each side. They are 2 ft x 3 ft each. 2 windows are in the coop area and 2 in the shed area. The structure was wrapped in house wrap which we had leftover from another project.
Exterior grade cedar plywood was used as siding.
We stained it to match the garage due to the close proximity to the garage and being able to see it from the house. We built a dutch door roughly 4ft x 7 ft high out of 2 x 4s and the same plywood as the siding on the outside and added trim boards to finish it off and give it a rustic look that again matches our garage.
The inside is fully insulated. We also did run electricity to the shed from our garage and then out to the greenhouse. The outlets are all on the shed side, none on the coop side. That gave us power while finishing off the inside of the coop which was really nice. We also added an LED light fixture to the ceiling on the shed side. I had read an article that fluorescent light is really bad for chickens so I went with LED. I don't use the light very often but when I do I wanted to make sure it was chicken-friendly.
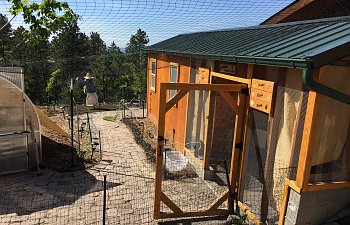
Here is the run, nearly completed. Just needed a door. The latches for the shed and the run are sliding bolts that can be locked. I use carabiner clips for this, again for predator proofing.
After insulating, we used exterior grade paneling for the inside walls and I painted it with some leftover white-ish paint. I used leftover green paint for a trim color to give it a country cottage feel. I chose paneling rather than plywood or drywall just because I felt it would hold up better to the chickens pecking, humidity and washing. It has been really great. You can also see we have started building the interior wall in the shed.
Here we have added the nest boxes. There are 2 on each level and I used the same paneling in between the boxes and across the bottom. They are each 14" x 14" on the bottom and 18" in the front sloping down to 12" high at the back. The green roofs lift for access to the boxes from the shed. There is also a kickboard across the bottom of the door to keep the sand in the coop and out of the shed.
At the top of the walls, I added several vents for ventilation. I used basic cheap cover plates just to make it look nicer. I put the same thing on the outside to keep the rain out.
You can also see that I added a chicken door on the back wall that goes out to the run. I installed the pullet-shut automatic door. Since we had power in the run this was easy to incorporate into the design. I built a niche into one of the walls for the battery to sit in and used the paneling to cover it. It is easily removed when needed. I ran the light sensor up the inside of the wall and poked it out the back just under the eaves. It has worked flawlessly for the 5 months it has been in use.
I ran 2 roosts 18" apart (vertically) and 12" apart horizontally along the back wall with a poop board underneath. The poop board is fully supported underneath by a 2x4 along the back wall another across the center (lengthwise) and another under the front edge. The board itself is more of the paneling used on the walls. It is very solid and rigid. I used zeolite on the board (PDZ). I used a thin trim board across the front to prevent them from roosting here and keep the PDZ on the board. I built them a little ladder out of leftover plywood and trim board pieces to access the lover roost bar.
This is what it looked like on the day we moved the girls in. The boxes were blocked off with cardboard at the time since the girls were not laying yet. Notice how clean it is. Boy did that change in a hurry.
I added a waterer from a beam in the ceiling that I had planned in the design ahead of time and added a feeder from the support for the poop board. It stays nice and clean under there.
Here they are moved in. I think they were 3 mos old.
They loved the coop right away. We kept them locked in just the coop for a week or so before we started using the auto door to make sure they knew to sleep in the coop.
The Run:
We then had to bribe them with snacks and grass to get them to leave the coop and check out the run.
We added pine branches for roosts in the run and moved the waterer outside.
I added a larger hopper feeder and placed it center on the wall between the coop and the run to prevent the food from getting wet when it rains.
Here is the run with the door in place.
The Outside View:
Most of the summer I left the upper half of the shed door open to increase air movement in the coop and cool it down. You can't see from the picture, but the windows are also covered with hardware cloth so that I can leave them open at night during the summer. One of my girls roosts in the window when its open. I used 2 layers of trim board to sandwich the hardware cloth and frame in the window.
I used shade cloth on the run to keep it cooler. Since we had to excavate the area before building there is no natural shade yet. We added several trees as part of the garden plans that will eventually help keep it a bit cooler out there.
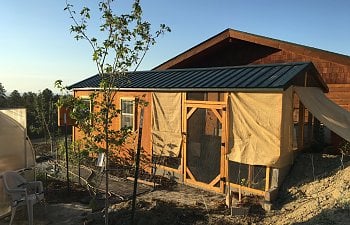
Here is an aerial view of our setup. You can see our garage on the left, the coop in the middle, and greenhouse at an angle on the right side.
Later additions:
When the girls were old enough to lay eggs I took the cardboard off the nest boxes and added a 2x2 for them to stand on before entering the box. I also added a 2x2 that goes from the nest box to the lower roost on the right as they were having trouble getting up to the boxes. I also added curtains.
The Shed:
One of the reasons I wanted an attached shed was not just gardening supplies, but for storing chicken supplies right where I need them. Here is what we added in the shed.
I used wire shelving to prevent dust build-up. Clear bins store mostly garden stuff, the pail has feed in it. My poop scoops are stored to the right of the shelves against the wall.
On the other side, I have a floating bench to work on with a second float shelf underneath for more storage and a couple more wire shelves. I have an ihome docking station for tunes and a pegboard for all my tools. I also have a safe place to hang a brooder light for odd cold snaps. The floating shelves allow me to keep the floor clean. I have a shop vac with HEPA filter for cleaning up the dust layer.
Access:
For my birthday, my husband and daughter built me a boardwalk to get out to the coop from our driveway so I don't have to tromp through the mud anymore. We ran the boards lengthwise to make shoveling/blowing snow easier.
The Fifth Nest Box:
One of my Buff Orpingtons, Lily, was determined not to use those other nest boxes. She kept using a corner of the coop. I tried blocking it off and it didn't work and she was getting very stressed. Instead, I designed a new box with her larger size in mind. This is a single box so it is quite a bit larger than the others and it does not slope. The slope really seemed to freak her out. I still made a door to lift up to grab the eggs from the shed.
I put this box right above the landing for the roost ladder so easy access and instead of curtains I made a hard barrier and left a smaller opening, but large enough for her to walk in easily. This box immediately appealed to my half-blind chicken, Sweet Pea who had a much easier time exerting this box. It took Lily a couple of weeks but she does use this box exclusively.
Water storage:
I also added a rain barrel waterer for the run. I built a nipple waterer out of 1 1/2 " PVC pipe and connected a rain barrel just outside of the run at the top of the slope. When full it supplies water for a full month even in the hottest part of summer.
For purely decorative purposes I added corrugated metal sheets to cover the block wall. It just finishes it off nicely on the inside. Across the top, I use 2x8 boards which the girls love to walk on to have a look around.
Misc:
I add Diatomaceous Earth to the corner for dust bathing.
Plenty of room for sunbathing
I also painted signs for each of the girls which I have hung on the front of the run. They are all named after plants so each one has a picture of the hen and the plant they were named for. My own artistic addition just for fun.
For Winter:
I have emptied and disconnected the rain barrel and will return it to service in the spring.
I have also begun making some plastic-covered panels that go between the frames in the run to provide wind, rain, and snow block. This will keep the sand drier and hopefully trap a bit of heat like a greenhouse for the girls this winter. Since the plastic is not quite see-through and I still wanted the girls to have a view, I added 3 acrylic panels, 2 on the front looking at the greenhouse and one at the back near one of the roosts so they can see out when they perch. The one on the back also allows me to peek in at them and catch them in the act of doing something funny. In spring I can't just take them down and then reuse them each winter. I'll let you know how it works out.
Winter Update
The plastic sheeting is working wonders. We have already gotten more snow than normal this year and the run is staying nice and dry and blocks the girls from the wind. It also prevents wind from sweeping through the pop door into the coop. Even when it's really cool the Easter Eggers go out to the run for dust baths. Last week we dropped down to -15F and my plan was to close the girls up in the coop, but I had a special brain moment and the auto pop door opened (as it should have) anyway and the girls were just fine. We did add a heater for the day in the coop which freaked me out due to all the fire stories.
I have added a heated water bowl to the coop and one in the run in case I need to isolate them in the coop. Running water out twice a day got old fast. The one in the run is just the heated dog bowl which is working great and the one in the coop is the one from K&H manufacturing that has the debris strainer and the cap that prevents the entire water content from spilling out when you flip it over, which I love. I only use this inside because I read that the plastic cracks below zero, the coop stays warm enough that won't happen.
I also just purchased a Sweeter Heater that I will put up over the next couple of days before it gets really cold again. The girls have been avoiding the roosts and huddling on the floor a lot so I am going to mount it behind the roosts to try to coax them back up there. I have already added a heating mat from K&H next to one of the roosts and the girls fight over that spot. The Sweeter heater is much longer and they will all have a space. This is a little selfish, it's much easier to clean the poop board than the floor. Also, someone has been sleeping in a nest box since it's been cold and I am hoping to provide a warmer spot that will stop that.
The sweeter heater works great, everyone has their favorite spot, but sweet pea still prefers roosting in the nest boxes. I need to fix that.
Here is the Sweeter Heater and a chicken heat pad installed on the coop walls. They have worked well. No more sleeping in nest boxes. I took out the heat lamp and small heater and the coop stays plenty warm.
In spring I will pull out the sweeter heater and use it in the brooder. No more heat lamps!.
Presents for Christmas
Our girls got their Christmas presents a little early this year. They got a new mirror which they loved right away and a new chicken swing which I hope they will enjoy over time.
"Chicken Approved"
Wish I would have:
Now that we are coming into our first winter, I wish I would have added an exterior outlet in the run for a water heater. Will fix that in the summer.
The Garden
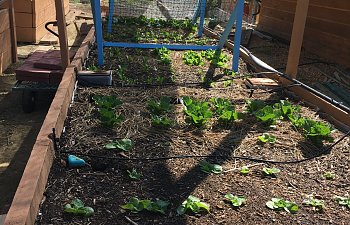
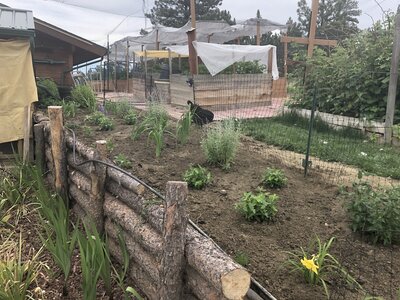
The Rustic Roost sits inside my garden area at the homestead so that I have easy access to compost bins and can use the chickens for pest control in the garden. Between my chickens and the bats we have, I did not have any pest issues last year. It is a great area for free-ranging as it is about 5000 sq ft. Unfortunately, we had a hawk attack at the end of Jan 2017 so we had to add hawk netting before I could let the girls free range again. I also added a scarecrow, i.e. fake me, to the garden and the girls seem to like her a lot. I also added some raised beds this year with shade cloth so the girls have a bit of extra shade which they really like. I also threw in a few chicken forage grass locations.
As the garden evolves the girls love it more and more. We added a Pergola between the greenhouse and the Coop which shades the whole Coop and run and the girls absolutely love it. It was ridiculously hot here this summer but with the shade from the pergola and the shade cloth over the raised beds, the girls had plenty of spots to hang out. I also added a misting system in their run during the hottest times. Here are some recent pics:

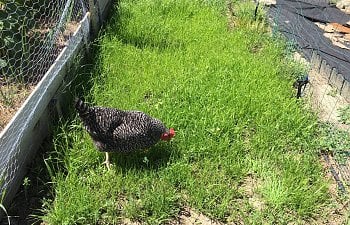
Sweet Pea grazing in forage grass by the raspberry bushes.
The new Pergola with shade cloth shattering the coop. Next, I attached the shade cloth from the greenhouse that is shown attaching at the ground to the pergola to shade the entire area, which worked really well.
I rocked this area to prevent the chickens from scratching up the apple tree roots. They have another foraging area to the left.
Rosie enjoying the new mulch between the raised beds and of course the shade and a tomato or two.
This is the best view I have of the raised bed area. There are 4 beds with 4ft spacing between them that is completely covered by hawk netting and Aluminet shade cloth under it supported by 2x4 T posts attached to the beds with 3mm wire used to support it between the posts. It has worked really well. We get some pretty heavy winds but I basically sewed the Aluminet in place with fishing line to the wire and it has not moved or torn at all.
Pumpkin lounging between the raised beds in a foraging area.
We recently expanded a bit more so the girls have a bit more space. Once the chickens realized that they could very easily hop up into the raised beds, they really started making a mess of things. I've had to add some extra netting to keep them out. (Brats!) Next year I plan to add a few chicken grass areas to really make it chicken heaven. And then...maybe ducks...
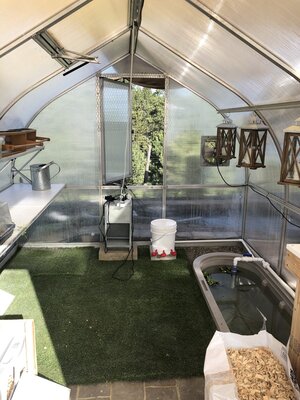
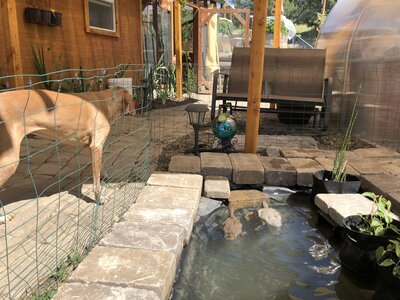
We have had our girls for about 4 years now and the garden has changed so much. They have 3 grass areas but still love to come out to the main back lawn to run around with the dogs. But now, we are adding ducks. Because our chickens do not use the deep litter method, but sand instead, I wanted to house the ducks separately. I almost never use my greenhouse so I thought it was high time to put it to good use and house the ducks there. We have 2 runner ducks coming in about a week. Can’t wait! We also added a pond next to the greenhouse but we will have to keep it fenced off after one of our chickens demonstrated what a poor swimmer she was after she fell in. She is fine, we pushed her towards the steps I put in and she got out, but we do not want a reoccurrence. So, here are some new pics, enjoy.
 Here is our old chicken brooder modified for ducks.
Here is the new pond. We used a stock tank at the back with filter media pads and clay balls, with big plants for a strong biofilter. The plants in the pond are ones that the ducks supposedly won't bother, horsetail reeds and lizard's tail.

Here Sweet Pea and Pumpkin are checking out the design and the dogs are inspecting the pond. The inside of the greenhouse has artificial turf leftover from the dog run which can be easily washed down, nest boxes, and a small indoor pond that will operate during winter. There is also an automated pop door behind that cute little entrance porch which I built to keep the snow out of the way in winter.

here is one of the new grass areas, a stepping stone portrait of my little Sweet Pea, and some more garden upgrades. Though I must say, the chickens are not impressed when we take a dirt section and then make it pretty and fence it off.
The ducklings are here! Two sweet little runner ducks, one chocolate one blue. They are so cuddly. I just love them. I have never seen anything eat so much so fast.


Kiwi on the left and Coco Bean on the right The feeding station, I can wash this down and out of the coop.
relaxing on their own lawn I call Duck Land.
I had to install a bog filter on the indoor pond. I swear those little poopers spend all night in it. After about two weeks the bog filter has the water really clear. Of course, I had to fence it off so they didn’t eat all the plants.
Ah relaxing on their own private pond. Life is good.
To learn more about our chickens go to my chickens' page at: https://www.backyardchickens.com/a/chickens-at-sweet-peas-rustic-roost
My husband and I moved from Southern California to Billings Montana in Dec 2014 for work. Growing up in busy California we never had the opportunity to raise chickens, but the prospect really excited me. Because I am an engineer, I researched the heck out of everything before I jump in and one of the first places I started was BYC. I found so much great information on this site and thought I would share our plans and what we ended up with for our first coop/run. Maybe it will help you like so many others helped me.
Location:
We have 20 acres in a pine tree area in Billings called Emerald Hills. There is no flat land at all on our property but we have plenty of space and my husband is pretty good with heavy equipment. I decided that I wanted to build a combined chicken/garden area with the coop and greenhouse in close proximity and the garden surrounding both. It needed to be close to the house for easy access too, so we chose a spot behind our garage and my husband began excavating. We ended up with 2 levels due to the extent of the slope.
Coop Plans
Size:
Since I wanted a garden with the chickens I designed a combination shed/coop/run. The shed is 14ft long by 8 ft wide with 8 ft high walls and includes the Coop. The coop inside the shed is 6 ft x 8 ft with an internal wall frame and hardware cloth to separate the coop from the shed. The run is 12 ft long by 8 ft wide attached on the rear wall so that the entire structure is 26 ft long and 8 ft wide with 8 ft high walls. This gives the chickens 48 sq ft of interior space, plus 5 nest boxes and 96 sq ft of enclosed and covered outdoor space. My plans were to have about 6 chickens (I currently have 7) and this size gave me a bit of room to grow if I really like having chickens. (Which I do)
Predator Proofing:
I read so many heartbreaking stories about people losing their chickens to predators that I really spent a lot of effort on making the enclosure safe. The shed/coop has a concrete floor with a drain on the coop side for easy clean-up. The drain hole is plugged normally. The Run floor is dirt, but it has a concrete block wall surrounding it. Remember that slope we had. We made it work to our advantage here. The run is built into the slope about 3 ft high. This means that predators would have to dig 4 ft down to get under the footing on 2 of the sides. A third side is attached to the coop and the remaining side has a 1 ft footing with hardware cloth 2 ft out. The run is fully framed and 1/2" hardware cloth is used to cover it. Trim boards are used to cover hardware cloth seams so that edges can not be pulled at by raccoons.
Construction Pics:
flooring and sidewalls for shed/coop/run. We also painted the floor with garage floor epoxy paint for easy clean-up.
beginning of run framing
framing of the shed/coop
The design included 4 windows, 2 on each side. They are 2 ft x 3 ft each. 2 windows are in the coop area and 2 in the shed area. The structure was wrapped in house wrap which we had leftover from another project.
Exterior grade cedar plywood was used as siding.
We stained it to match the garage due to the close proximity to the garage and being able to see it from the house. We built a dutch door roughly 4ft x 7 ft high out of 2 x 4s and the same plywood as the siding on the outside and added trim boards to finish it off and give it a rustic look that again matches our garage.
The inside is fully insulated. We also did run electricity to the shed from our garage and then out to the greenhouse. The outlets are all on the shed side, none on the coop side. That gave us power while finishing off the inside of the coop which was really nice. We also added an LED light fixture to the ceiling on the shed side. I had read an article that fluorescent light is really bad for chickens so I went with LED. I don't use the light very often but when I do I wanted to make sure it was chicken-friendly.
Here is the run, nearly completed. Just needed a door. The latches for the shed and the run are sliding bolts that can be locked. I use carabiner clips for this, again for predator proofing.
After insulating, we used exterior grade paneling for the inside walls and I painted it with some leftover white-ish paint. I used leftover green paint for a trim color to give it a country cottage feel. I chose paneling rather than plywood or drywall just because I felt it would hold up better to the chickens pecking, humidity and washing. It has been really great. You can also see we have started building the interior wall in the shed.
Here we have added the nest boxes. There are 2 on each level and I used the same paneling in between the boxes and across the bottom. They are each 14" x 14" on the bottom and 18" in the front sloping down to 12" high at the back. The green roofs lift for access to the boxes from the shed. There is also a kickboard across the bottom of the door to keep the sand in the coop and out of the shed.At the top of the walls, I added several vents for ventilation. I used basic cheap cover plates just to make it look nicer. I put the same thing on the outside to keep the rain out.
You can also see that I added a chicken door on the back wall that goes out to the run. I installed the pullet-shut automatic door. Since we had power in the run this was easy to incorporate into the design. I built a niche into one of the walls for the battery to sit in and used the paneling to cover it. It is easily removed when needed. I ran the light sensor up the inside of the wall and poked it out the back just under the eaves. It has worked flawlessly for the 5 months it has been in use.
I ran 2 roosts 18" apart (vertically) and 12" apart horizontally along the back wall with a poop board underneath. The poop board is fully supported underneath by a 2x4 along the back wall another across the center (lengthwise) and another under the front edge. The board itself is more of the paneling used on the walls. It is very solid and rigid. I used zeolite on the board (PDZ). I used a thin trim board across the front to prevent them from roosting here and keep the PDZ on the board. I built them a little ladder out of leftover plywood and trim board pieces to access the lover roost bar.
This is what it looked like on the day we moved the girls in. The boxes were blocked off with cardboard at the time since the girls were not laying yet. Notice how clean it is. Boy did that change in a hurry.
I added a waterer from a beam in the ceiling that I had planned in the design ahead of time and added a feeder from the support for the poop board. It stays nice and clean under there.
Here they are moved in. I think they were 3 mos old.
They loved the coop right away. We kept them locked in just the coop for a week or so before we started using the auto door to make sure they knew to sleep in the coop.The Run:
We then had to bribe them with snacks and grass to get them to leave the coop and check out the run.
We added pine branches for roosts in the run and moved the waterer outside.
I added a larger hopper feeder and placed it center on the wall between the coop and the run to prevent the food from getting wet when it rains.
Here is the run with the door in place.The Outside View:
Most of the summer I left the upper half of the shed door open to increase air movement in the coop and cool it down. You can't see from the picture, but the windows are also covered with hardware cloth so that I can leave them open at night during the summer. One of my girls roosts in the window when its open. I used 2 layers of trim board to sandwich the hardware cloth and frame in the window.
I used shade cloth on the run to keep it cooler. Since we had to excavate the area before building there is no natural shade yet. We added several trees as part of the garden plans that will eventually help keep it a bit cooler out there.
Here is an aerial view of our setup. You can see our garage on the left, the coop in the middle, and greenhouse at an angle on the right side.Later additions:
When the girls were old enough to lay eggs I took the cardboard off the nest boxes and added a 2x2 for them to stand on before entering the box. I also added a 2x2 that goes from the nest box to the lower roost on the right as they were having trouble getting up to the boxes. I also added curtains.The Shed:
One of the reasons I wanted an attached shed was not just gardening supplies, but for storing chicken supplies right where I need them. Here is what we added in the shed.
I used wire shelving to prevent dust build-up. Clear bins store mostly garden stuff, the pail has feed in it. My poop scoops are stored to the right of the shelves against the wall.
On the other side, I have a floating bench to work on with a second float shelf underneath for more storage and a couple more wire shelves. I have an ihome docking station for tunes and a pegboard for all my tools. I also have a safe place to hang a brooder light for odd cold snaps. The floating shelves allow me to keep the floor clean. I have a shop vac with HEPA filter for cleaning up the dust layer.Access:
For my birthday, my husband and daughter built me a boardwalk to get out to the coop from our driveway so I don't have to tromp through the mud anymore. We ran the boards lengthwise to make shoveling/blowing snow easier.
The Fifth Nest Box:
One of my Buff Orpingtons, Lily, was determined not to use those other nest boxes. She kept using a corner of the coop. I tried blocking it off and it didn't work and she was getting very stressed. Instead, I designed a new box with her larger size in mind. This is a single box so it is quite a bit larger than the others and it does not slope. The slope really seemed to freak her out. I still made a door to lift up to grab the eggs from the shed.
I put this box right above the landing for the roost ladder so easy access and instead of curtains I made a hard barrier and left a smaller opening, but large enough for her to walk in easily. This box immediately appealed to my half-blind chicken, Sweet Pea who had a much easier time exerting this box. It took Lily a couple of weeks but she does use this box exclusively.Water storage:
I also added a rain barrel waterer for the run. I built a nipple waterer out of 1 1/2 " PVC pipe and connected a rain barrel just outside of the run at the top of the slope. When full it supplies water for a full month even in the hottest part of summer.
For purely decorative purposes I added corrugated metal sheets to cover the block wall. It just finishes it off nicely on the inside. Across the top, I use 2x8 boards which the girls love to walk on to have a look around.Misc:
I add Diatomaceous Earth to the corner for dust bathing.
Plenty of room for sunbathing
I also painted signs for each of the girls which I have hung on the front of the run. They are all named after plants so each one has a picture of the hen and the plant they were named for. My own artistic addition just for fun.
For Winter:
I have emptied and disconnected the rain barrel and will return it to service in the spring.
I have also begun making some plastic-covered panels that go between the frames in the run to provide wind, rain, and snow block. This will keep the sand drier and hopefully trap a bit of heat like a greenhouse for the girls this winter. Since the plastic is not quite see-through and I still wanted the girls to have a view, I added 3 acrylic panels, 2 on the front looking at the greenhouse and one at the back near one of the roosts so they can see out when they perch. The one on the back also allows me to peek in at them and catch them in the act of doing something funny. In spring I can't just take them down and then reuse them each winter. I'll let you know how it works out.
Winter Update
The plastic sheeting is working wonders. We have already gotten more snow than normal this year and the run is staying nice and dry and blocks the girls from the wind. It also prevents wind from sweeping through the pop door into the coop. Even when it's really cool the Easter Eggers go out to the run for dust baths. Last week we dropped down to -15F and my plan was to close the girls up in the coop, but I had a special brain moment and the auto pop door opened (as it should have) anyway and the girls were just fine. We did add a heater for the day in the coop which freaked me out due to all the fire stories.
I have added a heated water bowl to the coop and one in the run in case I need to isolate them in the coop. Running water out twice a day got old fast. The one in the run is just the heated dog bowl which is working great and the one in the coop is the one from K&H manufacturing that has the debris strainer and the cap that prevents the entire water content from spilling out when you flip it over, which I love. I only use this inside because I read that the plastic cracks below zero, the coop stays warm enough that won't happen.
I also just purchased a Sweeter Heater that I will put up over the next couple of days before it gets really cold again. The girls have been avoiding the roosts and huddling on the floor a lot so I am going to mount it behind the roosts to try to coax them back up there. I have already added a heating mat from K&H next to one of the roosts and the girls fight over that spot. The Sweeter heater is much longer and they will all have a space. This is a little selfish, it's much easier to clean the poop board than the floor. Also, someone has been sleeping in a nest box since it's been cold and I am hoping to provide a warmer spot that will stop that.
The sweeter heater works great, everyone has their favorite spot, but sweet pea still prefers roosting in the nest boxes. I need to fix that.
Here is the Sweeter Heater and a chicken heat pad installed on the coop walls. They have worked well. No more sleeping in nest boxes. I took out the heat lamp and small heater and the coop stays plenty warm.In spring I will pull out the sweeter heater and use it in the brooder. No more heat lamps!.
Presents for Christmas
Our girls got their Christmas presents a little early this year. They got a new mirror which they loved right away and a new chicken swing which I hope they will enjoy over time.
"Chicken Approved"
Wish I would have:
Now that we are coming into our first winter, I wish I would have added an exterior outlet in the run for a water heater. Will fix that in the summer.
The Garden
The Rustic Roost sits inside my garden area at the homestead so that I have easy access to compost bins and can use the chickens for pest control in the garden. Between my chickens and the bats we have, I did not have any pest issues last year. It is a great area for free-ranging as it is about 5000 sq ft. Unfortunately, we had a hawk attack at the end of Jan 2017 so we had to add hawk netting before I could let the girls free range again. I also added a scarecrow, i.e. fake me, to the garden and the girls seem to like her a lot. I also added some raised beds this year with shade cloth so the girls have a bit of extra shade which they really like. I also threw in a few chicken forage grass locations.
As the garden evolves the girls love it more and more. We added a Pergola between the greenhouse and the Coop which shades the whole Coop and run and the girls absolutely love it. It was ridiculously hot here this summer but with the shade from the pergola and the shade cloth over the raised beds, the girls had plenty of spots to hang out. I also added a misting system in their run during the hottest times. Here are some recent pics:
Sweet Pea grazing in forage grass by the raspberry bushes.
The new Pergola with shade cloth shattering the coop. Next, I attached the shade cloth from the greenhouse that is shown attaching at the ground to the pergola to shade the entire area, which worked really well.
I rocked this area to prevent the chickens from scratching up the apple tree roots. They have another foraging area to the left.
Rosie enjoying the new mulch between the raised beds and of course the shade and a tomato or two.
This is the best view I have of the raised bed area. There are 4 beds with 4ft spacing between them that is completely covered by hawk netting and Aluminet shade cloth under it supported by 2x4 T posts attached to the beds with 3mm wire used to support it between the posts. It has worked really well. We get some pretty heavy winds but I basically sewed the Aluminet in place with fishing line to the wire and it has not moved or torn at all.
Pumpkin lounging between the raised beds in a foraging area.
We recently expanded a bit more so the girls have a bit more space. Once the chickens realized that they could very easily hop up into the raised beds, they really started making a mess of things. I've had to add some extra netting to keep them out. (Brats!) Next year I plan to add a few chicken grass areas to really make it chicken heaven. And then...maybe ducks...
We have had our girls for about 4 years now and the garden has changed so much. They have 3 grass areas but still love to come out to the main back lawn to run around with the dogs. But now, we are adding ducks. Because our chickens do not use the deep litter method, but sand instead, I wanted to house the ducks separately. I almost never use my greenhouse so I thought it was high time to put it to good use and house the ducks there. We have 2 runner ducks coming in about a week. Can’t wait! We also added a pond next to the greenhouse but we will have to keep it fenced off after one of our chickens demonstrated what a poor swimmer she was after she fell in. She is fine, we pushed her towards the steps I put in and she got out, but we do not want a reoccurrence. So, here are some new pics, enjoy.
 Here is our old chicken brooder modified for ducks.
Here is the new pond. We used a stock tank at the back with filter media pads and clay balls, with big plants for a strong biofilter. The plants in the pond are ones that the ducks supposedly won't bother, horsetail reeds and lizard's tail.


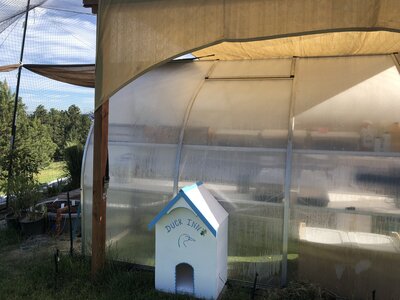
Here Sweet Pea and Pumpkin are checking out the design and the dogs are inspecting the pond. The inside of the greenhouse has artificial turf leftover from the dog run which can be easily washed down, nest boxes, and a small indoor pond that will operate during winter. There is also an automated pop door behind that cute little entrance porch which I built to keep the snow out of the way in winter.


here is one of the new grass areas, a stepping stone portrait of my little Sweet Pea, and some more garden upgrades. Though I must say, the chickens are not impressed when we take a dirt section and then make it pretty and fence it off.
The ducklings are here! Two sweet little runner ducks, one chocolate one blue. They are so cuddly. I just love them. I have never seen anything eat so much so fast.


Kiwi on the left and Coco Bean on the right The feeding station, I can wash this down and out of the coop.


relaxing on their own lawn I call Duck Land.


I had to install a bog filter on the indoor pond. I swear those little poopers spend all night in it. After about two weeks the bog filter has the water really clear. Of course, I had to fence it off so they didn’t eat all the plants.

Ah relaxing on their own private pond. Life is good.
")