This is my coop for 8 bantam chicks and this is my coop story.
I bounced all around when I started planning my coop. First I was going to get a tractor kit. Then I was going to get a coop kit. Next it was an Amish built coop. Then back to the kit. The main factors were money, size, and having to build it on my own. Size became the most important. One must account for chicken math. Build the coop as large as you can.
On a trip to Home Depot I went and looked at their sheds. The size was great, 8x8, tall enough and big enough to walk into, stand in and walk around. Relatively well built. The price was outstanding and I didn't have to build it! Sold!
This is the Shed USA photo of my shed I picked out.
Next I had to find a spot in the yard. I wanted it inside my fenced in back yard for extra protection. Close enough so that in the winter I did have to shovel a mile to the shed, and far enough away so I couldn't smell them from the house(in case they did smell like everyone told me they would but really they don't.) I also didn't want it to be an eye sore.
Per the shed people the area needed to be level within 6 inches and you needed to stake out the area using provided flags putting the red one where you wanted the doors. My chicks were arriving April 8th. I didn't need the shed until at least then, even later was fine since I had a room in the house to brood them. Well the shed people wanted to deliver it beginning of March. Here's the problem with that idea.
I live in Massachusetts. I had 18 inches of snow on the ground and it was on the ground for the entire month of March. I had to change the delivery date 3 times due to the snow.
While I waited for the snow to melt, and the ground to thaw I worked on the only thing I could, the coop sign. All coops need a sign!
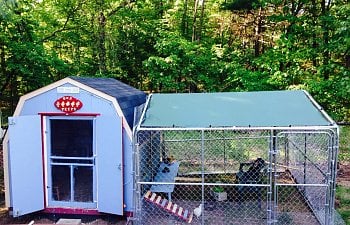
Finally April 11th there was no more snow the ground had thawed enough to level the area and my shed was installed!
Best part I didn't have to lift a finger!
First step get it painted to protect it from the weather.
Next seal all the joints
Paint the interior, I know the chickens don't care what it looks like! I care. The paint was all for my benefit.
The "vents" I paid extra for on the shed were a joke. They put two holes thru the wall with a hole saw. I had to cut the holes bigger to make them useful.
Time to hang the sign!
Now the scary stuff began. Time to star cutting some major holes. First was the automatic pop door.
Had to make sure it's level. Plus now I had unpainted wood! Can't have that!
Next I had to install windows. I have never installed a window in my life! I bought 2 functional shed windows online for $27 each and watched numerous videos online on how to do it. Once again I had to put giant holes in my shed.
I installed the windows, added a sill and then secured hardware cloth on the outside of each window. They were level, opened and closed and I didn't even need a shim.
Next I made a screen door. I bought a 36 inch wide screen door at Home Depot for $25. It took me awhile to figure out how I was going to install it, and make it secure. I added a 2x4 to each side of the interior studs the exterior doors were mounted on.
Next I had to cut the door. It was too high. I measured and then measured again and cut off a big portion of the top of the screen door.
I took the top piece I had cut from the door and reinstalled it lower down. Next I hung the screen door using two small hinges.
Once I knew it was the right size, and would swing open and that I could close the exterior doors, I took it down and installed hardware cloth on the inside.
I added three sliding bolt locks, top,bottom and middle. I added a handle to both the inside and outside and one sliding latch bolt to the inside.
I had to be able to close the door and latch it when I was in the coop too.
I built the poop board using a 24x72 interior door from Home Depot and attaching 1x3's to the edges.
The roost was a 2x4 and I bought joist hangers to attach it.
I thought at the time the baby bantams, once they moved out at 6-8 weeks would need the roost smaller so I hung it the short way, with the ability to move it once they were bigger. Yeah 10.5 weeks they aren't roosting yet so I've already moved the roost to the flat side of the 2x4.
I installed heavy duty shelf brackets to hold the poop board. I put the roost at the 4 foot mark and the board a little lower. I didn't want to have to lean over to clean the poop board and planned on storing the feed and the nesting boxes under it.
Once I had enough money I bought more hardware cloth for all around the coop bottom. I didn't want critters to get in or under and I didn't want the chicks to be able to get under the coop either.
I covered it with dirt.
The last thing I did was the floor of the coop. I had read on BYC about a weather proof roof coating called black jack 57 that was great. Created a sealed weather proof floor, able to wash it, virtual indestructible. I bought what I thought was the Home Depot equivalent. Henry Roof coating. I put it down on a Sunday.
All roof coats are NOT the same. By Friday the stuff was still sticky. You could see your shoe impressions when you walked on it. It just never set. Instead I had to put down linoleum. The only good thing, I didn't need floor glue. The black stuff just stuck to the linoleum and held it down.
Since my roost was so high I decided to build a ladder using 2x4's and 1x3's. I spaced the steps 2 inches apart. I made sure the wood was rough so the steps wouldn't be slippery when I painted them.
I also added a piece of linoleum to the poop board.
And then the sweet PDZ.
Next I added pine shavings and two cement blocks that are 6x8x16 to put the food and water on. With the three sizes I had three options for how high to put the food and water. And I added a lower roost for them to try out too.
The last item on the to do list was the run. I bought a 10x10x6 pre-made panel dog kennel from Tractor Supply. I had to rent a truck in order to get it home but it took all of 15 minutes to assemble. I also bought the top that goes with it and more hardware cloth.
I assembled the kennel got it into place, and attached the roof. I cut a hole in the chain link for the pop door opening. I built a smaller ladder for the pop door exit. Then I started to put on the hardware cloth. I used hog ring clips and the tool to go with it to attach all the hardware cloth to the run. The ends of the roof had huge openings that I needed to cover with hardware cloth as well.
I also made movable nesting boxes for easy cleaning. They won't be going in the coop for another 7 weeks. I plan on putting them up against the back wall under the poop board. I bought a 6 cube shelving unit from target for $35. We'll see how it holds up. Each box is 12"x12"x12.
This is the unit assembled with pink yoga mat cut into squares for padding.
Then I added a plywood back painted brown and attached it using Velcro squares. This way I can remover the back to clean them out. I added a lip to both sets of boxes to keep the nesting material in. I added a bar in front of the upper boxes for easier access for the chickens. Finally I made curtains for the top boxes. I left the bottom boxes open so they have a choice.
Here are the lessons I've learned;
Don't bother trying to keep track of how much your coop is costing you. It's a lot. That's all you need to know. It's amazing what one person can do on there own. I used my hands, my arms, my legs, my head, my teeth in order to get some of the things done. Give yourself plenty of time. You don't want the added stress of having to put the chickens in the coop when it's not ready. Do a little at a time. I worked on my coop after work and on the weekends but took my time and enjoyed the process. It doesn't have to be perfect. Remember as long as the chicks are safe they don't care what it looks like. Your shed is going to constantly evolve. You will always find something you can add or fix or make better. Finally BYC forums and members are your best friends!