The story of our urban coop...
We originally planned to save up and pay a builder to construct the coop based off of some plans that I had bought and many that I had found online. I was going to incorporate a lot of the ideas I learned about here. For some reason however I abandoned this and decided to go full-tilt and build it myself. Granted, I'm no wood-builder and did not have the tools or previous knowledge, only things I've researched and some minor past experiences helping others.
I had a few requirements:
Build using recycled or free materials when/if possible.
Exterior nesting box.
Tall enough to enter without crouching.
Large side entrance to the coop box for cleaning and etc.
Large coop box and enclosed run exceeding sq. foot recommendations.
Not an eye-sore.
Thus, after further research and material gathering the journey began. Construction started on May 7th, 2010 and ended on June 11th, 2010. My wife and I spent every evening after work as well as every weekend laboring away and learning as we went. So many things were done on a foot-by-foot basis because I lacked the ability to take a lot of the design ideas out of my head and apply them properly to paper where anyone other than me could understand. It has been a major learning process and the end result is something we're pretty pleased in for our urban coop.
We began by cutting many pallets into slats to stain and seal for roof shingles. The remaining pallets scraps went to the campfire. Extra stained slats that you see here that were not used on the roof have gone into making a garden border. We've also kept plenty in the case of future shingle repair since they're already stained and ready to go.

Here you can see the initial framework being created. I used the a-frame from a children's swing set that I recycled. The swing set also had a tower attached with a slide and roof for a playhouse. I deconstructed that to use for further framework as well as creating an entryway into the coop and extending the main interior coop box.
A view from the other side of the frame as it's being built.
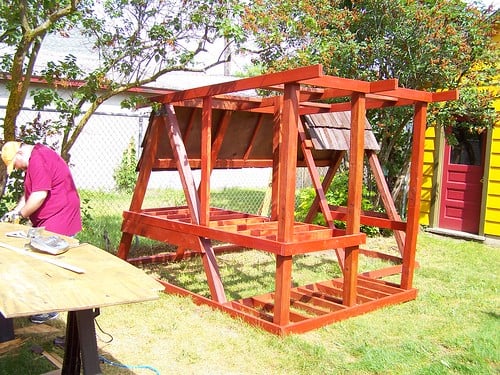
Here you can see the completed frame which used up the remaining wood recycled from the swing set as well as some further wood used from a recycled boat trailer.
Another view of the completed frame.
A side view of the completed frame.
Here we began applying the stain and sealer to the frame. This was a 2-day process due to all the angles and wood from the under side. Thankfully I have a wonderful neighbor who helped me along the way during construction and staining. We applied 2 full coats of stain and sealer.
The frame now stained and sealed from the other side. It's about 10 minutes away from nightfall here.
The next day the roofing began. The idea was that due to the weight of the entire coop I'd need to construct the frame and then apply the backside of my pallet-wood shingle roof so that I could then move the coop into place and finish construction from there. The weight using so many recycled beams and the additional weight that I added during construction made this one seriously heavy coop. After building the roof on the back and then the front as well my wife and I heaved the entire structure into place inch by inch. Thankfully it had rained that morning which made the grass a little wet to help sliding. I was blown away all day long that the 2 of us were able to heave this coop structure into place on our own. But, with the coop now in place further construction could begin!
Here is the back of the coop facing the fence between my neighbor and I. We thought the pallet-wood shingles gave a nice look.
Time to cut the recycled boat trailer flooring to fit inside the hen house. I used the spare section to also create the flooring inside the coop entry door. The wood had a little bit of a curve to it as you can see but virtually every board in this entire coop had a bend or angle of some sort. Part of using recycled wood and just part of the process in general. I found that even with the pieces of lumber I had to buy brand new there were still a high number of curved boards.

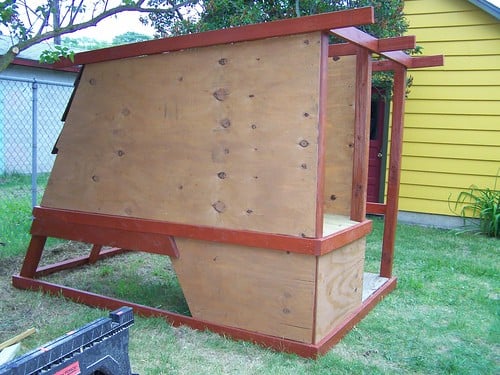
Here things are starting to take shape with the exterior panels now stained and sealed and then put into place. After these were attached and sized the next steps down the road would be to make ventilation changes and doorways for the hen house, exterior nesting box, and storage.
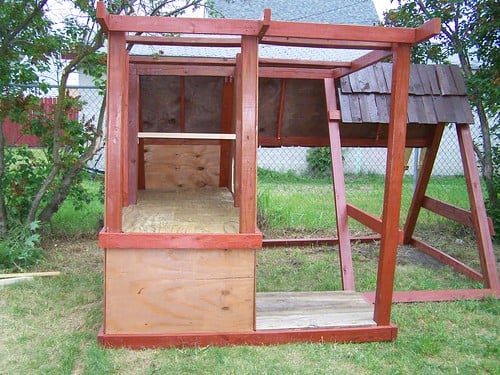
Another view from the front of the coop to give you an idea of the enclosed size. I have approx 29 sq. foot inside the hen house and 60-70 sq. foot inside the run. The storage box below that you see is pretty large as well but I don't have an exact measurement.
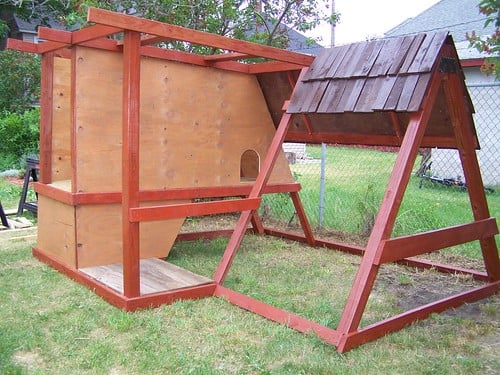
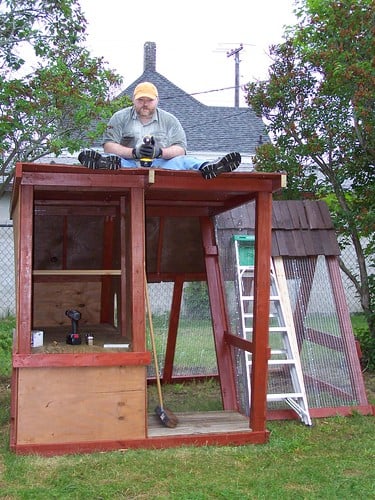
Another side view of the panels and pop door. The next major challenge awaiting me that I was dreading more than anything else with the coop construction... attaching the wire.
I decided that I'd skip over any pictures of wire attachment because it was 3 grueling days of work and the most difficult task I had with the entire coop. Rather than showing you pictures of me storming around the yard and bruised hands I figured I'd just jump straight to the roof. We were getting close to the end here and the rains were coming more and more. I needed to get the roof on. I spent a few hours outside in the rain to complete this task. Once the wood substructure of the roof was attached I attached the galvanized metal on top. I used the roofing metal used on outdoor sheds which worked out nicely.
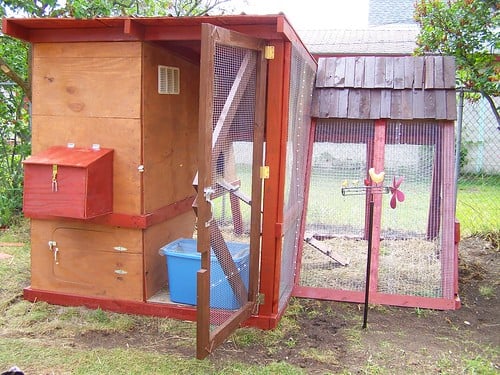
Here we are with a near completed coop. There are only a few minor things left to do that you can not see in this picture. The blue bin you see there is full of my 5 girls. We also added some more decorations to the exterior and have plans for a sign right there above the exterior nesting box. The ground is a bit torn up here as well because of the wire we have for predators surrounding the coop. The grass is already looking much better now than in this picture.
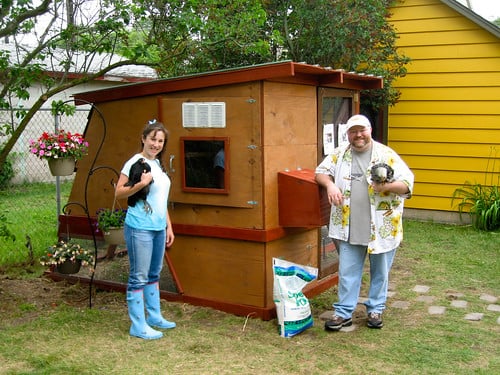
Here we are! The coop is completed and the girls are moved in!
We learned so much along the way and still have much more to learn in our adventures. I hope you enjoy our little story and a special thanks to you all for your wonderful forum contributions. I have learned so much and helped teach others as well just from our sharing. BYC Rocks!
We originally planned to save up and pay a builder to construct the coop based off of some plans that I had bought and many that I had found online. I was going to incorporate a lot of the ideas I learned about here. For some reason however I abandoned this and decided to go full-tilt and build it myself. Granted, I'm no wood-builder and did not have the tools or previous knowledge, only things I've researched and some minor past experiences helping others.
I had a few requirements:
Build using recycled or free materials when/if possible.
Exterior nesting box.
Tall enough to enter without crouching.
Large side entrance to the coop box for cleaning and etc.
Large coop box and enclosed run exceeding sq. foot recommendations.
Not an eye-sore.
Thus, after further research and material gathering the journey began. Construction started on May 7th, 2010 and ended on June 11th, 2010. My wife and I spent every evening after work as well as every weekend laboring away and learning as we went. So many things were done on a foot-by-foot basis because I lacked the ability to take a lot of the design ideas out of my head and apply them properly to paper where anyone other than me could understand. It has been a major learning process and the end result is something we're pretty pleased in for our urban coop.
We began by cutting many pallets into slats to stain and seal for roof shingles. The remaining pallets scraps went to the campfire. Extra stained slats that you see here that were not used on the roof have gone into making a garden border. We've also kept plenty in the case of future shingle repair since they're already stained and ready to go.

Here you can see the initial framework being created. I used the a-frame from a children's swing set that I recycled. The swing set also had a tower attached with a slide and roof for a playhouse. I deconstructed that to use for further framework as well as creating an entryway into the coop and extending the main interior coop box.

A view from the other side of the frame as it's being built.

Here you can see the completed frame which used up the remaining wood recycled from the swing set as well as some further wood used from a recycled boat trailer.

Another view of the completed frame.

A side view of the completed frame.

Here we began applying the stain and sealer to the frame. This was a 2-day process due to all the angles and wood from the under side. Thankfully I have a wonderful neighbor who helped me along the way during construction and staining. We applied 2 full coats of stain and sealer.

The frame now stained and sealed from the other side. It's about 10 minutes away from nightfall here.

The next day the roofing began. The idea was that due to the weight of the entire coop I'd need to construct the frame and then apply the backside of my pallet-wood shingle roof so that I could then move the coop into place and finish construction from there. The weight using so many recycled beams and the additional weight that I added during construction made this one seriously heavy coop. After building the roof on the back and then the front as well my wife and I heaved the entire structure into place inch by inch. Thankfully it had rained that morning which made the grass a little wet to help sliding. I was blown away all day long that the 2 of us were able to heave this coop structure into place on our own. But, with the coop now in place further construction could begin!

Here is the back of the coop facing the fence between my neighbor and I. We thought the pallet-wood shingles gave a nice look.

Time to cut the recycled boat trailer flooring to fit inside the hen house. I used the spare section to also create the flooring inside the coop entry door. The wood had a little bit of a curve to it as you can see but virtually every board in this entire coop had a bend or angle of some sort. Part of using recycled wood and just part of the process in general. I found that even with the pieces of lumber I had to buy brand new there were still a high number of curved boards.
Here things are starting to take shape with the exterior panels now stained and sealed and then put into place. After these were attached and sized the next steps down the road would be to make ventilation changes and doorways for the hen house, exterior nesting box, and storage.
Another view from the front of the coop to give you an idea of the enclosed size. I have approx 29 sq. foot inside the hen house and 60-70 sq. foot inside the run. The storage box below that you see is pretty large as well but I don't have an exact measurement.
Another side view of the panels and pop door. The next major challenge awaiting me that I was dreading more than anything else with the coop construction... attaching the wire.
I decided that I'd skip over any pictures of wire attachment because it was 3 grueling days of work and the most difficult task I had with the entire coop. Rather than showing you pictures of me storming around the yard and bruised hands I figured I'd just jump straight to the roof. We were getting close to the end here and the rains were coming more and more. I needed to get the roof on. I spent a few hours outside in the rain to complete this task. Once the wood substructure of the roof was attached I attached the galvanized metal on top. I used the roofing metal used on outdoor sheds which worked out nicely.
Here we are with a near completed coop. There are only a few minor things left to do that you can not see in this picture. The blue bin you see there is full of my 5 girls. We also added some more decorations to the exterior and have plans for a sign right there above the exterior nesting box. The ground is a bit torn up here as well because of the wire we have for predators surrounding the coop. The grass is already looking much better now than in this picture.
Here we are! The coop is completed and the girls are moved in!
We learned so much along the way and still have much more to learn in our adventures. I hope you enjoy our little story and a special thanks to you all for your wonderful forum contributions. I have learned so much and helped teach others as well just from our sharing. BYC Rocks!
