Hello All,
This is my first experience owning chickens and therefore my first time building a coop.
So, here we go....
The game plan changed many, many times, with input from my two young boys. During my pre-build brainstorming phase, I needed to plan our backyard layout. I wanted a swing set, a fort for the boys, a garden area, a chicken coop, and a run. (While keeping in mind a possible area for a few Nigerian Dwarf Goats, but that's a project for another time!)

I was trying to figure out how to possibly combine things. I knew the run would have to be connected to the coop. When combined, they make a pretty big foot print. Connecting the swing set to the coop quickly became unrealistic, due to the size of the area it would take up. So, I decided the swing set could go on the other side of the yard. The boys really wanted a tree fort, so I got the idea to put the tree fort above the coop and make a deck connecting it to the trees. That is how the Fort Coop was born!
")
As far as size, I went with a comfortable size coop & fort, not too big, not too small. I settled on 8'x8' floor, because it fits two sheets of plywood so nicely! LOL
Also, the walls are roughly 12' tall (peak is taller) which nicely fits a 8' sheet of T-111 and a 1/2 sheet (4') on top of that to make only one joint.
Quick Dimensions:
- Coop: 8' x 8' x 6'6" High
- Run: 8' x 15' x ~6' High
- Tree Fort: 8' x 8' x ~4'6" at the Wall and 5'6" High at the Peak
I didn't keep a detailed material list, mainly because the cost started to go way over budget and I didn't want to be reminded of that, but here is an idea:

Base: PT 4x4's and PT 2x6's
Flooring: Plywood
Coop & Run Framing: 2x4's
Siding: T-111
Roofing: Shingles
Run: 3ft Rolls of Chicken Wire
So, construction started at the end of March, 2015. March in CT can be cold, or relatively mild, but as luck would have it, this year there was actually still snow on the ground! Mother Nature can make things tricky, but we don't let that stop us! Besides, I had all ready been snow-blowing the build area while figuring out our final layout. Enough typing....on to the photos!
First things first, laying the base. Much of the framing was built in the garage. This made the most sense, because it's flat there and the weather is not an issue. Moving heavy PT frames to the build site is another story, but I had help, so that wasn't a big deal.
While my Dad & nephew were installing the plywood flooring, my bro & I built the frames for the walls. We also attached the T-111 to the walls and the four of us hoisted them into place. Building the coop in sections in the garage worked great. It kept things moving right along. Obviously, having the man power to move the sections made this possible.
That same day we also added the coop roof/fort floor framing. Here is a pic from the fort. Note the 8' T-111 is actually higher then the fort floor. I did this because I didn't need the full height in the coop, but I did want the additional height added to the fort.
We were able to add the plywood for the fort floor and covered it all with a tarp to keep some snow/rain out.
End of Build Day One! Phew!

What a difference a week makes! This was exactly one week later.The snow melted and out came the sun! We hoisted up the fort wall frames. Those were approximately 4ft High walls, so, without the T-111, they were fairly light. Good thing, too, because we had to carry them up ladders! The T-111 was added in place.
Here are the boys making sure their fort is being constructed properly!

Added the T-111 aluminum joint....
I was so excited by our progress that day, I forgot to take an end-of-day photo!
Anyhow, the next day we applied two coats of stain/sealer to the T-111. We wanted to make it weather-proof and we wanted this massive structure to blend in, at least a little bit.
Also, figured out the roof pitch to be about one foot higher at the peak. Added temp plywood and the tarp back on to keep out the weather.
Roof Day is finally here!
Somehow, I roped my brother into working up in the tree canopy while I ran back and forth getting shingles, etc.
Can you even see him up there!?
The roof is done! The shingles look great!
On to the doors! Thankfully, I had lots of help that day!
Both, coop & fort doors done!
Next, it was time to put up the trim. Again, couldn't have done it without my work crew!

Now the Fort Coop is finally 100% weather-proof! Also, added a storm window to the front.
Now that it was completely sealed up, it was time to start making it look like a chicken coop!
We (again) pre-built the nesting boxes in the garage. I decided on a section of 8 nesting boxes (4 on top of 4). The horizontal divider is permanent, but the vertical dividers are removable pieces that slide in to place on tracks. I figured that may help with cleaning. To also help with cleaning, I went with the dishpan idea, so I made the nesting boxes big enough to accommodate the dishpans and they fit great!
When framing the coop walls, I had all ready framed out an opening for the nesting boxes. That was a big help. It gave us the exact spot to cut out the T-111, which was still scary to do! I hope we measured correctly!
It fit like a glove! Also, added two vent windows. You can see one right above the nesting boxes.
Another note: I pre-planned & framed where all the coop & fort windows would go which was a huge help.
Added 2"x2" perches to the nesting boxes and have the bottom level perch out about 6" farther, so the chicks don't bump their head.
Me, instructing my helpers how to install the dishpans....
Dishpans in....
Added two roosting 2x4's above the poop boards. The higher poop board is right on top of the nesting boxes and I stepped the other poop board down a bit to give the chicks options.
I also made a 1"x4" frame around the edge of the poop boards so I could fill them with Sweet PDZ to help control odor and make cleaning easier. That stuff is great!
We cut in the chicken door near the human door for easy access. The ramp to the roosts also ends right at the chicken door, so it fits well.
Outside view of the chicken door and the window vent on that side.
Outside view of the egg door and window vent on that side.
You can't see much in this photo, but just for reference, this is the backside of the Fort Coop, showing the fort door and a fort window behind the pine branch. The branches were a pain to work around, but it is a tree fort, after all!


Mid-May, which was 6-7 weeks later, we finally moved the chicks out to their new home!
It seemed like a long time, but these were new chicks, so it was too cold outside for them at night until now anyhow.
I propped their food & water up off the floor and out of the wood shavings.
Also, hung twine with an eye hook, so we could hang corn on the cob, which is by far their favorite treat, as well as lettuce heads, etc.
Still getting used to their new home.
Note: Bottom perch is ~18" off the ground so chicks can walk underneath. It adds usable space and a bucket stores under it nicely!
Checking out the nesting box perches, where they slept until they were about 9 weeks old.
The boys put the chicks in their nesting boxes, but opened the egg doors, so they could see better.
The chicks lived just in the coop for another two weeks. We did let them out in the yard when we were home, but they didn't have a run during the day. Temps weren't too bad, so it worked out fine. Not to mention, finding time every weekend to work on the coop with everything else going on that two boys have to do is not very easy!
Thankfully the run went up in no time! We laid PT 4x4s on the ground to frame it and to keep the 2x4 walls out of the dirt.
I built my run walls as individual pieces that we pre-built, then put up and screwed them all together. I did this because it was strong, easy to build, and it would be easy to replace a section down the road, should I ever need to. The 4x4s were also secured to the ground with rebar, but from the inside, for that same reason. If needed, I could knock one out with a big sledgehammer and slide a new one in without disrupting the whole run. The run long walls were four sections and the short end was two sections. All had a horizontal 2x4 added for strength, as well as somewhere to staple the chicken wire to.
Run frame up....
Finishing up the chicken wire....
Adding the door handles....
Hooray! Run is done!
Now the chickens can get some fresh air all day long!
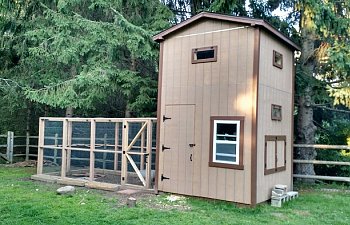
Here is a photo showing the coop & run 100% complete!
I also buried hardware cloth under the outside of the run to discourage predators. In this pic, you can see the three flower boxes I made out of pallets, which still need to have plants put in them (it's on the to-do-list). Also, I added a couple dust baths, neither of which the chickens really use. They prefer the ground.
A few photos of the family with the chickens!
Current Photo! Fort windows added. Hooray!
Updated Photos of the Fort portion in various stages of finished-ness....
It's 100% finished now! Hooray!
To the right you can see the stairs to the fort.
Here is a good photo, showing stairs up to the deck platform.
My oldest son staining the deck. Hey, it's the boy's fort after all! Gotta work for it!
Just hanging around!
Photo shows the big brackets we had made by one of my Dad's buddys.
The deck is basically resting on the support beam and the beam isn't bolted to the tree, allowing for swaying of the pine trees.
View of the far end of the deck.
View of our pond looking out past the far end of the deck.
View of the fort door. The door now has trim installed, but I couldn't find a photo of that.
View inside the fort, showing lights and superior workmanship! LOL
"Welcome Sign" is up! Fort is done!
Updated Dec 2015
- Added buried wire and installed outlets & fluorescent lights in coop & fort, as well as an additional outlet outside the coop.
- Added a motion sensor flood light right under the peak of the roof.
- Added hardware cloth inside the coop windows to make it more secure.
I am not adding any screen to the boy's fort windows, so they can throw paper airplanes, water balloons, etc.
Possible Fort Coop Additions:
- Roof over some, or all, of the run. I will see how it looks this winter, If I do add a roof, I could use the corrugated roofing and maybe collect the water with a gutter and rain barrel. I did keep this in mind when building the run. I figured corrugated roofing comes in 8' lengths, so i made the run 15' long to accommodate two lengths, even with a slight pitch.
- Decorations: Potted Plants, Barn Star, Sign over the door, etc.
Things I would have done differently:
- Not much!
I hope you enjoy the Fort Coop!
We all had a lot of fun building it and the chickens love it, too!
I will add updated photos as we go.
PS - (Unrelated to the Fort Coop construction)
I entered a dozen brown eggs from our hens in to our local fair this past fall....and....I won 1st Prize!
Blue Ribbon Winning Hens! Woo-Hoo!
2015 - Won 2nd Place in BYC's Coop & Run Contest