Well This is my second coop building adventure and i decided to build this one with as much re-useable material as possible. We had lots of scrap lumber left over from our other coop build project and a few sheets of plywood too, so I decided to put them all to some good use while building this second coop. The first coop experience you can find by clicking here was built with all new materials and we did not have any plans. This one I decided would be done as frugal as possible. Still no plans- I like to create as i go. I was not really concerned with the way it looked.
My main concern was that it would be safe and efficient for the chickens to live in it. I knew that clean out trays would be most important along with ventilation. And this time hubby could not help me because he was working double time so I had to build this one all by myself. It has taken me about a month working on it for several hours per day. But it was a labor of love. I still have a few finishing touches to add but for the most part it is now ready to house our 9 chickens. the footprint is 8x4 and the run is 8feet tall.- the run is 8x16 footprint. I plan to grow so grapevines around it and give the chickens a sweet treat from the vines..
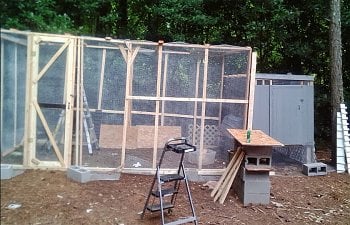
I still have to cover the top with hardware cloth and plywood for the roof and such and a few areas need to be trimmed and painted but over all i am calling this project finished!
I used a 4x4 cut into 2ft pieces for the legs off the ground.
I then covered the floor with hardware cloth under the bottom and covered the top with plywood.
Framed out the box as best i could with some left over 2x3's
I wanted the egg box to be a rol down type of thingie so I created
that next. I used some siding and 1x3's to create the outside of the nest box.
There are actually 4 nest boxes inside sectioned off with plywood seating.
I created a roll down egg box. Or roll-away egg box. It sits at a
slant so the eggs will roll down to the bottom.
The hardest part was putting the siding up by myself
I used half inch hardware cloth all around the coop and the run
300 feet of hardware cloth to be exact.I made sure to cover around the
top and bottom parts of the coop with the hardware cloth to give them some extra protection.
I left a 3foot space for my screen door. i am making the door with hardware cloth
finally got my screened door in!
Keep in mind this was a one WOMAN job. It's not the best or
prettiest coop, but it is well constructed and durable and safe for my birds and that was my main concern.
I used scrap siding and pieced it together all around and then i trimmed it out with some 1x2's and 1x3's
we had left over from the first coop project.
I will use those bricks to trim all the way around the run where the hardware cloth apron hits the ground.
I still have to finish the roof and put some roofing sheets on but that should be easy.
I used deck and porch paint on the siding to give it a longer lasting finish.
I used some hardware and locks i had laying around the house for the pop door and the egg box lock.
I still have to add some hardware cloth to the roof and connect it to the coop but that
should be easy too. The hard stuff is done now it's mostly cosmetics left to finish.
I will post more pictures when I have the final product finished for good.
But hopefully i will have the top on by next week and then i will put the birds outside.
thanks for your visit and any comments or questions you want to post are very welcome!
hugs from Atlanta Ga.
Latest updates
We put the chickens out in the new coop and run on sunday aug 18th-2013. We had to confine them to the coop for a week to coop train them so they would go in on their own at night. They love their new home.
This first video is a view of the coop and my girls.