Technically speaking, this isn't a coop. It's a run. We're still in the process of designing the coop, but that's coming in the next couple of weeks (months?). The girls have a temporary coop until the big one gets completed.
The run is 16' x 6.' We have three hens now, but doing some serious chicken math already. Once of my "girls" may be a boy, and that will open up a whole new line of arithmetic for me. So....
After studying all the things-I-wished-I'd-done-differently-when-I-built-my-coop articles (lots of really good ones here at BC!), I knew what I didn't want. And at the top of that list was a structure I couldn't conveniently WALK INTO without having to stoop over or bang my head. Easier to clean was my goal. So much to hubby's gentle bantering, this turned out much larger than he thought it would be. But in the end, it's really NOT that big -- if ya think about it, by the time you add in feeders and waterers and whatnot, you run out of space pretty quickly! And I wanted my girls to be comfortable, as they will be confined to the run much of the time. I do plan to free range, but only for a couple hours a day.
We live in Southern California and it gets insanely HOT in the summer. We don't really have to worry about fierce winters, but the summer heat will easily wreak havoc on my flock. We also don't have a very large yard. But we got lucky; the retaining wall you see here holds back a pretty steep slope, and just above grows a large old oak tree. The wall, being masonry, will provide some cool relief and the oak tree some good shade. Perfect location!
We also have every single predator living in our area that would love to make snacks of my chickens. Raccoons, rattlers, coyotes, bobcats, cougars, foxes, owls, hawks.... you name it. This had to be secure.
We started by digging out about six inches and laying hardware cloth down. Then we put CMUs (concrete masonry units) on top of the cloth at the edges, and hubby secured them into the ground with rebar. Once they were all in place, we backfilled the area with dirt.
Next he attached 2x6s on top of the CMUs to create a sort of "working foundation," to which he attached his entire frame, using all 2x4s. We worked upward, using the retaining wall as the back wall of the run, and created a lean-to design, making sure that the shortest height of the run, which is at the wall side, is still tall enough for me to stand without bashing my head on the roof joists (6'). He used a hammer drill to attach the lumber to the top of the wall.
Neither of us really have any construction knowledge, but this wasn't rocket science. We relied on a lot of Simpson brackets, a good drill gun, a hammer drill, galvanized screws (I prefer screws over nails, much easier to remove and replace)... and a little common sense

I painted the framing as we moved along. The toughest part was working in sync -- I had a specific design in mind for the Hen Den, and that meant he had to tell me which board was going where before he cut it so I could be sure to pull out the right color paint.
Hardware cloth was attached all along the inside of the framing.
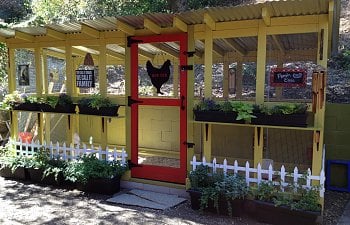
I put all the finishing touches on, like the planted mint boxes (to reduce flies and stink) and the white picket fence.
I don't know the exact total cost, but somewhere close to $1000. The hardware cloth was $45 a roll (we used five rolls) and we went through forty 2x4s and six 2x6s. There were a few extra runs to Home Depot in between, so I lost track, but this is a good close number.
This turned out super sturdy. We literally - yes, I said LITERALLY! - get winds of 100mph rolling down our street, so this had to be strong enough to hold up to strong winds. The sheet metal roof, I'm sure, will make quite a racket when the winds kick up, but this puppy isn't going anywhere!
A little cute decor to pimp the crib....
Our Inspector General approved....
I lined the inside with pine shavings and straw (it's a covered run) and some DE mixed in. The girls, now fully feathered, were very happy to get out of the brooder and into their new home. Only a little confused, but they took to it right away -- dust bathing within a few minutes of moving in!
Here are Eula (Welsummer) and Gracie (a Buff Orpington)...
And Louise... (Louise is a Speckled Sussex. She may be a he, but we aren't sure yet)...
And we're done!
Btw, the paint I used was all Home Depot's Behr Ultra. The "ultra" is the one with primer - stupid expensive at $40 a gal, but so-very-well worth it. Covers in one coat (except for a few problem 2x4 that were still wet) and it sticks. Colors I used were:
Avocado - for the retaining wall, door frame and shelves
Lemongrass - for the frames and roof joists
Firecracker Red - for the door
The girls have a temporary pre-fab coop right now, which we've put it inside the run (not pictured here). We're going to begin construction on the "real' coop in a few weeks and we will be attaching it to this run, so there will be some modifying. But it will be minor. The coop will be 6'x8' and I'll be sure to post up when it's all done.
YAY!