The Little Red Henhouse
My wonderful wife has completely foiled my plans for a simple coop that was designed to fit underneath our huge playground set. It was going to give the girls a 4'x4' coop with an attached 4'x9' run. It was simple, it was perfect, and apparently it was not what my wife decided she wanted.

| So began the plans for a new coop. There were several plans that I really liked. For instance, there was The Dixie Chicks' design or the beautiful one by DazeGoneBy. Neither fit correctly in the spot my wife designated, so I set out using ideas from both to create a Little Red Henhouse. I found a beautiful picture of an old-fashioned red schoolhouse that will give me a styling to aim for. A few changes are necessary to facilitate the specific location my wife wants, but this is an excellent starting point for what the final result should be. The smaller section at the far right will be the nesting boxes and the entrance will be transposed on to the side. But if all goes well, it'll have the bell tower and all! |
Laying the Foundation
The foundation is designed to elevate the coop approximately two feet off the ground. This allows some extra storage underneath for the feed, extra flooring, or whatever else you desire. Ultimately, it will be enclosed and have two doors on the front. For now, though, it's just open space. There are four 4"x4"x24" pieces holding it vertically, while there is a banding at the top and bottom made of Select Studs 2"x4". This provides a very sturdy base that will hold several thousands of pounds.
|
| Foundation and Base (A) x4 = 4"x4" x24" (B) x2 = 2"x4" x57" (C) x2 = 2"x4" x36" (D) x2 = 2"x4" x60" (E) x3 = 2"x4" x33" (F) x2 = 2"x4" x12" (G) x1 = 2"x4" x26" Plus one flooring grade, 3/4"x4'x8' plywood sheet. |
|
| Place the four 4"x4" legs (Piece A) standing vertically on a flat, level surface. Position the two side rails (Piece B) on each side of the the legs and secure them using a carpenter's square to ensure proper positioning, as shown in the diagram. Attach the two end rails (Piece C) in the same fashion. This immediately provides a solid, movable base for the coop and will give you a squared workpiece for better alignment later. |
|
| Flip the entire workpiece upside down, allowing you to utilize the same flat surface to mount the upper rails to the legs. This will also align the tops of the rails with the tops of the legs, providing a flat surface that you will mount the plywood sheet to. Mount the end rails (Piece E) to the legs first, ensuring they line up with the edges of the legs. Next, secure the side rails as shown in the diagram. Attach the shelf on the left end of the foundation using the extensions (Piece F) and end rail (Piece G). This is where the nesting boxes will be placed. |
|
| Finally, secure the large sheet of plywood to the top of the entire foundation and cut it down to fit. I used a jig-saw to rough-cut the inside corners of the nesting box floor and a circular saw to rough-cut the remainder of the edges. Follow up with a hand router, using a flush-trim bit that uses a bearing on the end. This will give you a perfectly matched flooring. |
|
Frame Only |
Frame with Nesting Boxes |
Frame with Flooring |
Beginning the Walls
The first wall to be designed was the front-facing wall that will have the coop's door and covered porch, just like the photo. The right half of that wall will swing open to allow full access to the inside of the coop for simplified cleaning. The door will be blended to match the outside wall, though, and will have two of the small framed windows in it. Each window will be covered with hardware or chicken wire to keep out the pests, but allow added ventilation.
|
| Front Wall (A) x1 = 2"x4" x60" (B) x2 = 2"x4" x6" (C) x4 = 2"x4" x33" (D) x1 = 2"x4" x12" (E) x4 = 2"x4" x34 1/2" |
|
| Because of the extremely small space in between the vertical frames around the coop's door, it is necessary secure the frame's top rail first. On two vertical rails (Piece C), mark one end the bottom and draw a line at 18" up from the end. This will be the bottom of the cross-piece. Ensuring the pieces are square, secure these three pieces together. Next, secure the outer sets of the door's frame (Piece C) to the wall's top rail (Piece A). The inside distance between pieces should be 21" apart. Before installing the inner door frame, you need to secure the dividing stile (Piece E) top the top rail. Then, secure the inner door frame you built in the previous step to the top rail and finish that section by installing the two cross braces at the very bottom of the section (Piece B). Lastly, add the remaining stiles (Piece E) to the right half of the wall. These all secure to the top rail first, and then can be attached to the outer stiles (Piece E) for added stability. Make sure they are all square. For the two pieces that appear extra wide, attach them with the wide side of the board mounting flush against the part of the top rail that will be the outer wall. |
|
| Back Wall (A) x1 = 2"x4" x60" (B) x3 = 2"x4" x33" (C) x1 = 2"x4" x56 1/2" (D) x1 = 2"x4" x34 1/2" |
|
| The back wall was extremely straight forward. The wall was designed to frame the opening for the dining room window. It allows full access to the coop without going outside. This has several advantages. First, it allows access during the cold or foul weather without having to go outside. Second, in the event of really extreme heat, we can crack the window and allow the air from the house to help cool the coop. I don't foresee this as being a problem, but it is a nice option to have. The main reason for designing the wall this way is to allow everyone to watch the girls inside the coop. I am hoping that this is a long term learning experience for my daughters, so seeing the full interaction between hens, plus maybe catching them laying is a huge bonus. In the event that we have any chicks later, it also provides an easy way to watch them. And everyone loves watching hens! The only thing to note is that the far right stile (Piece D) should be secured to the right interior stile (B) prior to securing the middle interior stile (Piece B). Also, the end stile should be placed flush with the outer wall, just as it was in the front wall. |
|
| Left Wall (A) x2 = 2"x4" x29" * (B) x2 = 2"x4" x18" * * Pieces are scraps from the previous steps. |
|
| Quite simply, secure the vertical stiles (Piece B) to the ends of the front and back wall. These are fillers to fill the cap for the nesting box frame. This will become more obvious during construction. Secure the two cross rail as show. The top rail is mounted with the tall side vertical. |
|
| Right Wall (A) x1 = 2"x4" x29" (B) x2 = 2"x4" x33" (C) x2 = 2"x4" x31 1/2" |
|
| Although a bit overkill, this wall ended a bit more secure than initially intended. The design of the back wall was changed after it was built to fix a small oversight I had when I designed it. As such, I ended up with a strange box frame here using Pieces B and Pieces C. Optionally, Piece A and Pieces C can be left out without any negative impact to the design. Both of the Piece B rails are the key parts to secure the front and back walls together. Piece A was used as a filler for the temporary chicken wire to be secured to, but will not be necessary once the roof and siding is installed. It is simply secured to Piece B below it. |
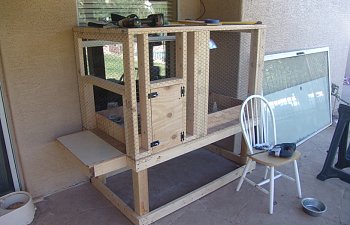
At this point, you can continue below or you can secure it with chicken wire and a door for immediate use. I had to wrap it in wire because the pullets were getting too large for the Rubbermaid container we were using inside the house. The door is just a scrap of plywood left over from doing the flooring.
In the photos below, you may notice the television mount above the coop. That was installed by the previous owner and will be relocated as soon as the roof is ready to install. Jumping ahead a bit, the roof will have a 22.5* slope, which equates to a 5/12 roof pitch. That means that for every 5" that the roof rises, it will run 12" across. Since the coop is 36" wide, it gives me a rise of 15". That's all explained better later.
|
Front Wall Secured on Foundation |
Back Wall Secured on Foundation |
Primary Coop Completed |
Attaching the Nesting Boxes
|
| Nesting Boxes (A) x2 = 2"x2" x14 1/2" (B) x1 = 2"x2" x26" (C) x2 = 2"x2" x10 1/2" (D) x1 = 2"x2" x22" (E) x2 = 2"x2" x14" |
|
| I used a brad nailer with 2" brads for this section since the wood is much smaller. Four brads in each piece worked very well. Start by securing the vertical end posts (Piece C) to the end frame (Piece B). This is done the easiest by laying all pieces flat on the ground and using a carpenter's square to line the pieces up. Next, secure the side frames (Piece A) to the end frame (Piece B) in a similar fashion. Attach the upper cross frame (Piece D) to each of the end posts and secure the entire piece to the nesting box floor on the main foundation. Secure the side frames to the nesting box frame and then the entire frame to the floor of the foundation. The most difficult part is getting the correct angles on the angled braces. The edge that connects the braces to the outer frame is a 24* cut, while the end attaching it to the main wall is a 66* cut. If you have access to a cross-cut saw or miter box, these will make the process much more accurate. Due to the small sizes of the 2"x2" pieces, a circular saw or a jigsaw are poor choices. |
The "Barn Door"
The large square area on the right side of the front wall is for a swing open door that will be used to access the coop from the outside for cleaning. It gets a bit awkward leaning out the window all the time to clean and during extreme weather, I don't want the window open that long. The door will swing open to the right.
|
| (A) x2 = 2"x4" x25 1/2" (B) x2 = 2"x4" x30 1/2" (C) x2 = 2"x4" x22 1/2" |
|
| There are two stages to building the door. The first is the outer frame. Attach all four pieces as shown in the diagram. As always, use a carpenter's square to ensure proper fitment and secure with deck screws. The second part is to install the hanging support. These pieces are used to mount the hinges to hold the door on. A T-Hinge is used in order to allow the right half to mount vertically to the foundation wall, while the other half mounts horizontally on the door. This also provides three interior sections that can be made in to storage. When it's completed, the interior and exterior of the door will be covered with panels. For my purposes, only the large middle section will be used for this. There will be several utility hooks for hanging a hand broom, dustpan, kitty litter scoop and canning funnel. At the time of writing, those are the only tools I have found necessary. I will have a small jar of spare nipples and such sitting on the ledge. |
Built-In Feed Hopper
To simply the feeding process, I utilized the idea from Jeb251's Simple PVC Hopper Type Feeder. With some slight modifications, the feeder is designed to be refilled from the roof. The vertical pipe runs up along the inside of the front wall and through the roof. A 22.5* angle coupler is utilized to give the pipe the same angle as the roof as it passes through. From there, another angle coupler is used to bring the end-cap level again. The entire feeder is secured to the inside wall using to steel bands.
The bowl is a 4" pipe cap, I was unable to find anything larger in town. The vertical pipe is 2" pipe, with two angle couplers, a clean out adapter and a cleanout plug. This allows the pipe to be securely closed from the top to keep the unwanted critters out. If the coop is to be kept in the open, it also keeps out the rain.
I will refer you to Jeb251's page for the specific instructions, but the cutout I used was 1 1/2" tall and approximately 1/3rd the circumference of the pipe. I used two pop rivets to secure the bowl to the pipe, rather than using screws. It was cleaner and easier to manage. I have a good selection of these, so they were readily available.
One perfect thing about using the 2" pipe was that a standard canning funnel fits perfectly into the clean out adapter. It is a tight enough fit to securely hold the funnel, allowing you to use two hands for managing the bag or whatever contains your feed.
|
Inside View of Feed Hopper |
Top View of Unfinished Fill Cap |
Top View of Finished Fill Cap |
Removable Roosting Ladder
Because of the design of the coop, I wanted the roosts to be easily removable. Installing some permanent ones just wasn't practical with this particular coop, plus, I prefer the ability to quickly and easily adjust it when necessary. It also allows me to remove it for cleaning. I chose to have three roosting levels in the ladder. The first is approximately 4" from the ground, mostly for the chicks. The second roost is at 12" and the last is at 24". Finally, the hens will be allowed to roost up in the rafters at 36".
|
| Foundation and Base (A) x2 = 2"x4" x37" (B) x2 = 2"x4" x18" (C) x2 = 2"x2" x18" (D) x3 = 2"x4" x22 1/2" * * Pieces are scraps from previous steps. |
|
| The roosting ladder is easier than it looks or sounds. The key is to take your time with the measurements and cuts. First, cut both of your angled supports (Piece A). These are a total of 37", but you will cut the excess off at a 45* angle to allow it to sit flat on the floor and have a flat top. This is mostly aesthetics, but I'm somewhat obsessive-compulsive on certain things. Next, secure the top roost (Piece B) at the top of the ladder. Next, secure the rear legs (Piece D). These will secure to the inside of the angled supports with the top roost resting on top of the leg. This provides a stable frame to allow you to measure the remaining two roosts from the floor. Secure the second roost so that the top of the board is 12" above the floor. Lastly, secure the lower roost 4" above the floor. This one is only a 2"x2" board for the chicks, but it can be secured at the base if it will only be a cross-brace. |