The Making of The Clucking Cabana...
It took us 8 months of chicken tending to realize we needed to build our girls their dream coop! We started our journey with the basic tractor supply coop. The only good thing to come from the TS coop was how quickly it taught us what we wanted & needed in a coop.
Fortunately for us, my husband has become pretty handy since we’ve become homeowners. I like to joke that between my Pinterest skills and his YouTube-taught-carpentry skills, we have made some pretty cool upgrades to our home and garden.

We really needed a new coop before the coming snowy winter, but lumber prices had/have SKYROCKETED - more than triple the normal price (Summer of 2020.)
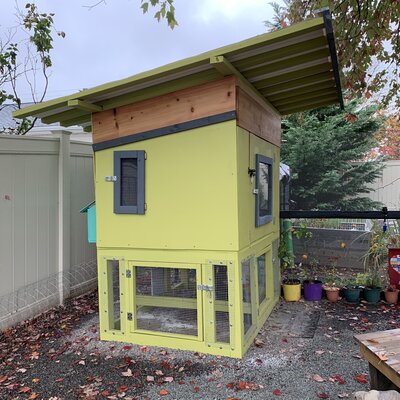
So on a whim, my husband put on BookFace asking our friends & family if anyone had wood sitting around they no longer wanted. We were shocked at the response and got 80% of the wood this way. Including that un-painted gorgeous wood piece that is above the coop door someone had leftover from a project. AND the coop’s back wall is a sheet of paneling a neighbor had leftover from their shed build. We basically built an amazing coop with everyone’s leftovers!

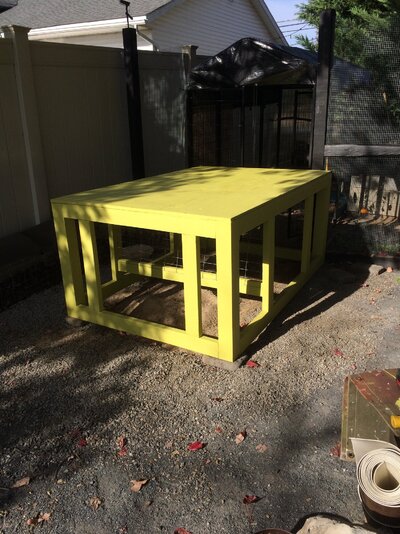
Our coop was designed for the space we had. We have a covered dog run and a chunnel that we wanted the coop to still fit in with. We knew we wanted a coop off the ground for easier cleaning. We also liked the idea of having more covered run space under the coop. And *I* was hoping being off the ground would deter rodents from the nesting boxes. Speaking of nest boxes; I love the curtains! I see a lot of chat about curtains on BYC. Our girls seem to enjoy the privacy. A few are always nesting while I’m scooping their you know what. Before curtains, they would leave the box and run off. With the curtains, they don’t see me and stay. Happy hens =
We actually have 5 nesting boxes in this coop. The back of the coop has 3 nesting boxes and a small cubby to hold treats. We thought we were going to have 4 boxes there, but hey we’re not professional and are building as we go. The treat holder is actually pretty convenient to have so I’m glad it worked this way. We also have a removable double stacking nest box in the coop. We currently have soccer balls in it so no one sleeps in it. We added it last minute just incase down the road we expand our flock and need more boxes.
Chicken math is real. We know.

To prepare to introduce new members to the flock, we added a hardware cloth divider in the run under the coopThe divider doesn’t reach the ground on purpose. The idea is while introducing new younger (smaller) birds they would fit under the divider, but the larger birds can’t -keeping the youngins safe. We do have a board to fill in there to keep the birds completely separate if/when needed. There is also a separate door for us to have access to this


*Above the nesting boxes is a photo of my Great Grandma and her flock
The inside of the coop was painted with interior semi-gloss paint (Lowe’s clearance-we didn’t care the color-it ain’t gonna stay pretty). You’ll wanna use a semi-gloss or gloss paint for easy cleaning. I’m still not sure how chickens shit sideways, but it happens.
Window sizes were chosen by the two pieces of plexiglass we already had in our shed. The large piece used for the front door was to be a light table for our son-we got that over 5 years ago and it never got built.

Other little details I should add:
Use a simple chain & hook to keep the coop door open while cleaning it. And another chain to keep the nest box open for egg gathering and cleaning. Both are small additions, but very helpful. Oh, I should add we wanted our nest box door to be the type that you lift up. Our last coop had a drop down door and if a nest was occupied, we would always shut their tail feathers in the door when closing. Ouch.
*Notice we put hardware cloth on the ceiling to keep predators out. Always hardware cloth!! Not chicken wire. And use screws and washers to secure it - chicken predators (raccoons especially) are VERY strong animals. We have metal traps that can attest to their strength -we trap and relocate.
*The roost is removable for easy cleaning.
*We use construction sand as litter and highly recommended it for multiple reasons.
*We also prefer using washable nesting pads from amazon. They work great!
*A solar door is worth every cent.
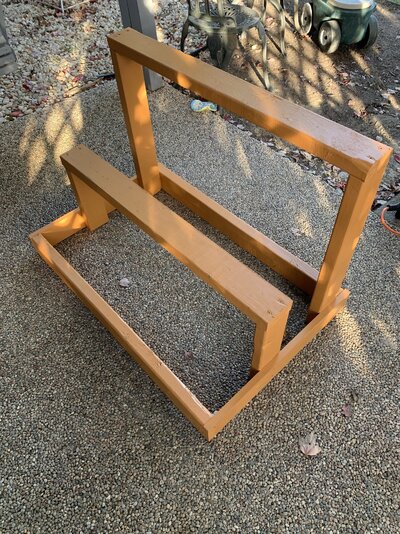
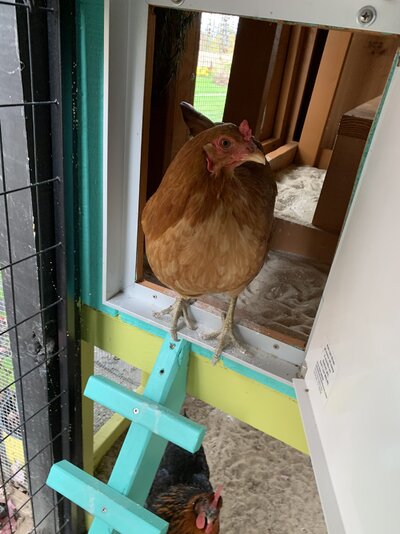
*We like the type of ladder we built (see pic below). They use it when needed and don’t hang out on it. We had the usual board like ramp, but it quickly got covered (and I mean covered) with and someone was always roosting/hanging out on it causing traffic jams and hurt feelings.
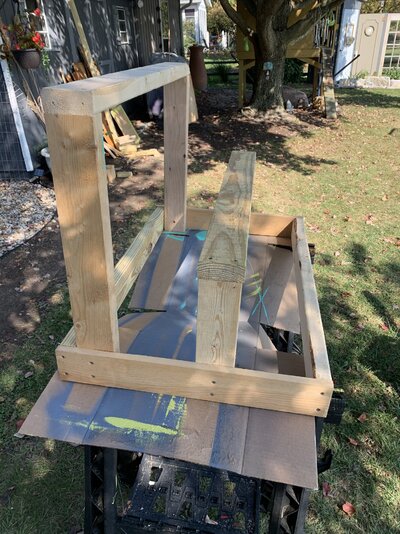
The photos explain the building process better than my husband or I could. Now with ALL of our home projects, I didn’t remember to start taking photos until we were well into the project - this always happens - and is why the photos start where they do. *Note there are more photos in the gallery of this article.
We didn’t follow an actual plan or blueprint (my husband drew blueprints for this BYC article.)
As you can see from our photos, he started with building a platform of sorts, then built a frame for the sides and went from there for the roof. Note how the roof hangs over in the front to keep us dry when cleaning and also in the back for egg collection. You can see in the photos, the roof was built for good ventilation- that’s very important for the birds health. We also added weather stripping to all doors and windows. Cold drafts can be very harmful to chickens.


Paint colors weren’t our choice. We bought what was on the clearance rack at Lowe’s. Two gallons of exterior paint for $24. I’m not passing up that steal. The colors work for us, it brings a brightness to our yard we hadn’t had before and the coop just looks happy
There really is nothing we would change about our coop at this point after having it for about 6 months.
Unless we can make it self cleaning?

We put a lot of thought into it before building and we are very happy with it. It seems perfect for our current flock of seven with room to grow. We call our coop The Clucking Cabana since it has a beachy island vibe. We may paint a mural on the side yet, we haven't decided for sure those details. But you can bet your coconuts we will be sipping piñata coladas hanging with our chickens this coming summer! Cheers!
-FEB. 2021 -UPDATE- THE CLUCKING CABANA’S 1ST WINTER-
I also wrote the article “The Ceramic Chicken” about finding treasure while we were prepping for our first flock. I’m so glad I found BYC to be able to share this story.
It took us 8 months of chicken tending to realize we needed to build our girls their dream coop! We started our journey with the basic tractor supply coop. The only good thing to come from the TS coop was how quickly it taught us what we wanted & needed in a coop.
Fortunately for us, my husband has become pretty handy since we’ve become homeowners. I like to joke that between my Pinterest skills and his YouTube-taught-carpentry skills, we have made some pretty cool upgrades to our home and garden.

We really needed a new coop before the coming snowy winter, but lumber prices had/have SKYROCKETED - more than triple the normal price (Summer of 2020.)
So on a whim, my husband put on BookFace asking our friends & family if anyone had wood sitting around they no longer wanted. We were shocked at the response and got 80% of the wood this way. Including that un-painted gorgeous wood piece that is above the coop door someone had leftover from a project. AND the coop’s back wall is a sheet of paneling a neighbor had leftover from their shed build. We basically built an amazing coop with everyone’s leftovers!

Our coop was designed for the space we had. We have a covered dog run and a chunnel that we wanted the coop to still fit in with. We knew we wanted a coop off the ground for easier cleaning. We also liked the idea of having more covered run space under the coop. And *I* was hoping being off the ground would deter rodents from the nesting boxes. Speaking of nest boxes; I love the curtains! I see a lot of chat about curtains on BYC. Our girls seem to enjoy the privacy. A few are always nesting while I’m scooping their you know what. Before curtains, they would leave the box and run off. With the curtains, they don’t see me and stay. Happy hens =
We actually have 5 nesting boxes in this coop. The back of the coop has 3 nesting boxes and a small cubby to hold treats. We thought we were going to have 4 boxes there, but hey we’re not professional and are building as we go. The treat holder is actually pretty convenient to have so I’m glad it worked this way. We also have a removable double stacking nest box in the coop. We currently have soccer balls in it so no one sleeps in it. We added it last minute just incase down the road we expand our flock and need more boxes.
Chicken math is real. We know.

To prepare to introduce new members to the flock, we added a hardware cloth divider in the run under the coopThe divider doesn’t reach the ground on purpose. The idea is while introducing new younger (smaller) birds they would fit under the divider, but the larger birds can’t -keeping the youngins safe. We do have a board to fill in there to keep the birds completely separate if/when needed. There is also a separate door for us to have access to this


*Above the nesting boxes is a photo of my Great Grandma and her flock
The inside of the coop was painted with interior semi-gloss paint (Lowe’s clearance-we didn’t care the color-it ain’t gonna stay pretty). You’ll wanna use a semi-gloss or gloss paint for easy cleaning. I’m still not sure how chickens shit sideways, but it happens.
Window sizes were chosen by the two pieces of plexiglass we already had in our shed. The large piece used for the front door was to be a light table for our son-we got that over 5 years ago and it never got built.


Other little details I should add:
Use a simple chain & hook to keep the coop door open while cleaning it. And another chain to keep the nest box open for egg gathering and cleaning. Both are small additions, but very helpful. Oh, I should add we wanted our nest box door to be the type that you lift up. Our last coop had a drop down door and if a nest was occupied, we would always shut their tail feathers in the door when closing. Ouch.
*Notice we put hardware cloth on the ceiling to keep predators out. Always hardware cloth!! Not chicken wire. And use screws and washers to secure it - chicken predators (raccoons especially) are VERY strong animals. We have metal traps that can attest to their strength -we trap and relocate.
*The roost is removable for easy cleaning.
*We use construction sand as litter and highly recommended it for multiple reasons.
*We also prefer using washable nesting pads from amazon. They work great!
*A solar door is worth every cent.
*We like the type of ladder we built (see pic below). They use it when needed and don’t hang out on it. We had the usual board like ramp, but it quickly got covered (and I mean covered) with
and someone was always roosting/hanging out on it causing traffic jams and hurt feelings.


The photos explain the building process better than my husband or I could. Now with ALL of our home projects, I didn’t remember to start taking photos until we were well into the project - this always happens - and is why the photos start where they do. *Note there are more photos in the gallery of this article.
We didn’t follow an actual plan or blueprint (my husband drew blueprints for this BYC article.)
As you can see from our photos, he started with building a platform of sorts, then built a frame for the sides and went from there for the roof. Note how the roof hangs over in the front to keep us dry when cleaning and also in the back for egg collection. You can see in the photos, the roof was built for good ventilation- that’s very important for the birds health. We also added weather stripping to all doors and windows. Cold drafts can be very harmful to chickens.


Paint colors weren’t our choice. We bought what was on the clearance rack at Lowe’s. Two gallons of exterior paint for $24. I’m not passing up that steal. The colors work for us, it brings a brightness to our yard we hadn’t had before and the coop just looks happy
There really is nothing we would change about our coop at this point after having it for about 6 months.
Unless we can make it self cleaning?
We put a lot of thought into it before building and we are very happy with it. It seems perfect for our current flock of seven with room to grow. We call our coop The Clucking Cabana since it has a beachy island vibe. We may paint a mural on the side yet, we haven't decided for sure those details. But you can bet your coconuts we will be sipping piñata coladas hanging with our chickens this coming summer! Cheers!
-FEB. 2021 -UPDATE- THE CLUCKING CABANA’S 1ST WINTER-
I also wrote the article “The Ceramic Chicken” about finding treasure while we were prepping for our first flock. I’m so glad I found BYC to be able to share this story.