My wife has talked about getting chickens for eggs for some time. After over 30 years of marriage, I understand that means I'm getting chickens! (And I'm ok with that) In preparation, I've been lurking on BYC for a couple of weeks, soaking up information and getting ready for 8 RIR pullets in mid April. I'll preface this by sharing that I have never touched a live chicken in my life! Almost everything I know about chickens has come from this site, so thank you to everyone for your contributions.
I figured I would share some pictures of my coop and run building / modifying journey as an introduction, which has now turned into an article in a shameless, long shot attempt at winning an automatic pop door.
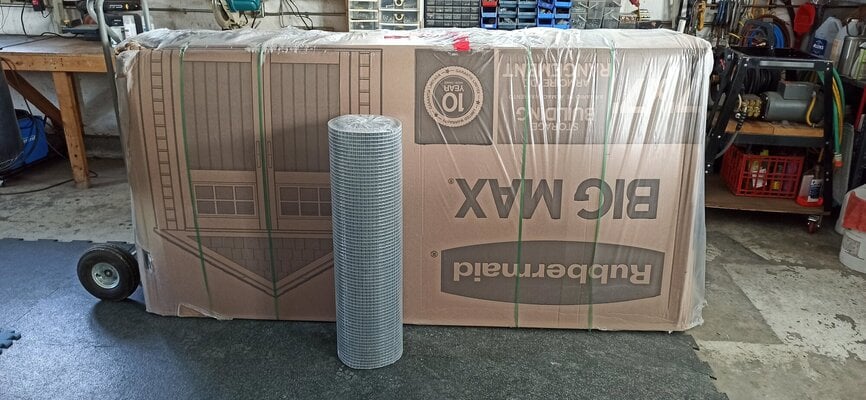
First off, a picture of where I stand approximately 2 weeks before our first ever chickens arrive! Below that is the riveting story on how I got here.

Apparently brownie points are awarded for including plans in your coop article, my plans may prove to be the exception to this rule, lol. I am mostly a sketcher and ponderer. After a brief stint at that stage, my urge to act takes over, I hold my tongue just right and start trying stuff! Because the shed was a kit, I didn't plan many modifications on paper, since I had to work within the limits of the individual panels, and didn't have measurements for those. I was, however, busy scouring BYC for ideas, dreaming of the layout, and thinking about what materials I could repurpose for the various components. With that said, here are most of my plans. They were a good "rough" guide, but when I revisit my notes, I see a lot had changed. Build tip #1 either be flexible, or plan better than I did.

These are my humble beginnings... That is, after Home Depot called to say they gave me the wrong shed when I picked it up and delivered the proper one! Build tip #2, "just because it's a 400 lb box, don't assume someone verified that it's the RIGHT 400 lb box!
My base is simply patio stones leveled with a bit of sand when needed. I cut the ones in the run to save money and space and laid hardware cloth under the pieces that the run is installed on, hoping to deter diggers. I found a nice level spot with good exposure to the sun, and great shelter from wind.
I was an eager beaver to get started, so I cleared the snow away from the site hoping it would dry up faster. At this point I wasn't too sure how long this process would take, or when the chickens would be arriving so I wanted to get to it!

I decided to buy a plastic shed to modify into a coop, party because the cost of lumber is outrageous in our area, partly because I'm better at modifying than building, and partly because I thought it would be faster. I think I was right on all counts, but there are definitely trade offs and limitations to modifying a plastic shed.
The shed went together in a couple of hours and seems sturdy and secure enough. I added some ventilation and a pop door before assembly since the pieces were easier to modify in the shop before assembly. Despite cutting numerous holes in the structure, I made a point of not breaching the envelope of the structure with fasteners whenever possible. The windows, vents and coop door are all "sandwiched" between the inner and outer walls with trim and are sealed from outside with silicone, but are otherwise free floating.
The coop and run are not actually attached either, with the exception of a strip of butyl tape sealing the seam where the coop and run roofs meet. That was one of the trickier parts of the build because of the two different angles and slopes meeting, and my desire to keep the water from the coop roof out of the run. Only time will tell if my plan worked.
The rear gable was a bit of an exception, I framed between the inner and outer walls with wood and installed hardware cloth and a support that had a previous life as a piece of railing on a friend's deck. Originally, the gable was home to the only vent in the shed, which was tiny. Build tip #3 Adding ventilation to a prefab shed is not for the faint of saw!
While I'm at it, build tip #4 don't throw any building scraps away until you are done. Like really done. I can't count how many little bits of wood, hardware cloth, etc that I used after I thought I was done with it.
Anticipating drafts in winter, I made an easy to install cover from an extra roof panel with the hope that it will reduce drafts, but still allow moisture to escape. My hope is that the coop is sheltered enough from that side, and the cover won't be needed, but I'm prepared either way.
I pre fabbed the walls and roof of the run on our driveway and assembled them on the patio stone after the shed was up. At that point I wasn't sure how I would seal the run to the coop, I did a lot of figuring on the fly!
Build tip #5 If you don't have an air compressor and a pneumatic stapler / Brad nailer, (or a fancier battery powered unit), you need to buy, borrow or steal them right now. Go! Attempting to install hardware cloth without them is a depressing thought!

The roof is clear polycarbonate called Sun Tuff around here, great stuff to work with and inexpensive. I did my best to cover every crevice with hardware cloth.
I'm still not sure why, but I decided I wanted a lever to operate the pop door. I have an actuator and a photocell, so some day I may make an automatic door, but I figure it will stay open most of the time anyway, and, for some reason, I desperately wanted to build a lever. Mission accomplished!
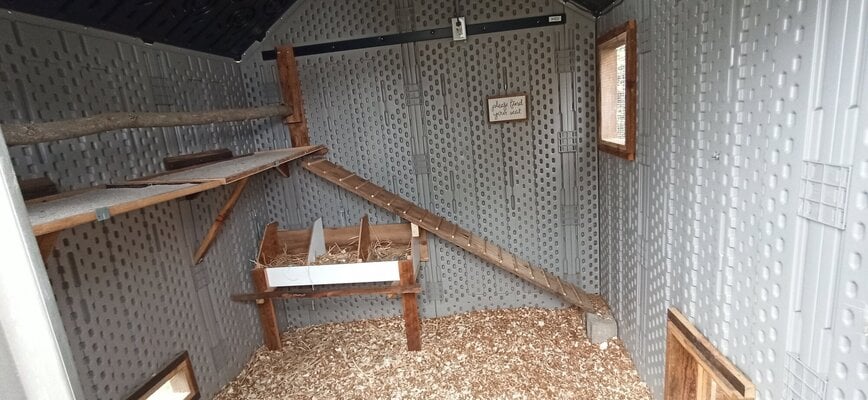
The interior is pretty simple. Everything is quickly removable without tools, and there are only a small handful of screws driven into the plastic walls. The nesting boxes were hung off of preexisting holes for pegboard, and the roost and poop trays are supported mainly off of the steel beams. The brackets under the trays are screwed into the fittings that hold the walls together, so that no screws had to go into the walls for them. I'm not sure why I was so fixated on not screwing anything to the walls, but it became a bit of a challenge, although one I eventually lost.
I read about using coffee husks for bedding and was intrigued enough to call a local shop that roasts beans. They were happy to have me collect the husks, and as a bonus they come in the burlap bags the beans arrive in. It looks like I'll get two bags per week, which is plenty. In the photo below, there are two weeks worth of coffee bean husks and one bale of wood shavings, providing a 3"- 4" depth of bedding. We recently trimmed our ornamental grass and I've already put a couple of the burlap bags to work storing the grass for nesting boxes! Have I mentioned I'm cheep!
The doors came with plexiglass windows, but I set them aside and covered the openings with hardware cloth. I think the draft may be too much in winter, or during storms, so I used some of the leftover roof material and made quick release covers that will block direct wind, but still allow for some ventilation. The spring loaded hooks are bent from old cattle fencing, and simply push and twist to install or remove the panels.
In my information travels, I came across someone that used rare earth magnets to keep a door closed. I had a few, so I figured I'd try it. I embedded the magnets in the door frame and just used screws and washers on the door itself. It doesn't repalce a proper latch, but it does help pull the door closed. Also, a big shout out to all those that warned against locking yourself in the run!
The run is, of course, a work in progress, EVERYTHING I've done is simply a theory at this point.
I was concerned about the door ventilation being covered in winter, so I decided to install an additional vent in the front gable end. I repurposed some plexiglass and made louvers to curb the wind. In a prefab coop, it's virtually impossible to have too much ventilation.
Although I bought the shed, the 2x4's for the run, the patio stones, and the roofing, I scrounged pretty much everything else! I was fortunate to have a neighbour that gave me all of the pine boards I used for trim, windows, nesting boxes etc. The wood looked old enough to have been part of Noah's ark and was very dry, so it all got a coat of raw linseed oil.
At this point, I need to start digging to run electricity. I wanted to be ready for chickens, and figured I could get to this point without interfering with the wiring. In hindsight, I likely wouldn't have put the bedding in, but I guess I got a little too excited.
I still need something to keep water and eggs from freezing. I had originally bought a heat lamp, but after learning more on BYC, I returned it. My quest in this regard continues...
Since I have several, I will install a trail camera before the girls arrive. I believe we have almost every predator in North America, with the exception of bears and cougars (which is questionable ). I'm quite confident that the coop and run are secure, but a little apprehensive about free ranging, although it is my full intention. If I was a chicken I would trade security for freedom any day!
If you're looking to modify a shed you already have, or are thinking of buying one to convert, I hope you found a nugget or two here, or maybe you figured out that you'd rather go a different route. Either way, good cluck!
UPDATE... After a few days with chickens...
Technically, most of my updates happened before the girls arrived. I ran electricity, installed two outlets, a timer/switch and a full spectrum LED light. I haven't decided if I'll use extra lighting in the winter, but I'm ready just in case.
After a couple of rainy days blown in by our typical east wind, I discovered that the dusting box was too exposed to the east, so it was swapped with the skid and hunk of wood. The new location seems to be better sheltered. I also put a bottom and feet on the box to allow things to dry better. The picture below is the old set up.
So far (which is not very far at all), since the girls have arrived, things are working out quite well. One modification I made was to install a ramp up to the roost bar. I'm not sure it's 100% necessary, but it's mostly for getting down. It looks like the hens might be hitting the far wall of the coop before they land on the floor, so I wanted to provide an alternative. They have no problem flying up, and all have done so after the second night.
Lastly, my sign arrived and was installed, and on the far right of the run you can see a trail camera that I have monitoring the night time comings and goings of critters. So far the odd coon has wandered past, but I haven't seen any signs of concern at all. In a few days I will start some supervised free ranging.
An item I have yet to address is roosting. So far, every night I go out after dark to check on things, and find five hens on the roosting bar and three directly below them roosting on the poop board. Every night I relocate the lower girls to the roost bar so they don't get pooped on all night. It's only been a few days, so I'm hoping they'll catch on, otherwise, I may lower the roost a few inches to reduce the gap and discourage roosting on the poop board.
All in all, I'm very happy with the set up, and grateful for the advice I've gotten from BYC. The coffee husks bedding seems excellent, the poop boards make keeping the coop clean a breeze, and the coop and run seem comfortable and secure for the chickens. So far everyone is doing great and looking happy!
Today's was the most expensive breakfast I've ever had!
UPDATE... After a few weeks with chickens...
After having the coop/run in use for a month, I'm quite happy overall and I'm pretty sure the chickens are too. I've made a few changes since the ladies arrived.
I did not account for heavy foot traffic on the poop boards when I built them! The hens use them to get in position for the night, which in hindsight makes perfect sense. They were "okay" the way they were, but I reinforced them with a 2"x2" running lengthwise under the outer edge and ultimately tied that into the steel beam. I didn't take a picture of the modification, it's just a stick of wood. Stomp away girls.
Although minor, the cord I used for releasing the latch on the run door drove me batty. It wouldn't return through the hole in the door frame (the old "push a rope" saying comes to mind) and usually left the latch up. In hindsight, it was a bit if a blessing and a curse because I could just push the door open to get out most of the time, and I have rare earth magnets that will hold it shut without help from the latch. My fear was I would forget to latch it securely when I need to. I ended up making a spring loaded rod that works very well. Now I have to release it every time! Be careful what you wish for.
A very small, but helpful addition was a tether for the carabiner on the coop door. I've absentmindedly set that thing aside a few times and had to hunt for it. I did settle on locking it back in the bolt once it was open, but I like this idea better. Thanks to @aart for that one!
I also saw a post about grazing screens, (pure genius), so I quickly threw one together before all of the grass was destroyed. I also added some oregano, which we have in abundance. Going forward I'll probably add some other herbs as well.
I installed a simple door holder so the girls could come and go throughout the day without getting shut out. I used a rare earth magnet to hold it up when not in use.

I'm quite sure I'll have to cover at least one the openings in the doors for winter to keep drafts off the girls, and I have had the importance of proper ventilation pounded into me on BYC, so my current project deals with the addition of a monitor style roof. It's not visible in the picture, because of the overhang, but there is an open strip 4" high running the length on each side. I'm going to remove the entire top section of the roof to install the addition in the shop, for ease of access. I scrounged everything except the raw linseed oil for this project, so I'm happy about that. It got pretty heavy after the shingles went on, I'm hoping it doesn't cause the roof to sag! I will be tying it into the steel beams as well (somehow!) so fingers crossed!
Test fit...
And, finally, I added a crude cover to my crude bench so that I'd have somewhere to sit without poop all over it. It looks ghastly, but works well if I remember to close it!
Today (May 15) was monitor roof installation day!
There's nothing like cutting a big hole in a perfectly good roof!
I used to own a company that custom modified vehicles for the disabled. We always laughed about taking brand new vehicles right from the manufacturer and cutting them to pieces.
I trimmed the inside before the monitor roof went on so it looked pretty from inside. The lip will also hopefully stop any water that might blow in from reaching the inside of the coop. I only sealed the gable ends of the monitor roof so any water that does manage it's way in can easily get out. With all that said, the overhang should keep water out from all but the nastiest storms.
That's ventilation!
The new view from inside.
And the new view from outside.
I think I'm done again. For now...
In preparation, I've been lurking on BYC for a couple of weeks, soaking up information and getting ready for 8 RIR pullets in mid April. I'll preface this by sharing that I have never touched a live chicken in my life! Almost everything I know about chickens has come from this site, so thank you to everyone for your contributions.I figured I would share some pictures of my coop and run building / modifying journey as an introduction, which has now turned into an article in a shameless, long shot attempt at winning an automatic pop door.
First off, a picture of where I stand approximately 2 weeks before our first ever chickens arrive! Below that is the riveting story on how I got here.
Apparently brownie points are awarded for including plans in your coop article, my plans may prove to be the exception to this rule, lol. I am mostly a sketcher and ponderer. After a brief stint at that stage, my urge to act takes over, I hold my tongue just right and start trying stuff! Because the shed was a kit, I didn't plan many modifications on paper, since I had to work within the limits of the individual panels, and didn't have measurements for those. I was, however, busy scouring BYC for ideas, dreaming of the layout, and thinking about what materials I could repurpose for the various components. With that said, here are most of my plans.
They were a good "rough" guide, but when I revisit my notes, I see a lot had changed. Build tip #1 either be flexible, or plan better than I did.
These are my humble beginnings... That is, after Home Depot called to say they gave me the wrong shed when I picked it up and delivered the proper one! Build tip #2, "just because it's a 400 lb box, don't assume someone verified that it's the RIGHT 400 lb box!
My base is simply patio stones leveled with a bit of sand when needed. I cut the ones in the run to save money and space and laid hardware cloth under the pieces that the run is installed on, hoping to deter diggers. I found a nice level spot with good exposure to the sun, and great shelter from wind.
I was an eager beaver to get started, so I cleared the snow away from the site hoping it would dry up faster. At this point I wasn't too sure how long this process would take, or when the chickens would be arriving so I wanted to get to it!
I decided to buy a plastic shed to modify into a coop, party because the cost of lumber is outrageous in our area, partly because I'm better at modifying than building, and partly because I thought it would be faster. I think I was right on all counts, but there are definitely trade offs and limitations to modifying a plastic shed.
The coop and run are not actually attached either, with the exception of a strip of butyl tape sealing the seam where the coop and run roofs meet. That was one of the trickier parts of the build because of the two different angles and slopes meeting, and my desire to keep the water from the coop roof out of the run. Only time will tell if my plan worked.
The rear gable was a bit of an exception, I framed between the inner and outer walls with wood and installed hardware cloth and a support that had a previous life as a piece of railing on a friend's deck. Originally, the gable was home to the only vent in the shed, which was tiny. Build tip #3 Adding ventilation to a prefab shed is not for the faint of saw!
While I'm at it, build tip #4 don't throw any building scraps away until you are done. Like really done. I can't count how many little bits of wood, hardware cloth, etc that I used after I thought I was done with it.
I pre fabbed the walls and roof of the run on our driveway and assembled them on the patio stone after the shed was up. At that point I wasn't sure how I would seal the run to the coop, I did a lot of figuring on the fly!
Build tip #5 If you don't have an air compressor and a pneumatic stapler / Brad nailer, (or a fancier battery powered unit), you need to buy, borrow or steal them right now. Go! Attempting to install hardware cloth without them is a depressing thought!
The roof is clear polycarbonate called Sun Tuff around here, great stuff to work with and inexpensive. I did my best to cover every crevice with hardware cloth.
I'm still not sure why, but I decided I wanted a lever to operate the pop door. I have an actuator and a photocell, so some day I may make an automatic door, but I figure it will stay open most of the time anyway, and, for some reason, I desperately wanted to build a lever.
Mission accomplished!
The interior is pretty simple. Everything is quickly removable without tools, and there are only a small handful of screws driven into the plastic walls. The nesting boxes were hung off of preexisting holes for pegboard, and the roost and poop trays are supported mainly off of the steel beams. The brackets under the trays are screwed into the fittings that hold the walls together, so that no screws had to go into the walls for them. I'm not sure why I was so fixated on not screwing anything to the walls, but it became a bit of a challenge, although one I eventually lost.
I read about using coffee husks for bedding and was intrigued enough to call a local shop that roasts beans. They were happy to have me collect the husks, and as a bonus they come in the burlap bags the beans arrive in. It looks like I'll get two bags per week, which is plenty. In the photo below, there are two weeks worth of coffee bean husks and one bale of wood shavings, providing a 3"- 4" depth of bedding. We recently trimmed our ornamental grass and I've already put a couple of the burlap bags to work storing the grass for nesting boxes! Have I mentioned I'm cheep!
The doors came with plexiglass windows, but I set them aside and covered the openings with hardware cloth. I think the draft may be too much in winter, or during storms, so I used some of the leftover roof material and made quick release covers that will block direct wind, but still allow for some ventilation. The spring loaded hooks are bent from old cattle fencing, and simply push and twist to install or remove the panels.
In my information travels, I came across someone that used rare earth magnets to keep a door closed.
I had a few, so I figured I'd try it. I embedded the magnets in the door frame and just used screws and washers on the door itself. It doesn't repalce a proper latch, but it does help pull the door closed. Also, a big shout out to all those that warned against locking yourself in the run!
The run is, of course, a work in progress, EVERYTHING I've done is simply a theory at this point.
I was concerned about the door ventilation being covered in winter, so I decided to install an additional vent in the front gable end. I repurposed some plexiglass and made louvers to curb the wind. In a prefab coop, it's virtually impossible to have too much ventilation.
Although I bought the shed, the 2x4's for the run, the patio stones, and the roofing, I scrounged pretty much everything else! I was fortunate to have a neighbour that gave me all of the pine boards I used for trim, windows, nesting boxes etc. The wood looked old enough to have been part of Noah's ark and was very dry, so it all got a coat of raw linseed oil.
At this point, I need to start digging to run electricity. I wanted to be ready for chickens, and figured I could get to this point without interfering with the wiring. In hindsight, I likely wouldn't have put the bedding in, but I guess I got a little too excited.
I still need something to keep water and eggs from freezing. I had originally bought a heat lamp, but after learning more on BYC, I returned it. My quest in this regard continues...
Since I have several, I will install a trail camera before the girls arrive. I believe we have almost every predator in North America, with the exception of bears and cougars (which is questionable
). I'm quite confident that the coop and run are secure, but a little apprehensive about free ranging, although it is my full intention. If I was a chicken I would trade security for freedom any day!If you're looking to modify a shed you already have, or are thinking of buying one to convert, I hope you found a nugget or two here, or maybe you figured out that you'd rather go a different route. Either way, good cluck!
UPDATE... After a few days with chickens...
Technically, most of my updates happened before the girls arrived. I ran electricity, installed two outlets, a timer/switch and a full spectrum LED light. I haven't decided if I'll use extra lighting in the winter, but I'm ready just in case.
After a couple of rainy days blown in by our typical east wind, I discovered that the dusting box was too exposed to the east, so it was swapped with the skid and hunk of wood. The new location seems to be better sheltered. I also put a bottom and feet on the box to allow things to dry better. The picture below is the old set up.
So far (which is not very far at all
), since the girls have arrived, things are working out quite well. One modification I made was to install a ramp up to the roost bar. I'm not sure it's 100% necessary, but it's mostly for getting down. It looks like the hens might be hitting the far wall of the coop before they land on the floor, so I wanted to provide an alternative. They have no problem flying up, and all have done so after the second night.
Lastly, my sign arrived and was installed, and on the far right of the run you can see a trail camera that I have monitoring the night time comings and goings of critters. So far the odd coon has wandered past, but I haven't seen any signs of concern at all. In a few days I will start some supervised free ranging.
An item I have yet to address is roosting. So far, every night I go out after dark to check on things, and find five hens on the roosting bar and three directly below them roosting on the poop board. Every night I relocate the lower girls to the roost bar so they don't get pooped on all night. It's only been a few days, so I'm hoping they'll catch on, otherwise, I may lower the roost a few inches to reduce the gap and discourage roosting on the poop board.
All in all, I'm very happy with the set up, and grateful for the advice I've gotten from BYC. The coffee husks bedding seems excellent, the poop boards make keeping the coop clean a breeze, and the coop and run seem comfortable and secure for the chickens. So far everyone is doing great and looking happy!
UPDATE... After a few weeks with chickens...
After having the coop/run in use for a month, I'm quite happy overall and I'm pretty sure the chickens are too. I've made a few changes since the ladies arrived.
I did not account for heavy foot traffic on the poop boards when I built them! The hens use them to get in position for the night, which in hindsight makes perfect sense. They were "okay" the way they were, but I reinforced them with a 2"x2" running lengthwise under the outer edge and ultimately tied that into the steel beam. I didn't take a picture of the modification, it's just a stick of wood. Stomp away girls.
Although minor, the cord I used for releasing the latch on the run door drove me batty. It wouldn't return through the hole in the door frame (the old "push a rope" saying comes to mind) and usually left the latch up. In hindsight, it was a bit if a blessing and a curse because I could just push the door open to get out most of the time, and I have rare earth magnets that will hold it shut without help from the latch. My fear was I would forget to latch it securely when I need to. I ended up making a spring loaded rod that works very well. Now I have to release it every time! Be careful what you wish for.
A very small, but helpful addition was a tether for the carabiner on the coop door. I've absentmindedly set that thing aside a few times and had to hunt for it. I did settle on locking it back in the bolt once it was open, but I like this idea better. Thanks to @aart for that one!
I also saw a post about grazing screens, (pure genius), so I quickly threw one together before all of the grass was destroyed. I also added some oregano, which we have in abundance. Going forward I'll probably add some other herbs as well.
I installed a simple door holder so the girls could come and go throughout the day without getting shut out. I used a rare earth magnet to hold it up when not in use.
I'm quite sure I'll have to cover at least one the openings in the doors for winter to keep drafts off the girls, and I have had the importance of proper ventilation pounded into me on BYC
, so my current project deals with the addition of a monitor style roof. It's not visible in the picture, because of the overhang, but there is an open strip 4" high running the length on each side. I'm going to remove the entire top section of the roof to install the addition in the shop, for ease of access. I scrounged everything except the raw linseed oil for this project, so I'm happy about that. It got pretty heavy after the shingles went on, I'm hoping it doesn't cause the roof to sag! I will be tying it into the steel beams as well (somehow!) so fingers crossed!
And, finally, I added a crude cover to my crude bench so that I'd have somewhere to sit without poop all over it. It looks ghastly, but works well if I remember to close it!
Today (May 15) was monitor roof installation day!
There's nothing like cutting a big hole in a perfectly good roof!
I used to own a company that custom modified vehicles for the disabled. We always laughed about taking brand new vehicles right from the manufacturer and cutting them to pieces.
I trimmed the inside before the monitor roof went on so it looked pretty from inside. The lip will also hopefully stop any water that might blow in from reaching the inside of the coop. I only sealed the gable ends of the monitor roof so any water that does manage it's way in can easily get out. With all that said, the overhang should keep water out from all but the nastiest storms.
That's ventilation!
The new view from inside.
And the new view from outside.
I think I'm done again. For now...