The Strange Coop Chicken Barn
(Updated 16MAR18)

Our chicken adventure all started on the thirteenth of June, in 2014. My wife and I inherited three, 1 year old hens and a chicken tractor from friends who moved away. We had already been discussing getting chickens throughout the past year, after our home owners association changed the by-laws. The new by-laws allowed us to have hens because we lived outside of city limits! Since then, chicken math has taken its toll on us!
After discussing a permanent location for the chickens, we decided using the space beside our garage. We built a 20' x 11' chicken pen, put 3" of sand down on top of the bare dirt, built another section of 6' fence with gate, and buried bricks 10" deep under the surrounding fence line. However, this was only the beginning. We knew that it was time to upgrade our coop to accommodate our growing pullets.
We live in suburbia, so that means two things. One, no roosters, and two, cosmetics. The new coop we built had to be cute and presentable not only to us, but to the neighborhood. With these requirements in mind, I looked around for a month in my spare time for coop ideas. During that time I came up with a list of features our coop had to have, but no designs I wanted to copy or use. Our coop features included; built off the ground (we have local racoons), had to survive the pacific northwest rain, removable poop tray, removable roosting bars, sand filled interior floor, an automatic nesting box lid, and finally curtains. But most importantly, it had look like a barn with a cupola!
BYC Coops and the Chicken Chick were my main sources for a lot of the features I ended up incorporating into the build. There are so many brilliant ideas on these websites. There was just one problem with all of my research, I just couldn't find the design that was in my mind. Until now.
The coop took me four weeks to build. I worked on it in my evenings after work, and on 3 weekends. I had some family and friends unexpectedly come over the last two days. They were glad to jump in and help with the nesting box lid concept, and installation. I also asked 2 co-workers, and 5 neighbors to help me move the coop from my driveway where I built it, to its current location.
We did not have an unlimited budget for this project. All of the materials for our entire coop was purchased from Habitat for Humanity. Only the exterior white, "vintage red" paint, barrel bolts, and cable for the nest box lid were purchased new from home depot. The compressed air lifts came from a local wrecking yard I pulled from a Geo Storm hatchback. Each cedar shingle on the coop I patiently milled down from 2' long grade 2 cedar shakes designed for roofs. The total price on materials we spent was $320. My wife and I got a good laugh at this, because the chicken tractor we inherited was originally purchased for $350 from Costco, and is 1/6th the size of our coop.
I apologize to the community, but I didn't write down all the specific dimensions on the sketches I originally drew up. They were just for my own reference, as most of the plans were in my head. However, in my spare time I am trying to get the coop drawn up in sketch up. The dimensions were all based off what I wanted it to look like, and were found on the fly as the project progressed. The overall coop box was based off a 4'x6' floor plan, not counting the nesting box. The walls once attached on the base, was 4 feet tall. These dimensions were to utilize full sheets of material. The finished coop stands just over 9' tall, and I am able to stand up inside of it, with my head and shoulders in the cupola.
My wife and I are very pleased to share our coop with the chicken community. I hope you enjoy it, and that it inspires you as much as others have inspired us! My wife periodically took pictures while I was working, and "my little helper" can be seen in them as well. The pictures are in chronological order, to show the progress of the build, and the methods I used. Updates since the original build are at the bottom of this article.
Step by step pictures:
Prepping side of garage, and building other section of fence with gate.
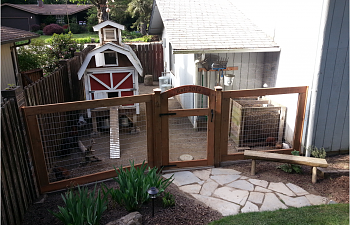
Chicken pen completed.
Foundation blocks being set.
Base completed. The base was built out of 2x6's, and 4x4 legs, lag bolted and nailed together. I decided that I was going to build the coop in my driveway because I would not be able to access all sides of it during construction due to its close proximity to my garage. So I asked around and found a few neighbors who would help me move it when completed.
Assembling trusses. My wife and I sat on the floor in our basement and laid out 2x4 pieces until we found our desired look. I recall the top angle being 43 degrees, and the next angle was 50 or something.
Nesting box frame w/ removable dividers.
Trusses completed.
Walls. All walls and framing on this coop were built with recycled 2x4's.
Framing
Trusses going up.
Trusses attached. The middle two trusses are backwards, I had a brain fart while building it that evening.
Cupola frame installed. Middle trusses still backwards.
It was at this point where I realized I had a brain fart the night before and installed the middle trusses backwards. So I had to switch them around. Everyone loves re-work!...
With the middle trusses swapped around, I could continue working on the cupola, and attach the gable ends.
Framing completed front.
Framing completed side.
"My little helper". <3
Since we live in Silverdale, Washington, and it rains a lot here in the winter instead of snowing (boo), I decided to build this coop up to building code. We want it to last for years. Tyvek, tar paper, and metal drip edges were incorporated into the build. However, I choose not to insulate it. We will just close the two windows in the winter.
Composite 3 tab roof going up.
My wife and helper painted the interior while I was at work.
Wife said painting by hand was taking to long. So I sprayed 4 gallons of white that night on the interior of the coop.
Trim going up. Wife was very excited now!!!
Four cupola vents were made one evening from scratch using my table saw and staple gun.
Nesting box lid fit test.
Cedar shingle install!!! We decided after much discussion, not to stain, or treat them. She likes the grey worn look they will get in a few years, and I like not having to restain them every few years.
I was up till 10:36 this night. "I gotta get to my stopping point dear." : )
The big move day! Woke up early, and mommy made us breakfast while we worked. Last minute touch up paint before the coop was moved.
The guys showed up and all 8 of us moved the coop beside the garage. Coffee and cinnamon rolls were provided for those who helped. Courtesy of the wife, made from scratch!
Final resting spot.
Installing the last couple of cedar shingle areas. The very last shingle required 10 cuts. From its starting life as a cedar roofing shake, to become a tiny, intricate, corner cedar shingle.
The "guts" begin to get installed. "My little helper" is weight testing it.
Roost bar 10 degree closeup. The 2x4's I used for the two roosting bars have a 10 degree angle on both sides of the top. I then sanded, and painted them.
Linoleum (some call if vinyl) was installed on the poop board, coop floor, and nesting box floor.
Completed Coop Close up Features:
All doors and windows closed. The two ramps I designed for the coop, have a dado'd tread pattern on them.
Chicken door and window open.
After a year, and with the newly added Rooster Weather vane.
Back side view.
Human access door and window open.
Cupola, back window, and new ventilation above walls in all four corners.
Cupola interior.
Poop board, roost bars, food bar, and sand all in place. We discussed and researched PVC feeders, metal feeders, Poultry nipples, and all the other hype including PDZ to deal with the poop. Since we already had the metal feeders, we figured if we wanted to switch to a PVC system or something fancier, we can later. To date, we still have not replaced our metal feeders, and probably never will. I modified the metal poultry feeder so I no longer have any spillage at all. You can read that short article Here. Regarding the poop, scraping is free.
After six months the chores are; change water once or twice a week, top off food as needed, and scrape poop board every Saturday. The poop we scrape goes directly into our compost bin. We use it for our garden. The sand in the coop and pen usually get raked every other month. We also change the straw in the nesting boxes, but that does not happen often. We still have had not had to buy another bail of straw in 3 years. The straw never gets dirty, just flattened over time. The Oyster shells get topped off quarterly.
2x4 Hanger Closeup.
Food hanger bar, poop board rests on it for support.
After six months, the linoleum was replaced with laminate. You can read my short article Here on why.
This is the drywall scraper I use to scrape the poop off into a galvanized bucket. It only takes about 5 minutes to clean the coop every Saturday.
I modified the roosting bars because the original design was awkward to get out. The new one is cleaner, easier to remove, and has no gaps on its sides for less poop mess.
Ramp dado closeup.
Ramp hanger bracket closeup.
Nesting box. Shown is the fence latch and cable system I modified to lock and unlock the lid. The compressed gas lifts raise the lid. It opens just like a hatch back on a automobile. Pull the brass ring, and the lid opens automatically. Close the lid, and it locks automatically.
Nesting boxes with removable dividers.
I went with a piano style hinge on the nesting box lid, because I wanted something as air tight as possible for weather resistance, and hidden for cosmetic sake.
Brass ring for opening the nesting box lid. One pull and up the lid goes.
Window details.
Underside. I used the 4 cornered foundation blocks, because if we ever want to build a sectioned off run for introducing new pullets, I can easily make 1/2" x1/2" wire cloth walls that will slide in the block notches.
ABA Post Base. The 4x4s never sit in water, rotting away. They are always above ground.
Window details. Behind the window door is 1/2" x 1/2" wire cloth.
Hinges: All hinges on the coop have a hidden side. It is a personal preference.
Sketches:
(I am in the slow process of building my chicken coop in Sketchup, and will have it posted when completed)
I sketched these at work on any piece of paper I could find, and used a pen and ruler because I did not have much time when sketching them. Keep in mind, I did these for myself. Not specifically for the BYC community. So if they don't make sense, I apologize. There are hardly any measurements written down, and please be aware that I completely changed the entire "guts" to the coop after it was built. My original idea for the food, poop tray, and roosting bars can be seen in the sketches. Due to my wife being vertically challenged (5' 3" and a half), I wanted to make it easy for her to reach in and manage the food and poop easily. She is very pleased with the current system, and not what I sketched out.
Final sketch of front side of coop. Took a few weeks to finalize the "look".
Framing floor plans. Nesting box was removed from side walls, and added to its own back wall.
The poop board has been turned from my original design (as shown in sketch) to help clean it easier. It is now located at the front behind the human access door.
The dimensions on this sketch are accurate. The sand filled poop tray was removed for a linoleum covered one, and rotated as shown in colored pictures.
Changes post construction:
Everyone changes something, or wishes they did something different lol. Well, I forgot to add 2x4's on top of the walls to cap them, helping support the assembly, and stability of the coop frame. These should have been added the night I installed the middle trusses backwards...
I originally wanted to create bird holes at the top of the walls for ventilation, instead I simply added 1/2" x 1/2" mesh over the spaces I was going to put 2x4's with holes drilled in them. Ventilation is more important then I originally thought.
After discussing the price, purpose, and longevity of powering the coop, we decided to run power out to the coop. Since building codes in our area demand specific materials to be used for buried power lines, we bought everything new from Home Depot, and spent $80 ($45 for the GFCI breaker). My father and I buried a dedicated line out to the chicken coop, and ran it up inside the coop above where the chickens can peck at it. Doing this gave us a hard wired timer, light, and two plug outlets for whatever we need in the future.
New power junction.
Timer Closeup.
Rooster Weather Vane:
I always knew we needed something classic to adorn and add that finishing touch on our coop. Some people use chicken signs, others planter boxes, while fewer still use weather vanes. After much discussion with the wife, we settled on a rooster weather vane concept. However, we needed one that didn't cost and arm and a leg, and I did not want one that looked cheep and mass produced. So I began researching them, and set off to make my own.
A month or so after I began research, we stumbled across an old weather vane at Goodwill. It was the exact size I was looking to make. The font of the compass was not correct, but I could grind and file that to suit our needs. Finding it, gave me the foundation and motivation I needed to start our weather vane. I cut off the cat that was originally on top of it, reshaped the font of the N, S, E, W, and began making templates for the rooster that I had in my mind. The two globes on the weather vane were free. The small top one was a metal door knob, and the big one on the bottom was two half spheres I found and welded together.
After asking around for two weeks, a gentlemen at our church, Bob Kimball Designs, was kind enough to let me come over to use his shop so I could create my rooster top. His shop/studio was a blessing to use, and I couldn't have done it without him. I got to build the rooster 100% myself during the course of one Saturday afternoon, and late into the night. The body of the rooster consists of 8 individual pieces of stainless steel, welded together. Bob let me build the rooster out of scrap stainless steel so it will never rust, and keep the cost of materials down.
Before coloring and painting.
The coloring of the rooster was done with a blow torch in my garage. I spent two hours with my small propane blow torch heating the stainless steel. When heated to certain temperatures, the metal changes colors permanently. Bob also gave me a blue glass eye to make the rooster "Pop".
After coloring, and painting.
Closeup of Rooster.
Cupola.
My wife and I are extremely proud of how the Rooster weather vane turned out mounted on the cupola.
Chicken run expansion 03MAY17
So after three years of owning chickens, we decided it was time to expand there run, and make it permanent. I spent the past five days with pink eye, so I was home and had plenty of time on my hands to do everything we have been planning. We expanded the run by 150%, and incorporated the compost bin. The girls really love the compost bin!
New fence up and complete. My other little helper was still in mommies tummy when we first built the coop.
Jacking our coop off the blocks with our car jack and preparing it for its move.
Moving our 800lb coop ourselves with skids, planks, and pipes. All things we had in the garage. It took me 3 hours to spin the coop 180 degrees, and move it into its new location about 15 feet from where we originally had it.
All set up in the newly expanded run.
Est. 2014 (I engraved it on the gate)
I can honestly say, we have done our best on this coop. I am very proud of how it turned out, and has held up over the past three years. Thank you for taking a look! I hope it inspires you all with an array of ideas for your coops! Feel free to private message me with any questions or post a comment with what you think! : )
(Updated 16MAR18)
Our chicken adventure all started on the thirteenth of June, in 2014. My wife and I inherited three, 1 year old hens and a chicken tractor from friends who moved away. We had already been discussing getting chickens throughout the past year, after our home owners association changed the by-laws. The new by-laws allowed us to have hens because we lived outside of city limits! Since then, chicken math has taken its toll on us!
After discussing a permanent location for the chickens, we decided using the space beside our garage. We built a 20' x 11' chicken pen, put 3" of sand down on top of the bare dirt, built another section of 6' fence with gate, and buried bricks 10" deep under the surrounding fence line. However, this was only the beginning. We knew that it was time to upgrade our coop to accommodate our growing pullets.
We live in suburbia, so that means two things. One, no roosters, and two, cosmetics. The new coop we built had to be cute and presentable not only to us, but to the neighborhood. With these requirements in mind, I looked around for a month in my spare time for coop ideas. During that time I came up with a list of features our coop had to have, but no designs I wanted to copy or use. Our coop features included; built off the ground (we have local racoons), had to survive the pacific northwest rain, removable poop tray, removable roosting bars, sand filled interior floor, an automatic nesting box lid, and finally curtains. But most importantly, it had look like a barn with a cupola!
BYC Coops and the Chicken Chick were my main sources for a lot of the features I ended up incorporating into the build. There are so many brilliant ideas on these websites. There was just one problem with all of my research, I just couldn't find the design that was in my mind. Until now.
The coop took me four weeks to build. I worked on it in my evenings after work, and on 3 weekends. I had some family and friends unexpectedly come over the last two days. They were glad to jump in and help with the nesting box lid concept, and installation. I also asked 2 co-workers, and 5 neighbors to help me move the coop from my driveway where I built it, to its current location.
We did not have an unlimited budget for this project. All of the materials for our entire coop was purchased from Habitat for Humanity. Only the exterior white, "vintage red" paint, barrel bolts, and cable for the nest box lid were purchased new from home depot. The compressed air lifts came from a local wrecking yard I pulled from a Geo Storm hatchback. Each cedar shingle on the coop I patiently milled down from 2' long grade 2 cedar shakes designed for roofs. The total price on materials we spent was $320. My wife and I got a good laugh at this, because the chicken tractor we inherited was originally purchased for $350 from Costco, and is 1/6th the size of our coop.
I apologize to the community, but I didn't write down all the specific dimensions on the sketches I originally drew up. They were just for my own reference, as most of the plans were in my head. However, in my spare time I am trying to get the coop drawn up in sketch up. The dimensions were all based off what I wanted it to look like, and were found on the fly as the project progressed. The overall coop box was based off a 4'x6' floor plan, not counting the nesting box. The walls once attached on the base, was 4 feet tall. These dimensions were to utilize full sheets of material. The finished coop stands just over 9' tall, and I am able to stand up inside of it, with my head and shoulders in the cupola.
My wife and I are very pleased to share our coop with the chicken community. I hope you enjoy it, and that it inspires you as much as others have inspired us! My wife periodically took pictures while I was working, and "my little helper" can be seen in them as well. The pictures are in chronological order, to show the progress of the build, and the methods I used. Updates since the original build are at the bottom of this article.
Step by step pictures:
Prepping side of garage, and building other section of fence with gate.
Chicken pen completed.
Foundation blocks being set.
Base completed. The base was built out of 2x6's, and 4x4 legs, lag bolted and nailed together. I decided that I was going to build the coop in my driveway because I would not be able to access all sides of it during construction due to its close proximity to my garage. So I asked around and found a few neighbors who would help me move it when completed.
Assembling trusses. My wife and I sat on the floor in our basement and laid out 2x4 pieces until we found our desired look. I recall the top angle being 43 degrees, and the next angle was 50 or something.
Nesting box frame w/ removable dividers.
Trusses completed.
Walls. All walls and framing on this coop were built with recycled 2x4's.
Framing
Trusses going up.
Trusses attached. The middle two trusses are backwards, I had a brain fart while building it that evening.
Cupola frame installed. Middle trusses still backwards.
It was at this point where I realized I had a brain fart the night before and installed the middle trusses backwards. So I had to switch them around. Everyone loves re-work!...
With the middle trusses swapped around, I could continue working on the cupola, and attach the gable ends.
Framing completed front.
Framing completed side.
"My little helper". <3
Since we live in Silverdale, Washington, and it rains a lot here in the winter instead of snowing (boo), I decided to build this coop up to building code. We want it to last for years. Tyvek, tar paper, and metal drip edges were incorporated into the build. However, I choose not to insulate it. We will just close the two windows in the winter.
Composite 3 tab roof going up.
My wife and helper painted the interior while I was at work.
Wife said painting by hand was taking to long. So I sprayed 4 gallons of white that night on the interior of the coop.
Trim going up. Wife was very excited now!!!
Four cupola vents were made one evening from scratch using my table saw and staple gun.
Nesting box lid fit test.
Cedar shingle install!!! We decided after much discussion, not to stain, or treat them. She likes the grey worn look they will get in a few years, and I like not having to restain them every few years.
I was up till 10:36 this night. "I gotta get to my stopping point dear." : )
The big move day! Woke up early, and mommy made us breakfast while we worked. Last minute touch up paint before the coop was moved.
The guys showed up and all 8 of us moved the coop beside the garage. Coffee and cinnamon rolls were provided for those who helped. Courtesy of the wife, made from scratch!
Final resting spot.
Installing the last couple of cedar shingle areas. The very last shingle required 10 cuts. From its starting life as a cedar roofing shake, to become a tiny, intricate, corner cedar shingle.
The "guts" begin to get installed. "My little helper" is weight testing it.
Roost bar 10 degree closeup. The 2x4's I used for the two roosting bars have a 10 degree angle on both sides of the top. I then sanded, and painted them.
Linoleum (some call if vinyl) was installed on the poop board, coop floor, and nesting box floor.
Completed Coop Close up Features:
All doors and windows closed. The two ramps I designed for the coop, have a dado'd tread pattern on them.
Chicken door and window open.
After a year, and with the newly added Rooster Weather vane.
Back side view.
Human access door and window open.
Cupola, back window, and new ventilation above walls in all four corners.
Cupola interior.
Poop board, roost bars, food bar, and sand all in place. We discussed and researched PVC feeders, metal feeders, Poultry nipples, and all the other hype including PDZ to deal with the poop. Since we already had the metal feeders, we figured if we wanted to switch to a PVC system or something fancier, we can later. To date, we still have not replaced our metal feeders, and probably never will. I modified the metal poultry feeder so I no longer have any spillage at all. You can read that short article Here. Regarding the poop, scraping is free.
After six months the chores are; change water once or twice a week, top off food as needed, and scrape poop board every Saturday. The poop we scrape goes directly into our compost bin. We use it for our garden. The sand in the coop and pen usually get raked every other month. We also change the straw in the nesting boxes, but that does not happen often. We still have had not had to buy another bail of straw in 3 years. The straw never gets dirty, just flattened over time. The Oyster shells get topped off quarterly.
2x4 Hanger Closeup.
Food hanger bar, poop board rests on it for support.
After six months, the linoleum was replaced with laminate. You can read my short article Here on why.
This is the drywall scraper I use to scrape the poop off into a galvanized bucket. It only takes about 5 minutes to clean the coop every Saturday.
I modified the roosting bars because the original design was awkward to get out. The new one is cleaner, easier to remove, and has no gaps on its sides for less poop mess.
Ramp dado closeup.
Ramp hanger bracket closeup.
Nesting box. Shown is the fence latch and cable system I modified to lock and unlock the lid. The compressed gas lifts raise the lid. It opens just like a hatch back on a automobile. Pull the brass ring, and the lid opens automatically. Close the lid, and it locks automatically.
Nesting boxes with removable dividers.
I went with a piano style hinge on the nesting box lid, because I wanted something as air tight as possible for weather resistance, and hidden for cosmetic sake.
Brass ring for opening the nesting box lid. One pull and up the lid goes.
Window details.
Underside. I used the 4 cornered foundation blocks, because if we ever want to build a sectioned off run for introducing new pullets, I can easily make 1/2" x1/2" wire cloth walls that will slide in the block notches.
ABA Post Base. The 4x4s never sit in water, rotting away. They are always above ground.
Window details. Behind the window door is 1/2" x 1/2" wire cloth.
Hinges: All hinges on the coop have a hidden side. It is a personal preference.
Sketches:
(I am in the slow process of building my chicken coop in Sketchup, and will have it posted when completed)
I sketched these at work on any piece of paper I could find, and used a pen and ruler because I did not have much time when sketching them. Keep in mind, I did these for myself. Not specifically for the BYC community. So if they don't make sense, I apologize. There are hardly any measurements written down, and please be aware that I completely changed the entire "guts" to the coop after it was built. My original idea for the food, poop tray, and roosting bars can be seen in the sketches. Due to my wife being vertically challenged (5' 3" and a half), I wanted to make it easy for her to reach in and manage the food and poop easily. She is very pleased with the current system, and not what I sketched out.
Final sketch of front side of coop. Took a few weeks to finalize the "look".
Framing floor plans. Nesting box was removed from side walls, and added to its own back wall.
The poop board has been turned from my original design (as shown in sketch) to help clean it easier. It is now located at the front behind the human access door.
The dimensions on this sketch are accurate. The sand filled poop tray was removed for a linoleum covered one, and rotated as shown in colored pictures.
Changes post construction:
Everyone changes something, or wishes they did something different lol. Well, I forgot to add 2x4's on top of the walls to cap them, helping support the assembly, and stability of the coop frame. These should have been added the night I installed the middle trusses backwards...
I originally wanted to create bird holes at the top of the walls for ventilation, instead I simply added 1/2" x 1/2" mesh over the spaces I was going to put 2x4's with holes drilled in them. Ventilation is more important then I originally thought.
After discussing the price, purpose, and longevity of powering the coop, we decided to run power out to the coop. Since building codes in our area demand specific materials to be used for buried power lines, we bought everything new from Home Depot, and spent $80 ($45 for the GFCI breaker). My father and I buried a dedicated line out to the chicken coop, and ran it up inside the coop above where the chickens can peck at it. Doing this gave us a hard wired timer, light, and two plug outlets for whatever we need in the future.
New power junction.
Timer Closeup.
Rooster Weather Vane:
I always knew we needed something classic to adorn and add that finishing touch on our coop. Some people use chicken signs, others planter boxes, while fewer still use weather vanes. After much discussion with the wife, we settled on a rooster weather vane concept. However, we needed one that didn't cost and arm and a leg, and I did not want one that looked cheep and mass produced. So I began researching them, and set off to make my own.
A month or so after I began research, we stumbled across an old weather vane at Goodwill. It was the exact size I was looking to make. The font of the compass was not correct, but I could grind and file that to suit our needs. Finding it, gave me the foundation and motivation I needed to start our weather vane. I cut off the cat that was originally on top of it, reshaped the font of the N, S, E, W, and began making templates for the rooster that I had in my mind. The two globes on the weather vane were free. The small top one was a metal door knob, and the big one on the bottom was two half spheres I found and welded together.
After asking around for two weeks, a gentlemen at our church, Bob Kimball Designs, was kind enough to let me come over to use his shop so I could create my rooster top. His shop/studio was a blessing to use, and I couldn't have done it without him. I got to build the rooster 100% myself during the course of one Saturday afternoon, and late into the night. The body of the rooster consists of 8 individual pieces of stainless steel, welded together. Bob let me build the rooster out of scrap stainless steel so it will never rust, and keep the cost of materials down.
Before coloring and painting.
The coloring of the rooster was done with a blow torch in my garage. I spent two hours with my small propane blow torch heating the stainless steel. When heated to certain temperatures, the metal changes colors permanently. Bob also gave me a blue glass eye to make the rooster "Pop".
After coloring, and painting.
Closeup of Rooster.
Cupola.
My wife and I are extremely proud of how the Rooster weather vane turned out mounted on the cupola.
Chicken run expansion 03MAY17
So after three years of owning chickens, we decided it was time to expand there run, and make it permanent. I spent the past five days with pink eye, so I was home and had plenty of time on my hands to do everything we have been planning. We expanded the run by 150%, and incorporated the compost bin. The girls really love the compost bin!
New fence up and complete. My other little helper was still in mommies tummy when we first built the coop.
Jacking our coop off the blocks with our car jack and preparing it for its move.
Moving our 800lb coop ourselves with skids, planks, and pipes. All things we had in the garage. It took me 3 hours to spin the coop 180 degrees, and move it into its new location about 15 feet from where we originally had it.
All set up in the newly expanded run.
Est. 2014 (I engraved it on the gate)
I can honestly say, we have done our best on this coop. I am very proud of how it turned out, and has held up over the past three years. Thank you for taking a look! I hope it inspires you all with an array of ideas for your coops! Feel free to private message me with any questions or post a comment with what you think! : )