First let me say that neither my Husband nor I have never, ever built something without pre-drilled holes and directions. You know what I mean, the beautiful book shelf, or the functional TV stand, those kind of builds. But to design and build a Chicken Coop after looking at picture after picture of cool coops is, well, daunting.
((( Complete Coop )))

But we knew we had to get to work because we brought the chick-lets home. Over the next few days I looked at other coops online and began to go from a thought process to putting it on paper, well scrap paper and with no clear idea, just a direction I wanted to go in.
((( Chicklets )))
We went with 4 foot sections to make it easier on us to build and put together. So we put the materials list together and headed to the big box store for supplies, and tools... yep, all we had at home was a measuring tape, a hammer and a screw driver.
((( Pile of supplies )))
We live on an 1/8th acre Urban lot. The corner we decided to use for the Chickens was a pond area which I took out, filled in and leveled off.
((( Plot area )))
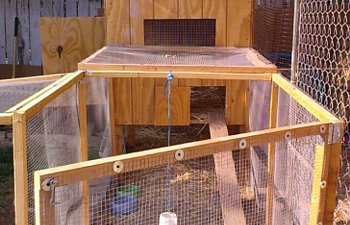
We built the coop 4 foot square and 2 feet off the ground. The frame on one side extended above the top by 4 inches to allow for water runoff once the roof is on. The floor of the coop has removable plywood in two 2 foot by 4 foot sections which allows us to open it up for cleaning or replacement if needed. The walls are pressure treated wood panels for outdoor use.
((( Coop frame )))
The top is open air and covered with 1/4 inch hardware cloth to allow for ventilation and we used PVC corrugated roof panels to protect from rain. The window is also covered with the hardware cloth and the cutout panel is used to close it up if needed. The door was cut out at 12 inches square and the panel was hinged on and a slide bolt added for complete protection at night.
((( Roof )))
The egg gathering/cleaning door was cut out and hinged on. It has two slide bolts as well as a positive lock hook and eye.
((( Main door )))
The run itself is 8 feet long and 4 feet wide. We built the frame using 2 x 2 boards, then covered it with 1/2 inch hardware cloth, using screws and washers. The 4 foot end frame is hinged on and has 2 positive lock hook and eyes, one at the top and one at the bottom.
((( Frame Process )))
((( Hardware cloth covering )))
The top panels were hinged on so they can be opened for cleaning within the run.
((( Open top )))
The coop is 16 square feet, the run is 48 square feet and we have added a side yard which is 150 square feet. It is also covered with netting as it is only to keep them from getting out and into the neighbors yards. Other than hawks, predators are really not a problem during the day. They also get daily supervised free range time in the yard.
((( Lilly the RI Red, Lucy the Barred Rock and Penny the Easter Egger )))
This fall, we will primer and paint the coop to help protect it from the rains. Overall, we are happy with the coop but next time we would make the run to the height of the coop rather than the 4 foot high with hinged top. The girls seem happy with it and are now laying us beautiful eggs!
((( Complete Coop )))
But we knew we had to get to work because we brought the chick-lets home. Over the next few days I looked at other coops online and began to go from a thought process to putting it on paper, well scrap paper and with no clear idea, just a direction I wanted to go in.
((( Chicklets )))
We went with 4 foot sections to make it easier on us to build and put together. So we put the materials list together and headed to the big box store for supplies, and tools... yep, all we had at home was a measuring tape, a hammer and a screw driver.
((( Pile of supplies )))
We live on an 1/8th acre Urban lot. The corner we decided to use for the Chickens was a pond area which I took out, filled in and leveled off.
((( Plot area )))
We built the coop 4 foot square and 2 feet off the ground. The frame on one side extended above the top by 4 inches to allow for water runoff once the roof is on. The floor of the coop has removable plywood in two 2 foot by 4 foot sections which allows us to open it up for cleaning or replacement if needed. The walls are pressure treated wood panels for outdoor use.
((( Coop frame )))
The top is open air and covered with 1/4 inch hardware cloth to allow for ventilation and we used PVC corrugated roof panels to protect from rain. The window is also covered with the hardware cloth and the cutout panel is used to close it up if needed. The door was cut out at 12 inches square and the panel was hinged on and a slide bolt added for complete protection at night.
((( Roof )))
The egg gathering/cleaning door was cut out and hinged on. It has two slide bolts as well as a positive lock hook and eye.
((( Main door )))
The run itself is 8 feet long and 4 feet wide. We built the frame using 2 x 2 boards, then covered it with 1/2 inch hardware cloth, using screws and washers. The 4 foot end frame is hinged on and has 2 positive lock hook and eyes, one at the top and one at the bottom.
((( Frame Process )))
((( Hardware cloth covering )))
The top panels were hinged on so they can be opened for cleaning within the run.
((( Open top )))
The coop is 16 square feet, the run is 48 square feet and we have added a side yard which is 150 square feet. It is also covered with netting as it is only to keep them from getting out and into the neighbors yards. Other than hawks, predators are really not a problem during the day. They also get daily supervised free range time in the yard.
((( Lilly the RI Red, Lucy the Barred Rock and Penny the Easter Egger )))
This fall, we will primer and paint the coop to help protect it from the rains. Overall, we are happy with the coop but next time we would make the run to the height of the coop rather than the 4 foot high with hinged top. The girls seem happy with it and are now laying us beautiful eggs!