New Playhouse Coop Construction in Minnesota
Day 1.
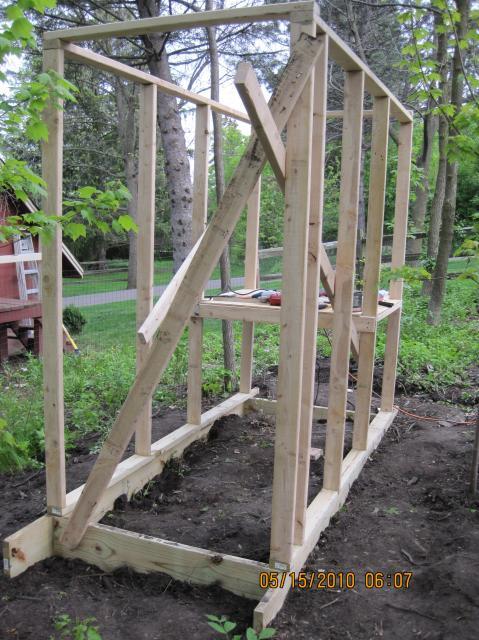
We (DH) built a foundation frame of pressure treated 2x10s 8'x4'. I, being the swamper, dug the trench, with a little help and much swearing at roots. I had to run some errands so DH built the frames for the walls 92 inches high. When I inspected them, he decided to cut a foot off of them. They were placed on treated 2x4s on top of the foundation. DH also framed the floor of the coop.

Day 2
We discovered quite a bit of settling had occurred overnight so we dug done around the 2x10s and propped them up with a prybar whilst adding dry concrete under and around them. We also put pieces of wood underneath Hopefully that will keep too much more shifting to a minimum. We expect we may have to do this again though. I dug out the center as far as I could for the roots and put down coated chicken wire which I nailed to the frame with wood lath. We backfilled with 6 to 8 inches of dirt and will add 2 inches of sand so hope the chickens will be ok with it. DH put up the roof rafters and had hoped to get the plywood on but we powered out and had a beer instead.
Days 3 and 4
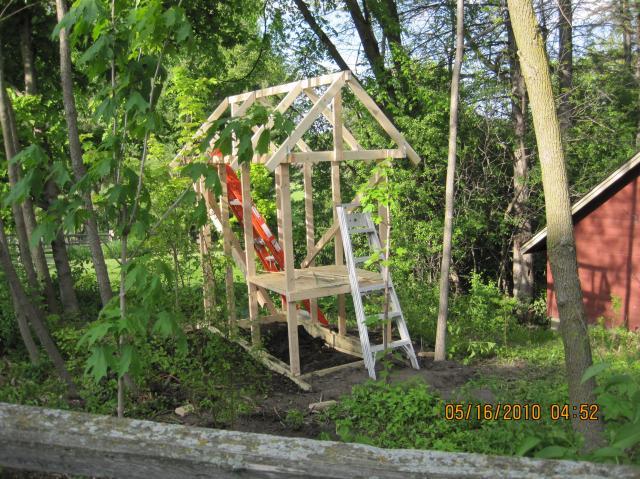
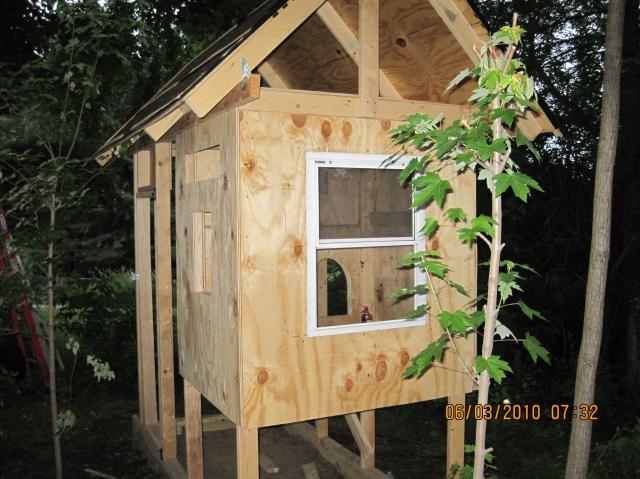
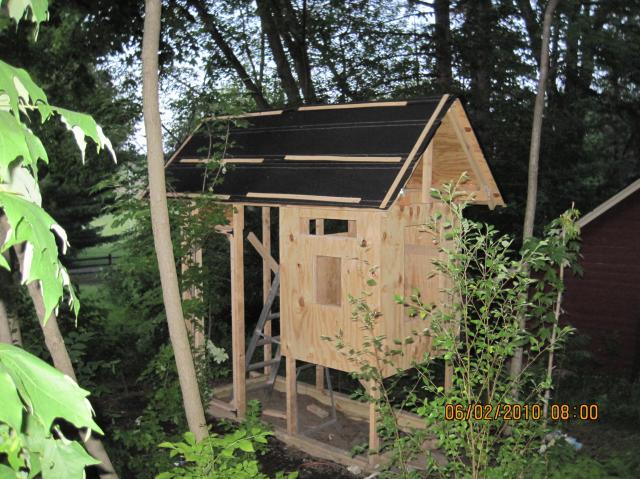
We put the plywood on for the roof and tarpapered it and DH put up the insulated ceiling. The whole door on the right hand side is done but hit the roof overhang so Dh will make a vent out of the top 6 inches or so and the rest will swing open for easy cleaning. One of the big orange heat lamps will fit in a hole in the center of the ceiling and we will run a cord to it. I didn't take a pic but may, it is not much to see...yet. However
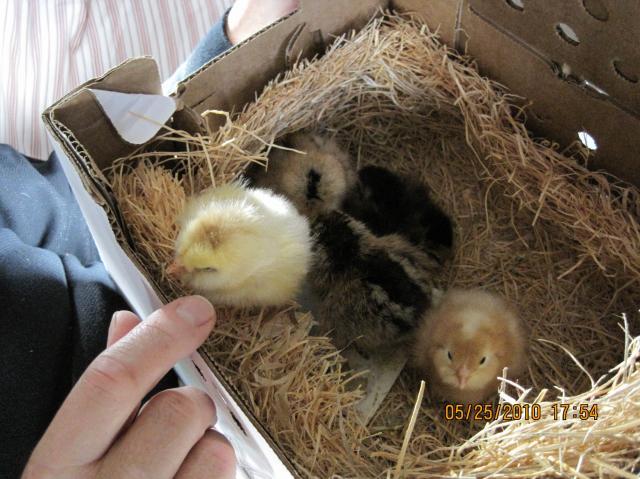
May 26th Ta da! Chick Day! 5 Easter Eggers. They called me from the United Poultry Service, aka UPS at 6 am. When I picked them up they told me that they had another chick delivery but couldn't contact the recipient. I told them to let me know if they couldn't get in touch and they said they would so perhaps we'll have visitors later on today.
Days 5 and 6
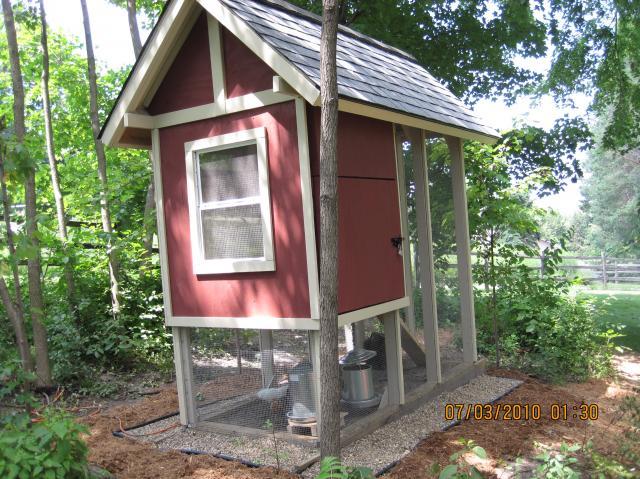
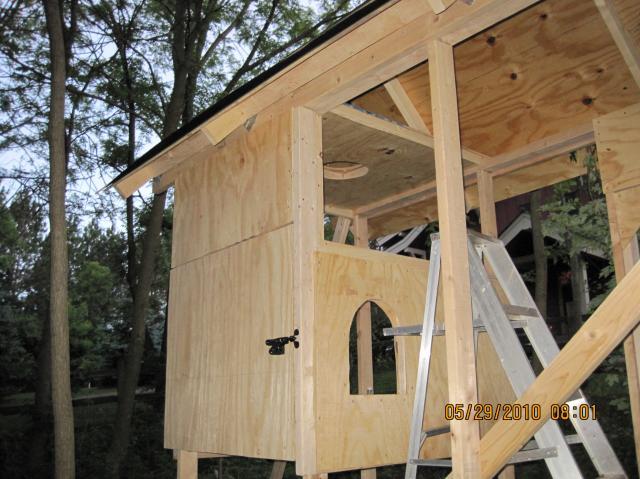
Actually DH has been doing a little work at night and on weekends so I'm just calling it days 5 and 6 but I think he did a LOT of work. After the roof and tarpaper went on I had to match the shingles to those on our shed and finally found them at Lowes but they had to be ordered so hopefully can get them on next week. DH installed the clean out door which is insulated and will have weather stripping to make it draft-free. The front of the coop facing the run is on with its stylish arched doorway. The top 18 inches or so will be wire mesh covered by an insulated panel that will be bolted on in the winter. We could let the chicks roost out in the pen all summer but our mosquitoes get pretty bad so thought with the panel ventilation opposite the open window they would get lots of air. We will put mosquito screen over the panel vent as well. Also will be more secure as we expect to attract plenty of park predators as we live next door to a park reserve. Dh also built the pen door frame so I can get started painting prior to putting on the hardware cloth. We don't know our paint color for the house and shed so am trying to match it to a Benjamin Moore color. Maybe we'll have to repaint the house to match the coop! Insulation makes the construction much more time consuming but I will sleep better on cold winter nights knowing the girls are comfortable.
Continuing saga..
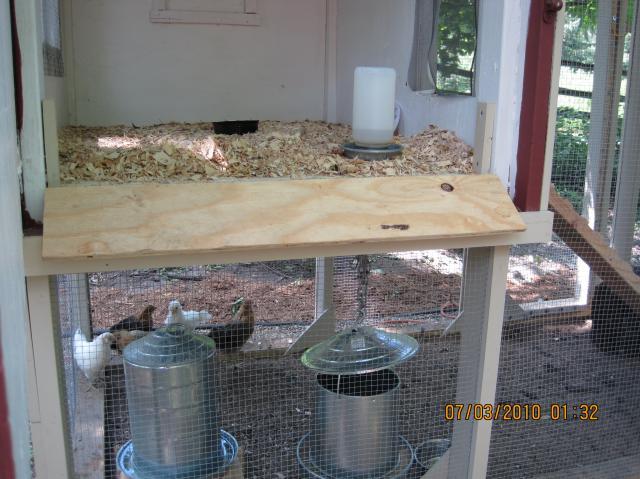
I forgot to mention the reason for the circular hole in the ceiling- we will run an extension cord for a hanging, heavy duty heat lamp on a thermal cube which will turn it on at 35 degrees and turn off at 45 degrees. We will have to cover the thermal cube in hardware cloth to keep it safe from pecking.
DH installed the removable panel on the pop door wall, also insulated AND with a smaller vent for winter, and made and installed the insulated west wall with the egg door and slot vent. We figured we needed as much adjustable ventilation as possible since we have the foam board insulation in the whole coop, except for the window. Last to go on was the south facing window wall with the $31 window on sale from Menard's, installed upside down and inside out, thanks very much backyard chickens member for the suggestion. We will install hardware cloth on the inside which will protect the chickens from raccoons.. Now what is left are the doors and ramp to the pop door, the painting , shingles and hardware cloth and trim for the outside; the roost and nest box ( which will eventually be 12-16 inches off the floor) and low voc white semi gloss paint for the inside. DH will install a couple of triangular gussets at the opposite end to firm up the run.
June 14,2010
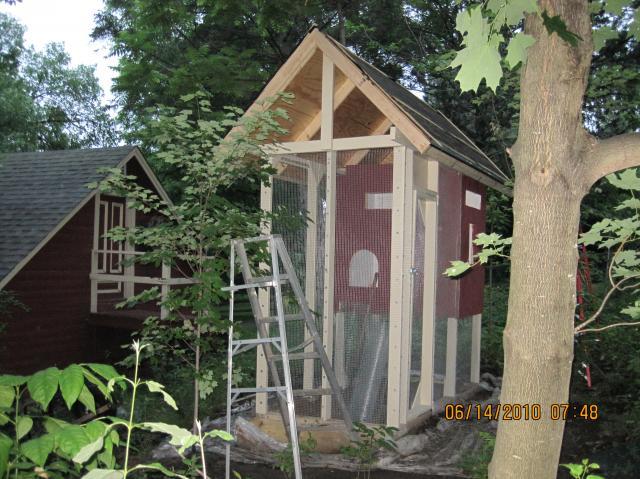
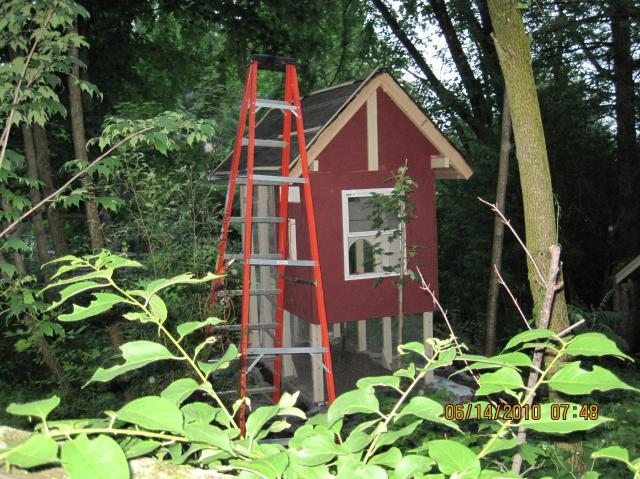
Well almost everything has had a coat of primer(inside), stain(outside walls) or paint(uprights). I wish I could have matched the trim colour better for the posts but I primed and put two coats of paint on them and then the hardware cloth except for one panel which I left open so I could dump wheelbarrows of sand onto the run floor. It has been so rainy we have fallen behind a little. DH painted trim and I have to do another coat before he cuts it with his brand new birthday miter saw. I put the hardware cloth on the outside of the posts and DH will put trim over top of the that for added security and aesthetics. Dh still has the two vent covers and the pop door sliding door to make. Hopefully will shingle this weekend and finish everything up and the chicks will only be 4 weeks old. Good thing we started before they ever arrived.
June 25, 2010
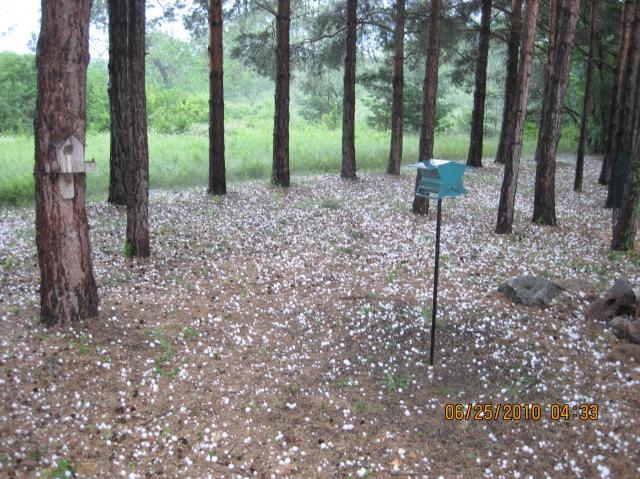
"By the Chicks" First day in the coop. We were so happy in the basement,warm and dry and quiet and every night a little cuddle and pajama dust bath. Then the Hand shoved us into a little dark box and put us in a big white box. Well we were scared to death but gradually got used to the big white room, there was food and water, bedding and sand and mealworm treats, kinda like home. Then the hailstorm hit - marble to walnut sized hail. Can only get better from here but boy do we hate the Hand now!
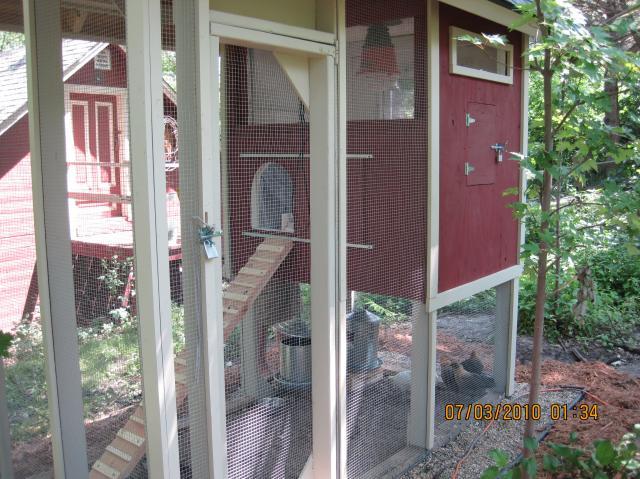
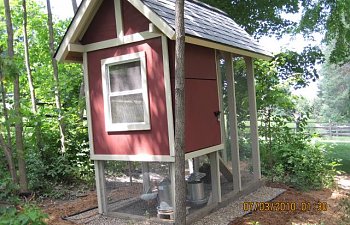
July 3 The chicks are settling in well and now all are going up and down the ramp in one fashion or another so their world is much expanded. The coop is DONE! Well DH is putting in the roost as I type but after today we will have time to golf again. I absolutely love it and we made it as predator proof as we could think to make it. Hardware cloth everywhere and trim covering the seams . The insulation is keeping the coop from overheating during the day. The chicks are enjoying their dust baths and scratching around in the sand run. I want to find a nice natural looking roost for them for the run.
The pea gravel around the perimeter is covering hardware cloth that is pegged down over landscape fabric. The gravel keeps the rainwater from splashing into the coop. The run floor is on a slope and above grade with 4-6 inches of sand. The day of the hailstorm we had 2.25 inches of rain in about an hour and the run was in perfect shape after and dried quickly.
Day 1.
We (DH) built a foundation frame of pressure treated 2x10s 8'x4'. I, being the swamper, dug the trench, with a little help and much swearing at roots. I had to run some errands so DH built the frames for the walls 92 inches high. When I inspected them, he decided to cut a foot off of them. They were placed on treated 2x4s on top of the foundation. DH also framed the floor of the coop.
Day 2
We discovered quite a bit of settling had occurred overnight so we dug done around the 2x10s and propped them up with a prybar whilst adding dry concrete under and around them. We also put pieces of wood underneath Hopefully that will keep too much more shifting to a minimum. We expect we may have to do this again though. I dug out the center as far as I could for the roots and put down coated chicken wire which I nailed to the frame with wood lath. We backfilled with 6 to 8 inches of dirt and will add 2 inches of sand so hope the chickens will be ok with it. DH put up the roof rafters and had hoped to get the plywood on but we powered out and had a beer instead.
Days 3 and 4
We put the plywood on for the roof and tarpapered it and DH put up the insulated ceiling. The whole door on the right hand side is done but hit the roof overhang so Dh will make a vent out of the top 6 inches or so and the rest will swing open for easy cleaning. One of the big orange heat lamps will fit in a hole in the center of the ceiling and we will run a cord to it. I didn't take a pic but may, it is not much to see...yet. However
May 26th Ta da! Chick Day! 5 Easter Eggers. They called me from the United Poultry Service, aka UPS at 6 am. When I picked them up they told me that they had another chick delivery but couldn't contact the recipient. I told them to let me know if they couldn't get in touch and they said they would so perhaps we'll have visitors later on today.
Days 5 and 6
Actually DH has been doing a little work at night and on weekends so I'm just calling it days 5 and 6 but I think he did a LOT of work. After the roof and tarpaper went on I had to match the shingles to those on our shed and finally found them at Lowes but they had to be ordered so hopefully can get them on next week. DH installed the clean out door which is insulated and will have weather stripping to make it draft-free. The front of the coop facing the run is on with its stylish arched doorway. The top 18 inches or so will be wire mesh covered by an insulated panel that will be bolted on in the winter. We could let the chicks roost out in the pen all summer but our mosquitoes get pretty bad so thought with the panel ventilation opposite the open window they would get lots of air. We will put mosquito screen over the panel vent as well. Also will be more secure as we expect to attract plenty of park predators as we live next door to a park reserve. Dh also built the pen door frame so I can get started painting prior to putting on the hardware cloth. We don't know our paint color for the house and shed so am trying to match it to a Benjamin Moore color. Maybe we'll have to repaint the house to match the coop! Insulation makes the construction much more time consuming but I will sleep better on cold winter nights knowing the girls are comfortable.
Continuing saga..
I forgot to mention the reason for the circular hole in the ceiling- we will run an extension cord for a hanging, heavy duty heat lamp on a thermal cube which will turn it on at 35 degrees and turn off at 45 degrees. We will have to cover the thermal cube in hardware cloth to keep it safe from pecking.
DH installed the removable panel on the pop door wall, also insulated AND with a smaller vent for winter, and made and installed the insulated west wall with the egg door and slot vent. We figured we needed as much adjustable ventilation as possible since we have the foam board insulation in the whole coop, except for the window. Last to go on was the south facing window wall with the $31 window on sale from Menard's, installed upside down and inside out, thanks very much backyard chickens member for the suggestion. We will install hardware cloth on the inside which will protect the chickens from raccoons.. Now what is left are the doors and ramp to the pop door, the painting , shingles and hardware cloth and trim for the outside; the roost and nest box ( which will eventually be 12-16 inches off the floor) and low voc white semi gloss paint for the inside. DH will install a couple of triangular gussets at the opposite end to firm up the run.
June 14,2010
Well almost everything has had a coat of primer(inside), stain(outside walls) or paint(uprights). I wish I could have matched the trim colour better for the posts but I primed and put two coats of paint on them and then the hardware cloth except for one panel which I left open so I could dump wheelbarrows of sand onto the run floor. It has been so rainy we have fallen behind a little. DH painted trim and I have to do another coat before he cuts it with his brand new birthday miter saw. I put the hardware cloth on the outside of the posts and DH will put trim over top of the that for added security and aesthetics. Dh still has the two vent covers and the pop door sliding door to make. Hopefully will shingle this weekend and finish everything up and the chicks will only be 4 weeks old. Good thing we started before they ever arrived.
June 25, 2010
"By the Chicks" First day in the coop. We were so happy in the basement,warm and dry and quiet and every night a little cuddle and pajama dust bath. Then the Hand shoved us into a little dark box and put us in a big white box. Well we were scared to death but gradually got used to the big white room, there was food and water, bedding and sand and mealworm treats, kinda like home. Then the hailstorm hit - marble to walnut sized hail. Can only get better from here but boy do we hate the Hand now!
July 3 The chicks are settling in well and now all are going up and down the ramp in one fashion or another so their world is much expanded. The coop is DONE! Well DH is putting in the roost as I type but after today we will have time to golf again. I absolutely love it and we made it as predator proof as we could think to make it. Hardware cloth everywhere and trim covering the seams . The insulation is keeping the coop from overheating during the day. The chicks are enjoying their dust baths and scratching around in the sand run. I want to find a nice natural looking roost for them for the run.
The pea gravel around the perimeter is covering hardware cloth that is pegged down over landscape fabric. The gravel keeps the rainwater from splashing into the coop. The run floor is on a slope and above grade with 4-6 inches of sand. The day of the hailstorm we had 2.25 inches of rain in about an hour and the run was in perfect shape after and dried quickly.