To start, this is our first year with chickens. The beginning of this summer we moved out of town to our countryside home, something we’ve been wanting for the last 10 years. So all summer long has been moving in and updating the house and barn in some order of priorities. Let's focus on the barn. View media item 7897368The previous owners had some free range chickens left to their own design - they almost burned the barn down when one decided to roost over a light switch/outlet combo.
So the list was:
1) fix the corral
2) reclaim the pasture
3) paint the barn
4) restore electric to the barn
5) resolve the drainage/flooding problems
I spent 2 weeks fixing the falling down corral, another 2 weeks bringing the pasture into some sort of usable condition, and 3 weeks painting the barn. The original plan was to bring in chickens in the spring,but then.... My Brother in Law received new chickens from a nearby school that they hatched out in class at the end of the school year - 11 pullets and cockerels. Except 9 ended up being cockerels! So we were offered to take a cockerel of our choice and a pullet to come along with him. Otherwise, it was off to the chopping block and freezer.
So off we went to take a look, and we found waiting for us, Robert the Rooster - aka "Bob". (His girl Ethel is behind him to the left)View media item 7897392 So with that, the race began for the "WhatAboutBob?" coop building!
So since we have a pre-existing barn, the easiest path seemed to be converting part into a coop.
Part 1 - Planning, Where to put the coop inside? The answer was convert an existing stall into the coop.View media item 7897369View media item 7897370 Part 2 of the planning - planning! 2 main issues abound - security and comfort. This space is easy on ventilation thanks to the open eaves and half wall separation of stalls. The "dirt" floor was an issue thanks to it not really being dirt - years of sheep, alpaca, and cow fecal accumulation was present. This was also accompanied by the previously mentioned drainage/flooding. Below are some of the drawings made to frame out the front entrance of the coop and the side wall.View media item 7897377
It was decided for time crunch to bring the floor up off the ground to work around the wet ground with some heavy duty pallets after scraping out as much of the offending material as possible to keep the birds dry, until a real solution could be made to the drainage/flooding issue.View media item 7897374Then OSB was laid down and screwed to the pallets.View media item 7897387
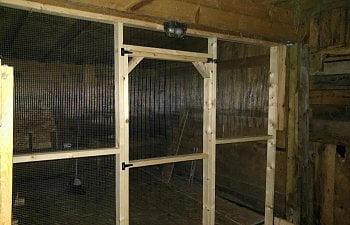
Next came the framing of the front wall, and creation of the human entrance.View media item 7897373View media item 7897375 In the pic above, you can see the spoils of scraping down to real dirt...View media item 7897376View media item 7897375
Next up was the framing of the side wall, and then installation of the 1/2" hardware cloth.View media item 7897382View media item 7897383
At this point, I made an executive decision that involved my first "chicken math" - since we were bringing in Bob and Ethel, we might as well set up a satisfactory flock and I was looking for a cold-hearty species. I saw some pics of GLW's and my internet hunt was on! After several days of searching, I came across WhatDaFlock Farm's in Wisconsin post regarding available GLW's that were 4 to 6 weeks old. After some fretting, and gnashing of teeth by the dear wife I ordered 6 pullets. So at this point the race was really on!
Security was the next priority, so all possible entry points needed shoring up. Back to my roll of hardware cloth to remedy my open eave issue!View media item 7897385 Then the bottom of the side wall needed tending.View media item 7897384Next I looked up. Whoops, I had openings from the hay loft that needed a resolution. So 2x6 boards cut to size were employed to close that access point off.View media item 7897401By now, the GLW pullets were en-route to Michigan and still issues of roosting, nesting, and integration existed. So back to more planning. First was nesting, not the highest priority, but my easiest fix. Drawings were made.View media item 7897378Pieces were cut.View media item 7897379Then put together to form the boxes.View media item 7897380The top is fixed with hinges directly onto the outer wall and is separate from the box assembly.View media item 7897381The remaining section of that wall was designated to become the roosting area and box to catch droppings. I had watched on YouTube a video of a automated coop door for the chickens, without the use of electricity. It uses the weight of the chickens on the roost with a teeter-totter type design. More on that later... So I decided to do that. (it's still in the works) But, a coop door location needed selecting and the door itself needed building. So the site was selected.View media item 7897372View media item 7897371 The the door frame assembly needed building.View media item 7897389View media item 7897390View media item 7897391And then installing.View media item 7897406View media item 7897407
Now the pullets are arriving, so water and feed are set up as well as wood shaving litter on the floor!View media item 7897402All made the trip across Lake Michigan, and settled right in eating, drinking, pooping, and peeping.
Next step, getting ready for integration. After a week of the GLW's settling in and getting comfy in their new home, it was time to bring in Bob and Ethel. So our extra large dog crate is set up for them to start the integration process.View media item 7897403That goes well and a week goes by with all the birds being fed and watered together, so it was time to go to the next level. Putting in the "Panic Room" panels.View media item 7897404At this time the frame of the roost is measured and made, and set up on top of the roosting tray.View media item 7897405
This space reserved for remaining edits.....stay tuned. There is more to this story.
So the list was:
1) fix the corral
2) reclaim the pasture
3) paint the barn
4) restore electric to the barn
5) resolve the drainage/flooding problems
I spent 2 weeks fixing the falling down corral, another 2 weeks bringing the pasture into some sort of usable condition, and 3 weeks painting the barn. The original plan was to bring in chickens in the spring,but then.... My Brother in Law received new chickens from a nearby school that they hatched out in class at the end of the school year - 11 pullets and cockerels. Except 9 ended up being cockerels! So we were offered to take a cockerel of our choice and a pullet to come along with him. Otherwise, it was off to the chopping block and freezer.
So off we went to take a look, and we found waiting for us, Robert the Rooster - aka "Bob". (His girl Ethel is behind him to the left)View media item 7897392 So with that, the race began for the "WhatAboutBob?" coop building!
So since we have a pre-existing barn, the easiest path seemed to be converting part into a coop.
Part 1 - Planning, Where to put the coop inside? The answer was convert an existing stall into the coop.View media item 7897369View media item 7897370 Part 2 of the planning - planning! 2 main issues abound - security and comfort. This space is easy on ventilation thanks to the open eaves and half wall separation of stalls. The "dirt" floor was an issue thanks to it not really being dirt - years of sheep, alpaca, and cow fecal accumulation was present. This was also accompanied by the previously mentioned drainage/flooding. Below are some of the drawings made to frame out the front entrance of the coop and the side wall.View media item 7897377
It was decided for time crunch to bring the floor up off the ground to work around the wet ground with some heavy duty pallets after scraping out as much of the offending material as possible to keep the birds dry, until a real solution could be made to the drainage/flooding issue.View media item 7897374Then OSB was laid down and screwed to the pallets.View media item 7897387
Next came the framing of the front wall, and creation of the human entrance.View media item 7897373View media item 7897375 In the pic above, you can see the spoils of scraping down to real dirt...View media item 7897376View media item 7897375
Next up was the framing of the side wall, and then installation of the 1/2" hardware cloth.View media item 7897382View media item 7897383
At this point, I made an executive decision that involved my first "chicken math" - since we were bringing in Bob and Ethel, we might as well set up a satisfactory flock and I was looking for a cold-hearty species. I saw some pics of GLW's and my internet hunt was on! After several days of searching, I came across WhatDaFlock Farm's in Wisconsin post regarding available GLW's that were 4 to 6 weeks old. After some fretting, and gnashing of teeth by the dear wife I ordered 6 pullets. So at this point the race was really on!
Security was the next priority, so all possible entry points needed shoring up. Back to my roll of hardware cloth to remedy my open eave issue!View media item 7897385 Then the bottom of the side wall needed tending.View media item 7897384Next I looked up. Whoops, I had openings from the hay loft that needed a resolution. So 2x6 boards cut to size were employed to close that access point off.View media item 7897401By now, the GLW pullets were en-route to Michigan and still issues of roosting, nesting, and integration existed. So back to more planning. First was nesting, not the highest priority, but my easiest fix. Drawings were made.View media item 7897378Pieces were cut.View media item 7897379Then put together to form the boxes.View media item 7897380The top is fixed with hinges directly onto the outer wall and is separate from the box assembly.View media item 7897381The remaining section of that wall was designated to become the roosting area and box to catch droppings. I had watched on YouTube a video of a automated coop door for the chickens, without the use of electricity. It uses the weight of the chickens on the roost with a teeter-totter type design. More on that later... So I decided to do that. (it's still in the works) But, a coop door location needed selecting and the door itself needed building. So the site was selected.View media item 7897372View media item 7897371 The the door frame assembly needed building.View media item 7897389View media item 7897390View media item 7897391And then installing.View media item 7897406View media item 7897407
Now the pullets are arriving, so water and feed are set up as well as wood shaving litter on the floor!View media item 7897402All made the trip across Lake Michigan, and settled right in eating, drinking, pooping, and peeping.
Next step, getting ready for integration. After a week of the GLW's settling in and getting comfy in their new home, it was time to bring in Bob and Ethel. So our extra large dog crate is set up for them to start the integration process.View media item 7897403That goes well and a week goes by with all the birds being fed and watered together, so it was time to go to the next level. Putting in the "Panic Room" panels.View media item 7897404At this time the frame of the roost is measured and made, and set up on top of the roosting tray.View media item 7897405
This space reserved for remaining edits.....stay tuned. There is more to this story.