Some years ago I lived in a place where the only grazing areas for my growing chicks were in rather rough terrain, so having a heavy wooden tractor with a frame at the bottom didn't work. Having to move the cage once a day, I had to think of something. I came up with an an extreme lightweight, easily movable chicken tractor. Almost no wood is used and no wheels attached, making it possible to maneuver over not-so-flat ground.
It's worth mentioning that it is not 100 % predator safe. It offers safety from above, but a fox or badger can penetrate the edges if persistent. Mine has withstood dog and cat attacks, but fell victim to a badger last year. I always have an outer fence around the area I'm moving it in.
This is not a physically appealing tractor to brighten the lawn of a suburban show home. It's a cheap, practical use-what-you-have kind of build.

THE WIRE CAGE
The cage I'm describing is 2 square meters (21.5 square feet), and I use then for >10 medium chicks, and >5 adolescents. At that point I open for them to roam during daytime, and have the net cage as a movable «sleeping quarters». Do not use for tiny chicks (up to 2 weeks), as they'll surely find a place to escape. Also do not use as a permanent residence for adults, as the space is restricted.
The tools needed are wire cutters, a knife, a saw and a drill/screw driver (for the hatch). The materials are wire or mesh, thin to medium rebar, lots and lots of zip ties, sturdy plastic and pieces of a garden hose. Four short wooden panels and a closing mechanism of choice is also needed.
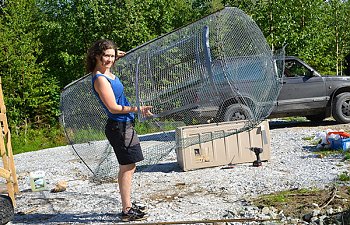
The tractor consists of two half circles of small holed reinforcing mesh tied together (sturdy self-standing chicken wire could also work), that's closed with more wire in each end, making it into a 2 x 1 meter tube. The wires are fastened together with zip ties.
Three half circles of rebars, that I bend myself, make up the framing. A rebar on top will provide both a stronger frame and handles for carrying and moving. Again, zip ties are used to fasten the structure.
I put more wire around the edges, to prevent escape. I've had many tries and errors with this, and have come to the conclusion that aprox. 1 feet wide plastic gardening mesh is the best alternative, fastened on the outside of the walls, all the way around.
For the entrance, I cut a hole in the net in one of the half circles. I'm a small woman, and made the hole just big enough for me to crawl in, that way I can reach the animals if I have to. I use a bigger net than the hole itself as the door and use zip ties as hinges. The edges around the hole must be protected with something, as that net is sharp. A garden hose cut in pieces in the appropriate length, and also cut in the whole length so that it can be threaded onto the edges, is a good and cheap alternative.
Now the hatch need to be closed. I have so far not come up with the ultimate solution to this, and the closest I get is the use of two lengths of wood on the door and on the frame, screwed together on both side of the mesh. These will now stand above each other when closed, and a closing mechanism can be added.
Covering the cage halfway with sturdy plastic gives the chickens some cover, both from rain and wind. The wind will rip the plastic if it's only fasten it with zip ties, so a rope can be used for extra support.
That is it, a net cage that an average woman can lift with one hand.
THE HOUSE
A housing unit can be added. No wood this time either, just plastic. I've found that a pillow box is brilliant for big or multiple animals, while a square bricklayer bucket with a thin metal plate hinged on top is good for tiny chicks and broody hens.
This needs a bit more tools, a drill and an electric jigsaw.
The jigsaw is used to make the hole for the entrance, and the drill is used to make holes around the entrance, to fasten the bucket or box to the net cage with zip ties.
MOVING IT
Moving the cage with the birds in require a bit of technique so that the don't escape under it. Remember that you get what you asked for, the cage is light, but it's also a bit wobbly since there's no support around the edges. Standing on the end, lift one side first, the same width as the cage, then put it down. Walk around and lift the other side to its new position, straightening out the cage at the same time. The house unit will drag behind, so make sure it doesn't lift up the net to allow escape.
You can also drag the cage in the length direction, simply lifting one short side up (only a feet up, not in elbow height...) and walking backwards with it.
Depending on how small the animals are, and how rough the terrain is, I have a couple of rocks available to lay over the plastic gardening mesh if there's an obvious hole somewhere.
MAINTENANCE
The plastic needs to be changed seasonally, since it will rip a bit no matter how good you strap it down, and the sun will make it brittle.
The mesh or wire might also need some tlc after a while, especially at the bottom. All the lifting and dragging can loosen some of the threads or bend the mesh. I'd recommend using thin chicken wire or the plastic gardening mesh for patching, since it's easier to work with than the reinforcing mesh.
I have three of these cages at the moment, all of them in use. They're from 2 – 5 years old, and have been through a lot, including getting stacked into a moving truck, snowed down through a whole winter and one was even run halfway over by a tractor (with no animals in it, mind you!). It looks a little worse for wear, but I managed to straighten it out and I'm still using it.
My cages are a work in progress, there's always something that could be done better. I hope with this that I can inspire someone to make their own, better version of this lightweight, easily movable tractor.
EDIT AUGUST 2019
I fixed up a 5 year old cage with new wire, and at the same time covered the bottom with a garden hose. I cut the hose lengthwise and thread it on the wire, then fastened it with zip ties. Hopefully this will prevent the bottom wire to rip.

It's worth mentioning that it is not 100 % predator safe. It offers safety from above, but a fox or badger can penetrate the edges if persistent. Mine has withstood dog and cat attacks, but fell victim to a badger last year. I always have an outer fence around the area I'm moving it in.
This is not a physically appealing tractor to brighten the lawn of a suburban show home. It's a cheap, practical use-what-you-have kind of build.
THE WIRE CAGE
The cage I'm describing is 2 square meters (21.5 square feet), and I use then for >10 medium chicks, and >5 adolescents. At that point I open for them to roam during daytime, and have the net cage as a movable «sleeping quarters». Do not use for tiny chicks (up to 2 weeks), as they'll surely find a place to escape. Also do not use as a permanent residence for adults, as the space is restricted.
The tools needed are wire cutters, a knife, a saw and a drill/screw driver (for the hatch). The materials are wire or mesh, thin to medium rebar, lots and lots of zip ties, sturdy plastic and pieces of a garden hose. Four short wooden panels and a closing mechanism of choice is also needed.
The tractor consists of two half circles of small holed reinforcing mesh tied together (sturdy self-standing chicken wire could also work), that's closed with more wire in each end, making it into a 2 x 1 meter tube. The wires are fastened together with zip ties.
Three half circles of rebars, that I bend myself, make up the framing. A rebar on top will provide both a stronger frame and handles for carrying and moving. Again, zip ties are used to fasten the structure.
I put more wire around the edges, to prevent escape. I've had many tries and errors with this, and have come to the conclusion that aprox. 1 feet wide plastic gardening mesh is the best alternative, fastened on the outside of the walls, all the way around.
For the entrance, I cut a hole in the net in one of the half circles. I'm a small woman, and made the hole just big enough for me to crawl in, that way I can reach the animals if I have to. I use a bigger net than the hole itself as the door and use zip ties as hinges. The edges around the hole must be protected with something, as that net is sharp. A garden hose cut in pieces in the appropriate length, and also cut in the whole length so that it can be threaded onto the edges, is a good and cheap alternative.
Now the hatch need to be closed. I have so far not come up with the ultimate solution to this, and the closest I get is the use of two lengths of wood on the door and on the frame, screwed together on both side of the mesh. These will now stand above each other when closed, and a closing mechanism can be added.
Covering the cage halfway with sturdy plastic gives the chickens some cover, both from rain and wind. The wind will rip the plastic if it's only fasten it with zip ties, so a rope can be used for extra support.
That is it, a net cage that an average woman can lift with one hand.
THE HOUSE
A housing unit can be added. No wood this time either, just plastic. I've found that a pillow box is brilliant for big or multiple animals, while a square bricklayer bucket with a thin metal plate hinged on top is good for tiny chicks and broody hens.
This needs a bit more tools, a drill and an electric jigsaw.
The jigsaw is used to make the hole for the entrance, and the drill is used to make holes around the entrance, to fasten the bucket or box to the net cage with zip ties.
MOVING IT
Moving the cage with the birds in require a bit of technique so that the don't escape under it. Remember that you get what you asked for, the cage is light, but it's also a bit wobbly since there's no support around the edges. Standing on the end, lift one side first, the same width as the cage, then put it down. Walk around and lift the other side to its new position, straightening out the cage at the same time. The house unit will drag behind, so make sure it doesn't lift up the net to allow escape.
You can also drag the cage in the length direction, simply lifting one short side up (only a feet up, not in elbow height...) and walking backwards with it.
Depending on how small the animals are, and how rough the terrain is, I have a couple of rocks available to lay over the plastic gardening mesh if there's an obvious hole somewhere.
MAINTENANCE
The plastic needs to be changed seasonally, since it will rip a bit no matter how good you strap it down, and the sun will make it brittle.
The mesh or wire might also need some tlc after a while, especially at the bottom. All the lifting and dragging can loosen some of the threads or bend the mesh. I'd recommend using thin chicken wire or the plastic gardening mesh for patching, since it's easier to work with than the reinforcing mesh.
I have three of these cages at the moment, all of them in use. They're from 2 – 5 years old, and have been through a lot, including getting stacked into a moving truck, snowed down through a whole winter and one was even run halfway over by a tractor (with no animals in it, mind you!). It looks a little worse for wear, but I managed to straighten it out and I'm still using it.
My cages are a work in progress, there's always something that could be done better. I hope with this that I can inspire someone to make their own, better version of this lightweight, easily movable tractor.
EDIT AUGUST 2019
I fixed up a 5 year old cage with new wire, and at the same time covered the bottom with a garden hose. I cut the hose lengthwise and thread it on the wire, then fastened it with zip ties. Hopefully this will prevent the bottom wire to rip.