WestKnollAmy
The Crazy Chicken Lady

I love building these tractors! This is my latest one. Now you all know I am not a builder but each one I build gets me closer to understanding how to make them better. Learning has been fun and sometimes painful.
The chickens enjoy my efforts and make this all worth while.
This time I painted the boards before I started......well, most of them anyhow!

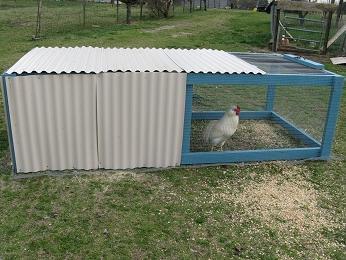
I made this one 3x8 and 30" tall. I put a door on each end on the top.

I decided a tall roost and a short roost would keep them happy. The spring rains have kept them off the ground except when bugs float by or come to the top of the ground. Yum!

It isn't as tall as I know birds like to be but they can't have both in my tractors...fresh ground contents or high roosts.
I try to attach the roosts securely for their weights.

I'm sure there are better ways to attach the sides and corners but this is the only way I could make it suitable for all the moving we do with the tractors.

And I am terrible at doors but will show this photo of a decent one I made and attached. This one actually has PVC on it now and will show more on it later. I am trying to keep the rain water from running in when I open them to check the nests and so far this one has done well.

I covered the door on the end as well as the sides. Ruler? Who uses a stinking ruler? LOL I stood the PVC up and measured with a magic marker.

Then simply cut with large scissors. Very easy.

Most of the time I have used roofing screws with a rubber washer to attach the PVC but since I was out of them I just used the roofing nails.

I left some over hang so the water wouldn't run inside too much.

I hid the door handle under the PVC since it is easy to roll up and get to the handle. No real reason, it just turned out that way for a more secure fit of the PVC.

This is how it looked when covered with the PVC. This is the back view.

And if you open that hidden handle and look in, this is what you see.

Doesn't take me long to move birds in!
From the front looking into the back.....

And this is how I attached the front door that is uncovered. DH said I should put my boards on the top of the door instead of under the door to catch it. I don't know which is best but this tractor has it both ways so I can get more experience with it.

This is the finished coop. So far they are enjoying it tremendously. Except for the torrential rains that have kept the ground a soggy mess they seem happy.
I am still trying to decide how to attach a nest box inside instead of using a crate. The crate can be lifted out for nest box checks and cleaning but is a pain when we move the tractor every few days.
I hope I didn't forget any photos. I am terrible at story telling so I thought the photos could give you more of an idea of what I do. It really didn't take me but about 20 hours to make this thing but I had many interruptions so it took me about 2 weeks spread out like that.
The chickens enjoy my efforts and make this all worth while.
This time I painted the boards before I started......well, most of them anyhow!
I made this one 3x8 and 30" tall. I put a door on each end on the top.
I decided a tall roost and a short roost would keep them happy. The spring rains have kept them off the ground except when bugs float by or come to the top of the ground. Yum!
It isn't as tall as I know birds like to be but they can't have both in my tractors...fresh ground contents or high roosts.
I try to attach the roosts securely for their weights.
I'm sure there are better ways to attach the sides and corners but this is the only way I could make it suitable for all the moving we do with the tractors.
And I am terrible at doors but will show this photo of a decent one I made and attached. This one actually has PVC on it now and will show more on it later. I am trying to keep the rain water from running in when I open them to check the nests and so far this one has done well.
I covered the door on the end as well as the sides. Ruler? Who uses a stinking ruler? LOL I stood the PVC up and measured with a magic marker.
Then simply cut with large scissors. Very easy.
Most of the time I have used roofing screws with a rubber washer to attach the PVC but since I was out of them I just used the roofing nails.
I left some over hang so the water wouldn't run inside too much.
I hid the door handle under the PVC since it is easy to roll up and get to the handle. No real reason, it just turned out that way for a more secure fit of the PVC.
This is how it looked when covered with the PVC. This is the back view.
And if you open that hidden handle and look in, this is what you see.
Doesn't take me long to move birds in!
From the front looking into the back.....
And this is how I attached the front door that is uncovered. DH said I should put my boards on the top of the door instead of under the door to catch it. I don't know which is best but this tractor has it both ways so I can get more experience with it.
This is the finished coop. So far they are enjoying it tremendously. Except for the torrential rains that have kept the ground a soggy mess they seem happy.
I am still trying to decide how to attach a nest box inside instead of using a crate. The crate can be lifted out for nest box checks and cleaning but is a pain when we move the tractor every few days.
I hope I didn't forget any photos. I am terrible at story telling so I thought the photos could give you more of an idea of what I do. It really didn't take me but about 20 hours to make this thing but I had many interruptions so it took me about 2 weeks spread out like that.
Last edited by a moderator:


