attempting open Southern Coop need help

starryhen

Songster
13 Years
Apr 24, 2010
109
84
246
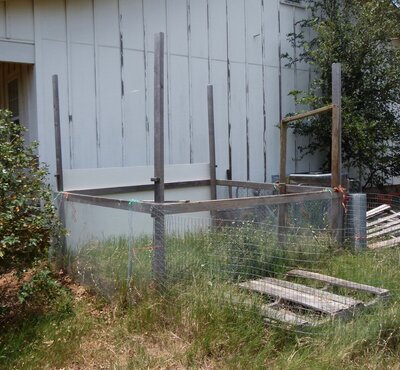
We started an 8 x 8 chicken coop but we are too busy to finish it and we are knuckleheads as far as building goes. So we have hired our handy man to build it but are having trouble.... What we want: something very open with mostly hardware cloth walls and floor. ... What we have built so far: a frame (no posts in the ground) lower perimeter and 4 verticals with 2 x 4 horizontals about 4 feet up. A piece of plywood is attached horizontally at the back.. Also a "floor" of hardware cloth ... PROBLEM: We know nothing about bracing and don't have power tools ... then being busy. Every time we think we have it solidly plum, it starts to tilt. PROBLEM: Our handy man wants to take apart what we have done and sink posts in the ground :hmm ... The big PROBLEM: the "floor" which is now 1/2 inch hardware cloth to keep varmints out. I had planned on "wrapping" the fencing up around the bottom of the frame and extending fencing up the sides for a very open, cool coop. I can not figure out how that hardware cloth floor is going to be securely attached to a post in the ground construction and the handy man guy is not answering that question. Can you folks help with that question? Should we go ahead and tear apart what we have done or ask handy man guy to just continue with what we have started and brace the heck out of it? In the attached photo there is a "door frame" leaning against the front right corner in case ya'll find that confusing in the photo.
chicken coop frame.jpeg
 
I'm not sure I understand your question. Do you have a drawing (even a basic one) of the coop you are trying to design? That would really help us understand what your plans are for this coop.
 
We started an 8 x 8 chicken coop but we are too busy to finish it and we are knuckleheads as far as building goes. So we have hired our handy man to build it but are having trouble.... What we want: something very open with mostly hardware cloth walls and floor. ... What we have built so far: a frame (no posts in the ground) lower perimeter and 4 verticals with 2 x 4 horizontals about 4 feet up. A piece of plywood is attached horizontally at the back.. Also a "floor" of hardware cloth ... PROBLEM: We know nothing about bracing and don't have power tools ... then being busy. Every time we think we have it solidly plum, it starts to tilt. PROBLEM: Our handy man wants to take apart what we have done and sink posts in the ground :hmm ... The big PROBLEM: the "floor" which is now 1/2 inch hardware cloth to keep varmints out. I had planned on "wrapping" the fencing up around the bottom of the frame and extending fencing up the sides for a very open, cool coop. I can not figure out how that hardware cloth floor is going to be securely attached to a post in the ground construction and the handy man guy is not answering that question. Can you folks help with that question? Should we go ahead and tear apart what we have done or ask handy man guy to just continue with what we have started and brace the heck out of it? In the attached photo there is a "door frame" leaning against the front right corner in case ya'll find that confusing in the photo.View attachment 2235305View attachment 2235305
Tear it apart!! It will never last long built that way.
If you want it on the ground, that's fine. You can build a "floating" coop.
First completely level the ground.
I'd then lay out a course of cinder block making it level. I would in-fill them with concrete to stabilize them.
Then use pressure treated (PT) 4x4s and lap the corners to form a base to lay over your cinder block. Attach corner braces to each corner to hold it square.
In-fill the concrete block base with soil until it's just level with the top of the blocks to form the floor of your coop which is now the perfect medium for using the Deep Litter Method.
Build each wall on a flat surface then erect it on the 4x4 and screw the wall's bottom plate to the 4x4. Brace the walls plumb with scrap lumber then join them together with tie plates on the top. Frame it out to be able to attach each wall to the next.
Every wall that will not be covered by sheathing and protected from the elements should be constructed using PT lumber.
After the coop is built you can either add more fill to cover the outside face of the cinder blocks to further stabilize the base and slope the fill/soil away from the coop. Then attach a predator apron around the entire thing and use fender washers/screws to screw the top edges of the HC into the 4x4s. Use a 4' wide roll of 1/2" hardware cloth or what you already have, rip it to 2' wide and attach low to the 4x4's to give you a nearly 2' wide skirt. Anything tenacious enough to start digging at the edge of the apron is going to hit the cinder block and would have to dig down under that. Unlikely.
Your handy man should be able to understand all this.
Quite an excellent reply. It never occurred to me to raise the floor/base but I now see that it is crucial to keep things dry. In the past our chickens have been free range with only little sheds we have acquired to keep them in the rare instances of inclement weather.
 
I'm not sure I understand your question. Do you have a drawing (even a basic one) of the coop you are trying to design? That would really help us understand what your plans are for this coop.
Ah.... no blueprint, only ideas about where to put what and how large. We have built free standing run ins for horses and hay but never something so complicated (don't laugh). Basically nesting boxes outside one side and an enclosed roosting hut on the other side for the rare bad weather. Our hm is asking for something on paper so that is my next step since our old designs for this little project are ... somewhere and he has trouble remembering what I say and ... I tend to change my mind ..... The reply below gives me some ideas about how to proceed ... and I'll send these to the hm. This is great because it forces me to focus on concrete plans and solutions. The hens are out and about most of the day with fenced in areas they can hang out in during the day under the rose bushes when the dogs are inside.
 

Attachments

  • Bon D 7:19 crp.jpeg
    Bon D 7:19 crp.jpeg
    890.3 KB · Views: 0

New posts New threads Active threads

Back
Top Bottom