I will preface this by saying that my husband and I have just about no skill or talent when it comes to carpentry. The biggest thing we've built together is a shelf from Ikea. Okay, maybe that's a little dramatic, but you get my point. So what did we decide to do? Try to build a chicken coop from a set of plans purchased on eBay!
I already have a coop. I didn't build my coop, obviously. A local chicken coop company built and delivered my current coop and run, so this is all new territory for us. A friend of ours has two girls, 9 and 10, that absolutely adore our chickens. They come over every week (sometimes multiple times a week) to visit and help take care of my chickens. The oldest daughter is REALLY into it, she's a real mama hen and even volunteers to clean the poop tray and scoop poop out of the coop. Their mom would love to have chickens, but she's disabled and cannot walk, so being able to build a coop is out of the question. So we offered to build the girls a chicken coop so they can raise 4 chickens. We warned them that it wouldn't be a perfect coop, but we'd try our best!
Of course, in true chicken fashion, we currently have eggs in the incubators that are due in 10 days, so we're trying to finish the coop before the chicks need to be in it. So feel free to laugh, cry, or shake your heads at us as we attempt to create something that looks halfway decent.
Also, if you're wondering who in the world would decide to build a coop in the middle of winter, we live in Florida. There is no winter. The weather is amazing... about 3 months out of the year. That time is now, haha!
Day One: Thursday, January 17th
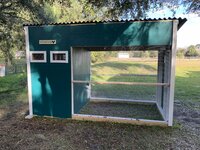
Just for reference, this is what the coop is SUPPOSED to look like. It's 6x12, and since it's a walk in coop/run, it should be easy enough for the girls to manage with very little help. We're going to make some modifications (gasp!) on the inside to make things easier for them. An solar powered chicken pop door, PVC feeders, poop tray and an automatic waterer are on the list of must haves.

The plan we bought has a cut list, so it's actually a lot easier than I thought it would be to construct the foundation and walls. We basically nailed all of the 2x4s together and raised the walls. Did you know 2x4 walls are really heavy? I didn't. But I'm still here writing this, so I lived. Once all the walls were up, I was throughly surprised that the whole thing didn't fall down. It wasn't wobbly at all! I pictured some kind of scene where a bird lands on it and it all falls to the ground, but there it stood!


Day Two: Friday, January 18th
After studying the plans for a while, we realized that there were no instructions on how to build the coop floor. Apparently it doesn't have one. And we had already constructed the walls, so we basically had to wing it. We nailed 2x4s on the inside of the foundation and a support beam to go across the middle. Miraculously, it seems pretty sturdy! I also bought some vinyl peel and stick tiles to lay on top of the plywood floor and the poop tray. With a little liquid nails, they stuck!
I also stapled the 1/2 inch hardware cloth onto the run, which was oddly enough the easiest task of the day.
And then there's the rafters. This is what most of the day was spent *trying* to figure out. Trying, key word, once again. The plan called for the 2x4s to be nailed in standing up on the long end, with what was called a "birds mouth" cut. Yep. That's where we got off track. We spent HOURS looking up youtube videos and trying to print templates. Nothing helped us figure it out. After cutting many, many 2x4s, we finally said screw it, just nail them in on their sides. It's still standing, so that's a good sign, right?


Day Three: Saturday, January 19th
Today we put up plywood walls! It took a lot more time than I thought it would (which is basically the theme of this build, since my husband was convinced that we could get the entire thing done in the course of a weekend - hah!) Did I mention that we don't have a table saw? I think a table saw would have helped. Side note - I think we broke my husband's jig saw.
The plan calls for a shingled roof, but that seemed difficult, so we figured a metal roof would be a lot easier. Once we got to Lowe's, my husband was convinced that this recycled asphalt roofing material would be easier to work with than metal, so that's what we bought. I also bought these little foam things that block anything from crawling through the gaps. I tried to make them stick to the top of the plywood using wood glue (don't ask) and that didn't work out so well. Also, we had to cut down the rafters once we figured out they were too long in the back. Did I mention we have no idea what we're doing? We're learning as we go... I think.


Day Four: Sunday, January 20th
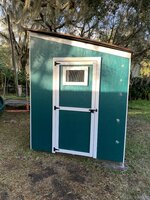
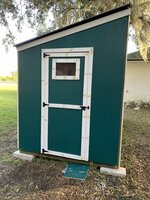
Today was cold and windy. Well, cold for Florida, anyway. Highs in the 50s, and I don't love the cold, but we tried to press on for a few hours. I was able to get the coop painted, and my husband started cutting out the holes for the coop windows and pop door. He used a circular saw, it seemed dangerous. Spoiler alert: he still has all of his fingers. Spoiler alert #2: we don't have health insurance.
We also put the roof on - kind of. I think we might have to cut that end that sags, but it's on, and it's a roof! It's exciting!
For those of you that noticed that we omitted the nesting box on the outside, is anyone really surprised? Once we read over how to construct it, and how it needed to be fairly precise and square, we decided that was a big NOPE. We opted for a double nesting box from Amazon, which was a royal pain in the butt to put together. We also didn't do the fancy side cuts on the run. You know why. I'm just pleased that we built a structure that hasn't fallen down, so we're winning in my book.


Day Five: Tuesday, January 22nd
We took a break on Monday - cold and rainy weather isn't the best time to paint trim. So on Tuesday, we were back at it! I stapled the hardware cloth to all of the windows, and we built a door! Is it completely level? Not really! Is all the trim even? Not even close! Is it still fully functional? Yes! It seems like we made a lot more progress in the first few days than we are now. Maybe because it's a lot of trim work that takes longer? Who knows, but the building is still standing!


Day Six: Today! Wednesday, January 23rd
So, that brings us to today. The coop collapsed. Just kidding, it didn't. But based on the previous 5 days, you totally believed that it did, didn't you?
We managed to get some more trim pieces painted and nailed on, and we got the coop door on! I think all of the hard stuff is done. We still have to figure out the floppy roof end... but we're making progress! The pullet shut pop door is in, we just have to hook up the solar panel. My husband is going to be out of town for the next few days, so we won't be back until next week to keep working on it.
If you read all of this and you were questioning whether or not you can build a chicken coop, the answer is yes, yes you can. If we can kind of do it, literally anyone can.


I already have a coop. I didn't build my coop, obviously. A local chicken coop company built and delivered my current coop and run, so this is all new territory for us. A friend of ours has two girls, 9 and 10, that absolutely adore our chickens. They come over every week (sometimes multiple times a week) to visit and help take care of my chickens. The oldest daughter is REALLY into it, she's a real mama hen and even volunteers to clean the poop tray and scoop poop out of the coop. Their mom would love to have chickens, but she's disabled and cannot walk, so being able to build a coop is out of the question. So we offered to build the girls a chicken coop so they can raise 4 chickens. We warned them that it wouldn't be a perfect coop, but we'd try our best!
Of course, in true chicken fashion, we currently have eggs in the incubators that are due in 10 days, so we're trying to finish the coop before the chicks need to be in it. So feel free to laugh, cry, or shake your heads at us as we attempt to create something that looks halfway decent.
Also, if you're wondering who in the world would decide to build a coop in the middle of winter, we live in Florida. There is no winter. The weather is amazing... about 3 months out of the year. That time is now, haha!
Day One: Thursday, January 17th
Just for reference, this is what the coop is SUPPOSED to look like. It's 6x12, and since it's a walk in coop/run, it should be easy enough for the girls to manage with very little help. We're going to make some modifications (gasp!) on the inside to make things easier for them. An solar powered chicken pop door, PVC feeders, poop tray and an automatic waterer are on the list of must haves.
The plan we bought has a cut list, so it's actually a lot easier than I thought it would be to construct the foundation and walls. We basically nailed all of the 2x4s together and raised the walls. Did you know 2x4 walls are really heavy? I didn't. But I'm still here writing this, so I lived. Once all the walls were up, I was throughly surprised that the whole thing didn't fall down. It wasn't wobbly at all! I pictured some kind of scene where a bird lands on it and it all falls to the ground, but there it stood!
Day Two: Friday, January 18th
After studying the plans for a while, we realized that there were no instructions on how to build the coop floor. Apparently it doesn't have one. And we had already constructed the walls, so we basically had to wing it. We nailed 2x4s on the inside of the foundation and a support beam to go across the middle. Miraculously, it seems pretty sturdy! I also bought some vinyl peel and stick tiles to lay on top of the plywood floor and the poop tray. With a little liquid nails, they stuck!
I also stapled the 1/2 inch hardware cloth onto the run, which was oddly enough the easiest task of the day.
And then there's the rafters. This is what most of the day was spent *trying* to figure out. Trying, key word, once again. The plan called for the 2x4s to be nailed in standing up on the long end, with what was called a "birds mouth" cut. Yep. That's where we got off track. We spent HOURS looking up youtube videos and trying to print templates. Nothing helped us figure it out. After cutting many, many 2x4s, we finally said screw it, just nail them in on their sides. It's still standing, so that's a good sign, right?
Day Three: Saturday, January 19th
Today we put up plywood walls! It took a lot more time than I thought it would (which is basically the theme of this build, since my husband was convinced that we could get the entire thing done in the course of a weekend - hah!) Did I mention that we don't have a table saw? I think a table saw would have helped. Side note - I think we broke my husband's jig saw.
The plan calls for a shingled roof, but that seemed difficult, so we figured a metal roof would be a lot easier. Once we got to Lowe's, my husband was convinced that this recycled asphalt roofing material would be easier to work with than metal, so that's what we bought. I also bought these little foam things that block anything from crawling through the gaps. I tried to make them stick to the top of the plywood using wood glue (don't ask) and that didn't work out so well. Also, we had to cut down the rafters once we figured out they were too long in the back. Did I mention we have no idea what we're doing? We're learning as we go... I think.
Day Four: Sunday, January 20th
Today was cold and windy. Well, cold for Florida, anyway. Highs in the 50s, and I don't love the cold, but we tried to press on for a few hours. I was able to get the coop painted, and my husband started cutting out the holes for the coop windows and pop door. He used a circular saw, it seemed dangerous. Spoiler alert: he still has all of his fingers. Spoiler alert #2: we don't have health insurance.
We also put the roof on - kind of. I think we might have to cut that end that sags, but it's on, and it's a roof! It's exciting!
For those of you that noticed that we omitted the nesting box on the outside, is anyone really surprised? Once we read over how to construct it, and how it needed to be fairly precise and square, we decided that was a big NOPE. We opted for a double nesting box from Amazon, which was a royal pain in the butt to put together. We also didn't do the fancy side cuts on the run. You know why. I'm just pleased that we built a structure that hasn't fallen down, so we're winning in my book.
Day Five: Tuesday, January 22nd
We took a break on Monday - cold and rainy weather isn't the best time to paint trim. So on Tuesday, we were back at it! I stapled the hardware cloth to all of the windows, and we built a door! Is it completely level? Not really! Is all the trim even? Not even close! Is it still fully functional? Yes! It seems like we made a lot more progress in the first few days than we are now. Maybe because it's a lot of trim work that takes longer? Who knows, but the building is still standing!
Day Six: Today! Wednesday, January 23rd
So, that brings us to today. The coop collapsed. Just kidding, it didn't. But based on the previous 5 days, you totally believed that it did, didn't you?
We managed to get some more trim pieces painted and nailed on, and we got the coop door on! I think all of the hard stuff is done. We still have to figure out the floppy roof end... but we're making progress! The pullet shut pop door is in, we just have to hook up the solar panel. My husband is going to be out of town for the next few days, so we won't be back until next week to keep working on it.
If you read all of this and you were questioning whether or not you can build a chicken coop, the answer is yes, yes you can. If we can kind of do it, literally anyone can.


 Good job!
 phew! I must be fixin to go broody!