Chicken Coop Beginnings

porchpooch4

In the Brooder
Mar 28, 2020
9
22
18
Arizona
Hello everyone, I bought my package of wood for my 6' x 12' chicken coop. It set me back by $500 but I am excited to finally start building my own design. I started off with four 4"x4" pressure treated lumber at 12 feet for the front and back and 6 feet for the sides. Thankfully my son leveled it for me.
20200912_142105.jpg
20200912_142041.jpg

Next was to build the walls, I made room in my garage and started building the walls. The front wall was last because it was the largest at 7 feet and 3 inches tall and 12 feet long. Since I didn't have any help today I used my trusty board to steady the front wall while I clamped the first side wall to it.
20200926_085726_HDR.jpg

Once I was able to get that side square and level I added the other two sides, clamping them together as I went. Good thing I have a lot of clamps.
20200926_092238_HDR.jpg

Here is another view. I started screwing all the walls together leveling as I went.
20200926_092302.jpg
20200926_092302.jpg

I will post more pictures with everything screwed in place and with some of the cross beams going in. I need to wait till the late afternoon before I venture back out in the heat. Thankfully it is starting to cool down and will only be 104 degrees F today. I like to start early before it gets too hot. I am not 20 anymore and the heat can be a bear. I decided to build my coop more like a house than some of the other designs I have been looking at. So far I like what I see. Let me know what you think. Thank you
 
Got air conditioning?

kidding. I think. Wow, that’s HOT. Guessing you’ll make provision for lots of ventilation. Looks like you’re off to a good start after a lot of planning, and making quick progress.

What size flock do you have in mind?
 
Got air conditioning?

kidding. I think. Wow, that’s HOT. Guessing you’ll make provision for lots of ventilation. Looks like you’re off to a good start after a lot of planning, and making quick progress.

What size flock do you have in mind?
We have eight hens that are six months old. All eight are laying everyday. They are golden sex links
 
Well last night I was able to get the wall up that forms the other half of the coop area. I also put the header in for the door. Yes it is very tall because I am very tall, and don't want to hit my head every time I go into the run area.
20200929_140920_HDR.jpg

Today I placed an extra 2"x4" in the corners of the coop area to make it more rigid and to support the cleanout door and the door to the run area. You have to look pretty close to see the changes. I also started putting in the cross pieces that will hold the floor of the coop.
20200929_153952.jpg

A couple more cross pieces and then I will cut and place the bottom 1/2" thick plywood into position. I also plan on having four large windows for ventilation. While we can get very hot during the day our night time temperatures can swing into the high 60's even though it was 105 degrees during the day. This usually occurs during the spring and fall. Summer is hot all the time with day time temperatures over 110 degrees and night time temperatures in the high eighties. We use a mister to keep the chickens cool along with shade. Shade alone can be a ten degree difference in temps.
Below is a picture of the coop area with the cross beams in place. One more cross piece to cut and place into position.
20200929_153959_HDR.jpg
 
Latest update, I know it has been a while but I have been busy. As I wait for the sun to rise this morning in order to finish adding the rafters and plywood roof, I thought I would give a status update. In the following photo I finished the frame for the bottom of the coop and installed the plywood bottom.
20201008_134448.jpg


Second I added 2 x 4 edges to hold the sand for the bottom.
20201010_160354_HDR.jpg


I then installed the first clean out door. I will have some tweaking to do to get this right.
20201012_180325_HDR.jpg


I started adding some hardware cloth to the run portion of the chicken coop.
20201012_180343_HDR.jpg


I was being carefully watched by my lead hen. ;-)
20201012_180401.jpg


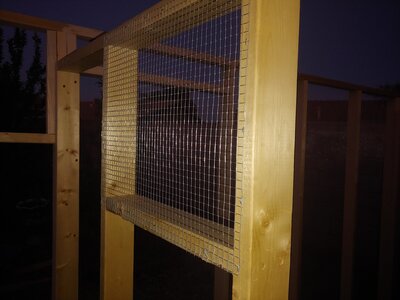
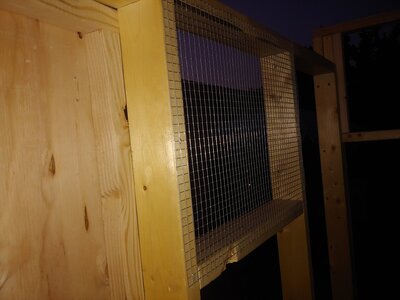
All four of the windows for the coop portion had to have hardware cloth installed.
20201012_181655.jpg 20201012_181705.jpg
Now I am starting to get excited because I installed the West wall and the egg box.
20201023_170009_HDR.jpg


Next to install is the East wall with the entrance door for the coop.
20201023_174538_HDR.jpg


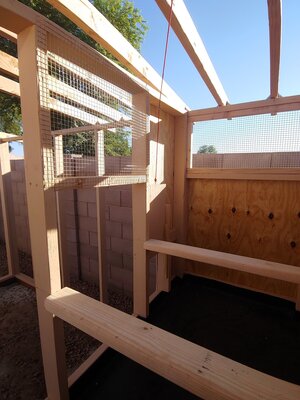
2 x 4 roost bars with beveled edges on the top and sanded down to prevent splinters. We also installed a rubber mat to line the bottom and side of the sand box.
20201026_164036_HDR.jpg

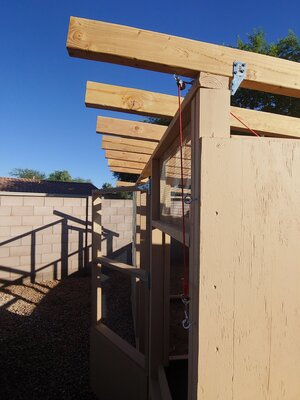
The egg box lid was next along with paint for the newly installed parts of the coop. I also was able to put up the first seven rafters for the roof.
20201028_154811.jpg

Hardware to open and close the chicken door was next. I used two pulleys and two eye bolts for positioning open and closed. The tracks for the door had been framed in earlier.
20201028_154834.jpg
20201028_154845.jpg
Now I have finished the East wall and the second main clean out door. And I am fixing the main door lower hinge.
20201030_101231.jpg
20201030_101245.jpg

Added my first two bags of sand to get an idea how many bags I am going to need to fill the box.
20201030_101305.jpg


And that is where I am at currently. I highly recommend making a task list when you start getting close to the end to ensure you don't forget anything. I am an engineer after all, so you have to have the program plan in place. I am a little anal retentive with the due dates, sorry :cool:
Task List.JPG

Now it is time to go to work. Have a great day!
 

New posts New threads Active threads

Back
Top Bottom